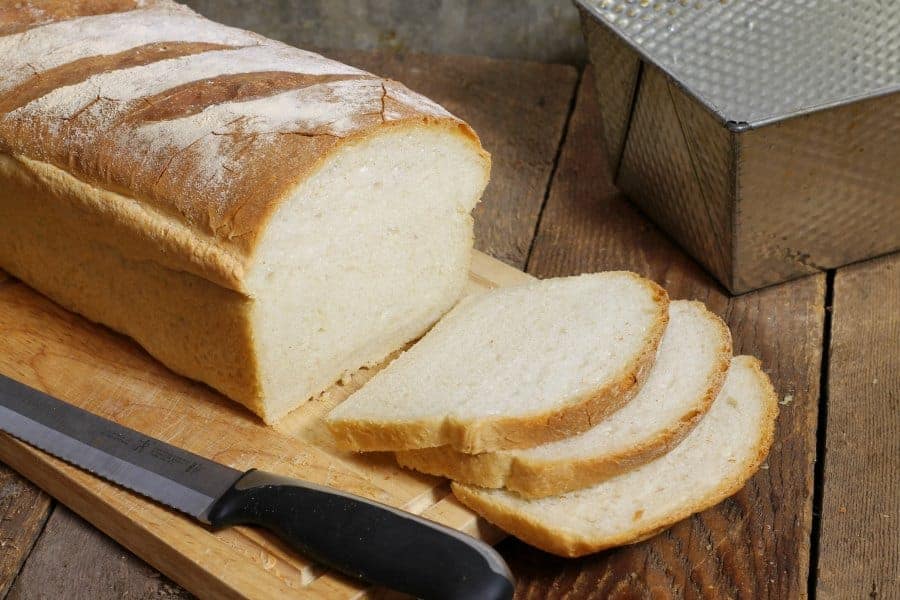
Knowing how to make bread at home is a very simple skill that should really be taught in schools across the country. A basic food item that can save you hundreds of dollars a year, (not to mention commercial bread is filled with preservatives) every home cook should know how to bake their own homemade sandwich bread.
This homemade sandwich bread recipe I will share with you today will provide a base from which you can launch your own bread-making skills. A basic, wonderfully soft white bread, ideal for learning the basic skills of bread baking, before going on to make things such as homemade biscuits or sourdough bread.
This post contains affiliate links for which we may be compensated if a purchase is made through the links provided at no extra cost to you. For more information, please read our affiliate disclosure.
Table of Contents
The Tasty Story of Sandwich Bread!
Did you know sandwiches were named after a real person? Back in the 1700s, a guy named John Montagu, the Earl of Sandwich, didn’t want to stop playing cards to eat. So, he asked for some meat between two slices of bread—boom, the sandwich was born! As more people started loving this easy, no-mess meal, bakers made special soft, sliceable bread just for sandwiches. Now, from peanut butter & jelly to grilled cheese, sandwich bread is a must-have for tasty lunches everywhere! 🥪😋
Is It Cheaper To Make Your Own Bread?
In the long run ...yes. It will be cheaper to bake your own bread at home as opposed to buying it.
Here in Atlantic Canada, commercially available bread will run you anywhere from $2.99 to $5.99 per loaf (or .18 to .37 cents a slice) depending on the brand and quality of the bread. Artisanal bread can cost even more.
A homemade loaf of bread using the recipe below will roughly come in around .15 cents a slice (or $2.50 /loaf). While the upfront cost of buying ingredients may be higher.......
- $8.99 for 5 kg (11 lb) of flour
- $4.58 for 100 g active dry yeast
- $3.99 for 454 g (1 lb) of butter
- $1.50 for 2 kg (4 lbs) Sugar
.......you are able to control the quality of ingredients much better. The cheapest loaves of commercial bread are filled with preservatives and ingredients you can't even pronounce, (ever wonder why store-bought bread lasts so long?)
By investing the time to bake a quality loaf of homemade bread you can create a nutritious product that rivals the "higher-end" breads at a fraction of the cost.
Reduce your costs of baking bread at home even further by purchasing ingredients such as flour and sugar in bulk, and only when on sale!
Chef Markus
How Long Does Homemade Bread Last?
On average, a loaf of homemade bread when stored properly will last anywhere from 3 to 5 days at room temperature. If you live in warm humid conditions this may be cut short to 2 to 3 days due to the higher chance of mold developing.
Due to homemade bread not containing any preservatives, mold spores(which are present in the air around us) are able to grow and multiply much faster then they would on commercial bread.
What's The Best Way To Store Homemade Bread?
To extend the shelf life of the bread as long as possible I would recommend letting the freshly baked loaf of bread cool completely (overnight on the counter), before refrigerating in a plastic bag, or clean linen bag specifically for that purpose.
By refrigerating the bread, you can easily get it to last you a week. If you don't eat it all first.
Easy Homemade Bread
If this is your first time baking bread at home, this recipe will teach you the basic steps of making homemade bread the old-fashioned way, without a bread machine.
You can make this recipe in an electric mixer (I used my Kitchen Aid Stand Mixer ) if you have one, otherwise, you can mix the dough by hand in a bowl and then knead the dough on a countertop.

Before We Begin
All bread will contain some type of flour, (though it is most often a wheat flour), water and a leavening agent, such as yeast or sourdough starter.
Ingredients such as butter, eggs, sugar, nuts, grains, and fruit, can all be added to a basic bread recipe and will change the texture, flavor, and style of the bread.
The basic steps we will follow below are:
- Activating the yeast & measuring out ingredients
- Mixing & kneading the dough
- Proofing the dough
- Punching down and shaping the loaf
- Proofing the loaf
- Baking The Bread
These six steps are the basic actions most homemade bread recipes will need to follow in order to successfully bake bread.
Types of Yeast
Most modern bread recipes use some form of bakers yeast. These are most often found in dried 'active dry yeast' or 'instant yeast' versions. Fresh yeast is sometimes used as well, though not as common as it used to be.
- Active Dry Yeast needs to be 'bloomed' or activated before being used in a recipe for best results.
- Instant Yeast can be added right to the dry ingredients of a recipe, and does not need special activation.
- Fresh Yeast should also be activated before use, much like active dry yeast.
Sourdough breads generally do not use 'bakers yeast' , and instead rely on the 'wild' yeasts found in the sourdough starter. Did you know you can make your own sourdough starter at home? - Chef Markus Mueller
Ingredients you will need:
- 2 cups of warm water
- 2 teaspoon of active dry yeast - I use fleischmann's traditional yeast
- 2 tablespoon of sugar (use your favourite kind, even molasses or honey will work!)
- 1 teaspoon salt
- 4-5 cups of all-purpose or bread flour
- ½ cup soft butter or oil
- extra flour for dusting the counter and kneading
1. Activating the yeast & measuring out ingredients
Begin by taking your active dry yeast and mixing it with your sugar in a deep bowl or another tall container. Add the warm water to the yeast and stir it once to make sure all the yeast is mixed with water and not clumped together.
Make sure that the water is WARM. A littler warmer then lukewarm is perfect but not hot, generally between 105F and 110F. If you use hot water you will kill the yeast (120F+), which is, believe it or not, a living organisim. Use water that is too cold, and the yeast will not activate. It needs the warmth and moisture to wake up, and the sugar to feed on and begin fermentation.
Chef Markus
You will see the yeast start to froth and bubble as it feeds on the sugar. The warmer the water the faster this process will go. Make sure you can easily hold your hand in the water without burning yourself. This is called blooming or activating your yeast.
2. Mixing & kneading the dough
While the yeast is happily frothing away, measure out your flour and salt.
Tip: Don't add your salt to the water/ sugar mix at the start, as it can inhibit the growth of the yeast.
Once the yeast has doubled in size and" bloomed", you can add the whole liquid yeast mixture to your bowl or mixer with the flour and salt. Add in the butter or other fat, and mix it together until it forms a soft dough that you can either knead by hand on a counter or keep kneading(mixing) in a stand mixer.
If using a stand mixer as I did with my Kitchen Aid, you will want the dough to pull away from the sides without leaving behind any flour or gloopy mess on the sides of the bowl. The dough should be soft and elastic without overly sticking to your hands.
If mixing the dough by hand in a bowl, simply get it to a point where it holds together in a ball, and then place it on a floured surface to continue kneading the dough.
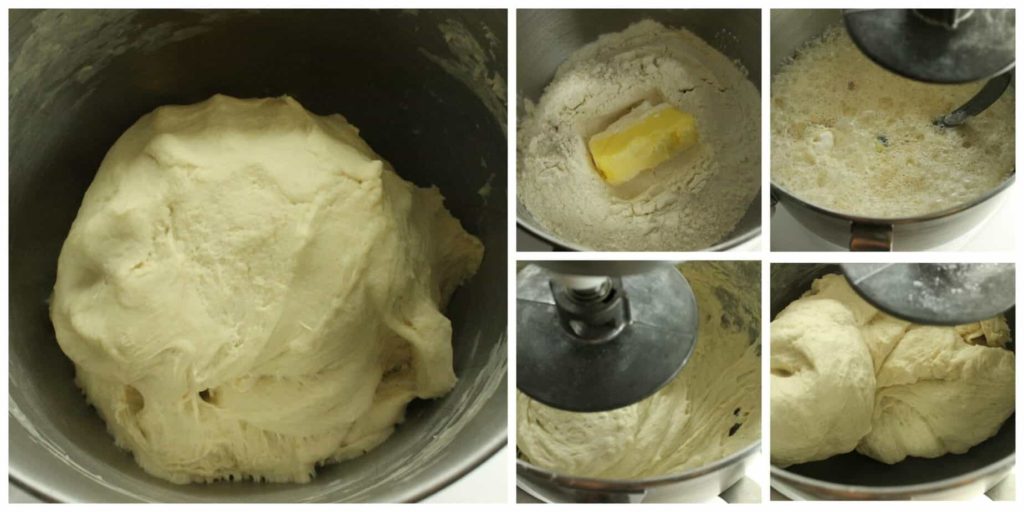
Knead the bread dough for about 5 to 10 minutes until it forms a smooth stretchy ball. While kneading the dough you are developing the gluten strands that form when flour and water are mixed.
The more you knead the dough the stretchier it will become resulting in a fluffier and softer end product.
Pizza dough for example, is kneaded for a longer time(12 -15 minutes)which results in a chewier and denser crust, while kneading biscuits for a short time (1-2 minutes) allows the dough to stay flaky and not become chewy.
3. Proofing the dough
To avoid the bread becoming chewy and dense we need to proof the dough. Proofing is the process in which you allow the yeast to go back to work consuming the sugar and releasing gas into the dough causing it to rise.
Since the gluten strands have been developed in the mixing/kneading stage, they will stretch, resulting in a nice fluffy ball of dough.
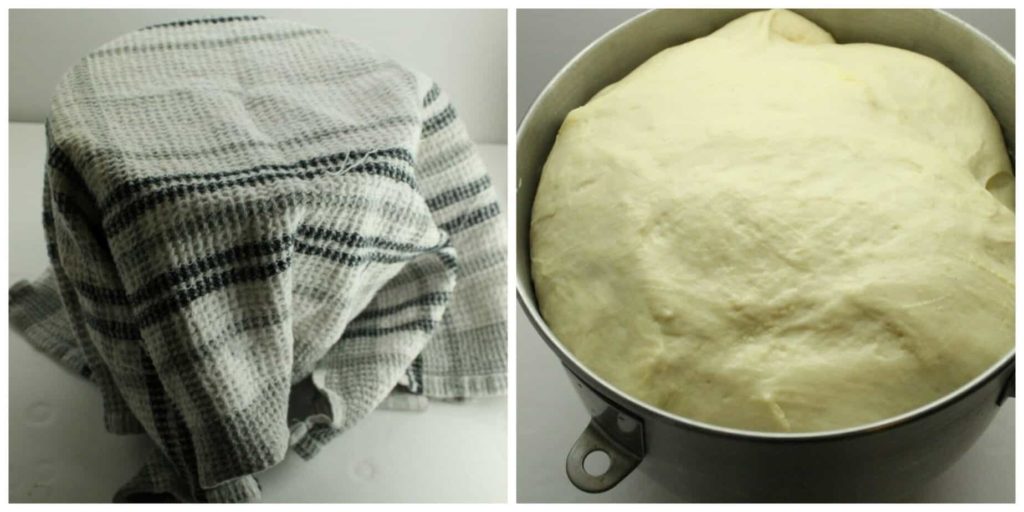
Proof your dough by placing it in a greased bowl. This helps to prevent the dough from sticking to the sides. Cover it with a clean linen dish towel and then place it in a warm area, such as on top of your stove (which we will now pre-heat to 375F). Proofing takes about 20 to 30 minutes depending on the temperature of the dough and in the surrounding room. The dough needs to be at least double in size.
4. Punching down and shaping the loaf
Once fully proofed, take the dough out of the bowl and place it back on a floured countertop/ surface. Punch out all the air from the dough, flattening it completely with your hands.
You may be asking well what was the point of that if it was just all nice and fluffy? Don't you worry! This first proofing stage is to help relax the gluten in the flour and lets the yeast use up some of its pent up energy. Proofing the dough twice (once after the dough is mixed, and then again after it is shaped), will give you a much softer and more developed texture than simply proofing it once.
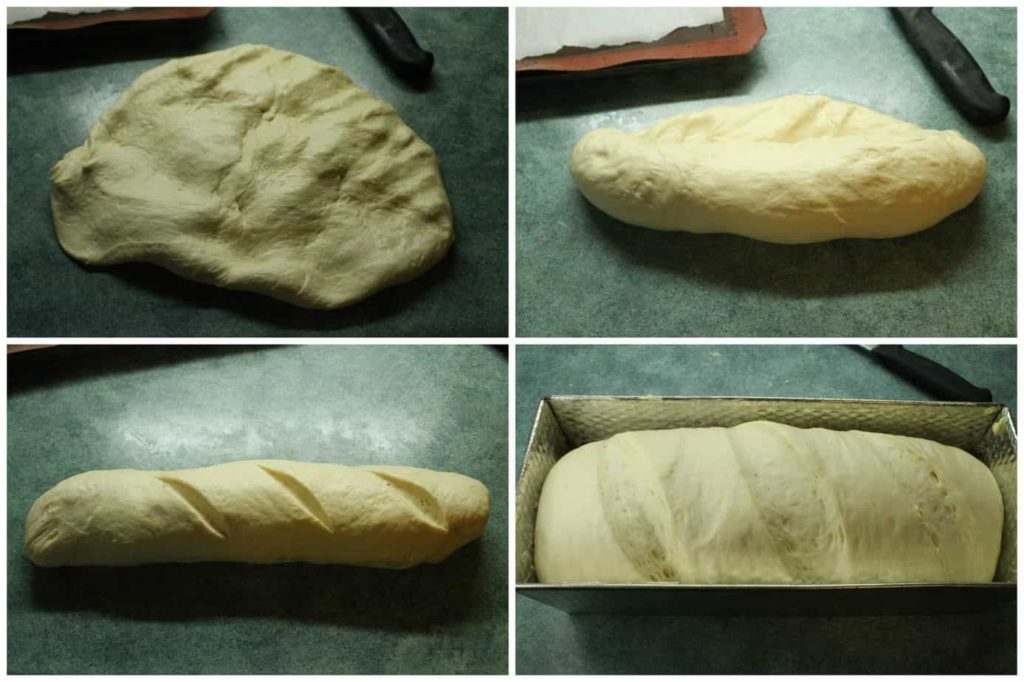
Next, we shape the dough. Starting at one edge of the flattened bread dough, start rolling it up into a tube. Make sure to roll it nice and tight to avoid any unnecessary air bubbles. Once it is rolled up, pinch the trailing edge to the rest of the dough to prevent it from unrolling.
Place the shaped bread in a pre-greased bread loaf pan or on a sheet pan if you want to bake a more rustic loaf. You should now have a simple shaped sandwich bread loaf!.
5. Proofing the loaf
Again cover the loaf with your clean dishcloth and let it proof again until double in size. This can take up to an hour if the kitchen is fairly cool. Once proofed a second time the bread can go right into your pre-heated oven.
6. Baking Your Homemade Bread
This is the easy part!
Bake the homemade bread at 375F for 15 minutes and then drop the temperature down to 350F. Baking it at a higher temperature ensures the bread rises just a little extra in the oven and produces a nicer crust due to the initial heat.
After dropping the temperature the inside of the loaf continues to bake without browning the outside to severely. Bake the loaf of bread for another 30 to 40 minutes or until the bread sounds hollow when you "knock" on the top.
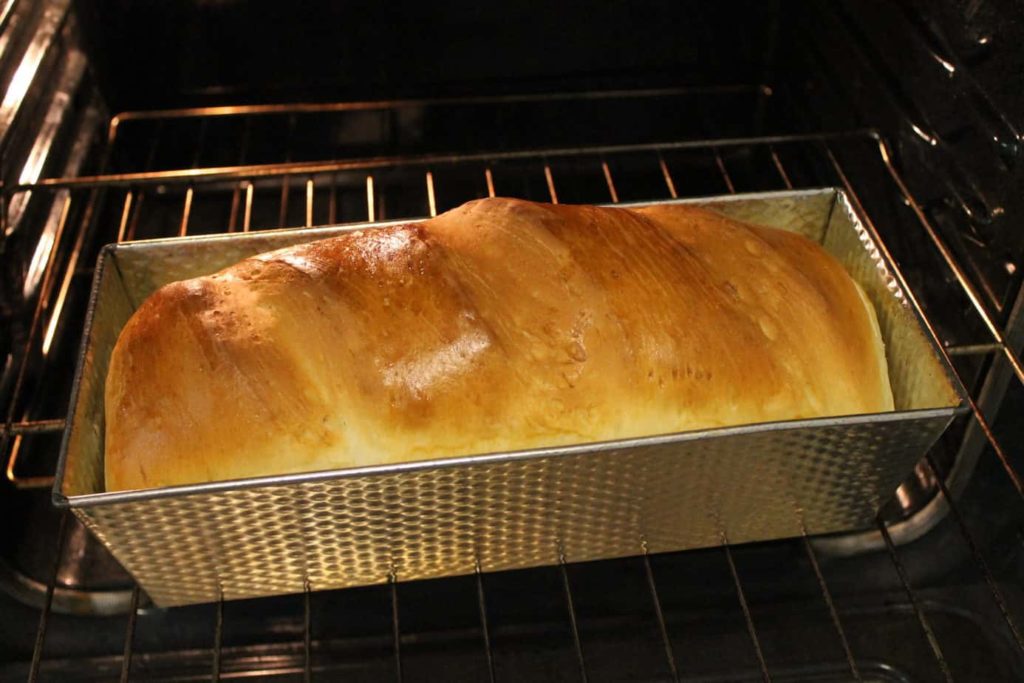
You can also check the temperature with a food thermometer. The temperature should read 220F.
Cooling The Bread
After your homemade bread comes out of the oven let it cool on a wire rack until you can touch it with your bare hands without burning yourself. If baking the bread in a loaf pan, let the bread cool in the pan until you can turn it out with your hands, and then cool on a wire rack.
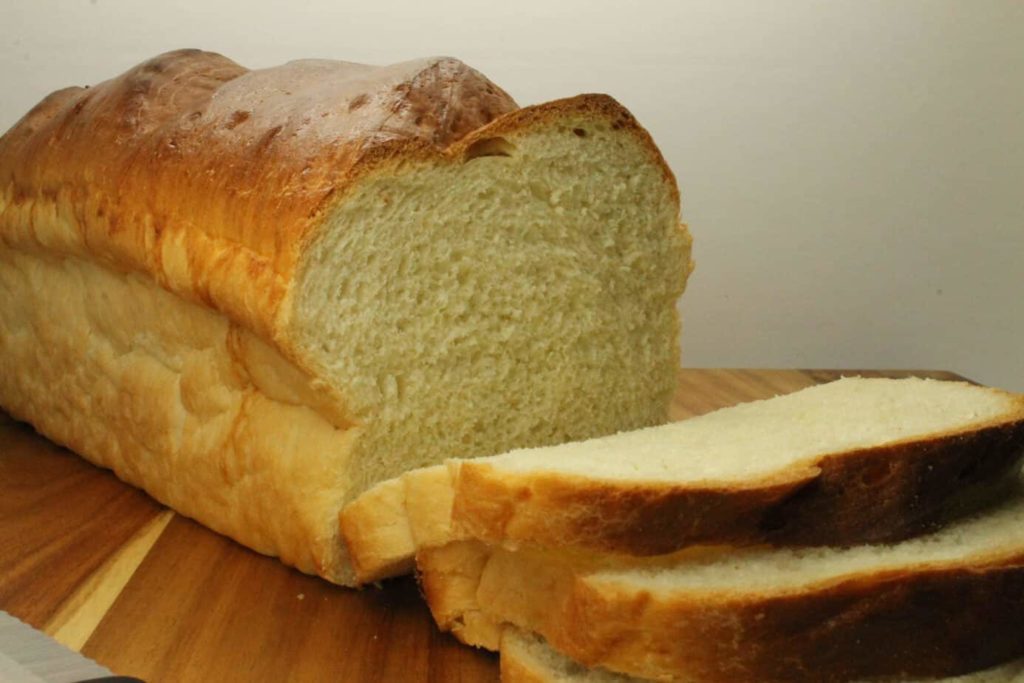
Slice the bread and bag it up for storage. This homemade bread will keep on the counter for 2 to 3 days or 5 to 7 days in the fridge. Once completely cooled you can also wrap the whole loaf in plastic wrap and then Ziploc bag it and freeze it! When you need to thaw it out simply place it in the fridge in its wrapping until completely thawed.
Made the recipe? Comment & Rate it below, then take a picture and tag me on Facebook. For more from scratch recipes, follow me on Facebook & Pinterest.
Recipe
Homemade Sandwich Bread
Ingredients
- 2 cups warm water
- 2 teaspoon active dry yeast
- 2 tablespoon sugar
- 1 teaspoon salt
- ¼ cup unsalted butter or oil
- 4 - 5 cups all purpose flour
Instructions
Bloom the Yeast
- Measure out the yeast, warm water and sugar.
- In a tall measuring cup or other container, combine the sugar yeast and water, stirring once to ensure all the yeast is mixed, and doesn't clump together. Set this mixture aside and let the yeast activate and double in size.
Mixing & Kneading the Dough
- Measure out the flour,salt, and butter. Ensure the butter is at room temperature.
With an Electric Mixer
- Add the flour, salt and butter to the mixing bowl. Once the yeast and water mixture has risen and doubled in volume, add the liquid to the dry ingredients. Mix on low until the dough forms a solid mass, and pulls away from the sides of the bowl. Keep kneading for about 5 minutes.
Mixing by Hand
- In a bowl mix the flour and salt. Pour the flour mix onto the counter and make a "well" in the middle of the flour. Melt the butter and pour it into the yeast and water mixture. Pour the liquid mix into the well slowly, making sure it does not breach the flour walls.
- Using a wooden spoon or your finger slowly mix flower from the edges into the liquid until the liquid starts to become thicker. Keep mixing in the flour until you do not have to worry about the liquid "escaping" and running across the counter.
- Keep mixing the flower into the liquid mix until you form a dough. Knead the dough by hand for 10-12 minutes until it is smooth and slightly stretchy.
- Pre-heat your oven to 375F
Proof The Bread Dough
- Once the dough is mixed, set it in a greased bowl and cover with a clean linen dish towel. Set the bowl in a warm area(such as ontop of a pre-heating stove) and let the dough proof for 30 to 40 minutes or until the dough has doubled in size.
Shaping The Bread Loaf
- Remove the proofed dough from the bowl and place it on a lightly floured surface. Punch down the dough until all the air has been pressed out and the dough is flat on the counter.
- Form the dough by rolling the flattened dough into a roll. Pinch the trailing edge together to prevent it from unrolling. Place the loaf in a bread loaf pan or on a sheet pan.
- Again cover the dough and let it proof in a warm spot until it has doubled in size again.
Baking Your Homemade Sandwich Bread
- Once doubled in size, you may brush the top of the dough with an eggwash if you like.
- Place the dough in the pre-heated oven. Bake at 375F for 15 minutes, then lower the temperature to 350F and bake for another 30 to 40 minutes(for a loaf of bread - if making rolls bake for 15-20 minutes). The bread should be a nice golden brown, and sound hollow when you knock on it. You can also check the internal temperature of the bread with a thermometer. It should read 220F
Nutrition
Nutrition info is auto-generated. This information is an estimate; if you are on a special diet, please use your own calculations.
Some of the links in this post lead to affiliate sites where Earth, Food, and Fire may earn a small commission should you make a purchase. This allows us to stay online and keep creating awesome recipes! For more info check the Affiliate Disclaimer.




Ebony
It didn't come out for me. I used oil instead of butter and I mixed it by hand. I placed it on the stove to proof and it looked like it cooked some. The dough was very sticky and would not rise 😞
Bianca
Hi Ebony, the oil instead of butter replacement should be OK. It sounds like the dough got too hot on your stove if it started cooking. Try to keep the temperature at around 75F, no more than 85F (24-30 C) - i.e. place it further from the stove or somewhere else in the house (sunny window still?). Any much hotter, and it will kill the yeast.
Mabel
Excellent recipe..turned out beautiful..but I should've had a long loaf pan for this...I used my glass loaf pan.
This was enormous for this pan..
But sure is tasty..
Melody Dorton
I’ve made this bread quite a few times now. I saw in a comment you add sun dried tomatoes and other fruits and herbs sometimes. Was wandering at what time in the recipe do these get added? I would love to try this. And thank you so much for your recipe. My family loves it so much.
Chef Markus Mueller
Hi Melody, glad that your family likes the bread, you must be doing a good job baking it as well 😉
You can add extra fillings to the dough along with the flour, salt and butter, before mixing it all together (step 2 in the article).
Kait
First time making a loaf! this was very easy to follow along. I was unable to get the internal temperature to 220 but after an additional 5 minutes I pulled the loaf out and it sounded hollow with 210 internal. It was very hard and I read from a reddit article to put a damp kitchen towel over it while it cools to soften it.
Did I maybe cook it too long and that is the reason its so hard?
I am using a pampered chef stone loaf pan which could also be a reason it cooked fast.
Chef Markus Mueller
Hi Kait, both the extra five minutes and/or baking in the stone pan possibly might make the bread a bit harder - like a pizza stone that gives the dough a crust. I haven't tried the damp kitchen towel trick, but generally the bread will draw some moisture from the air and the crust will soften a bit in a few hours.
Carla Wilson
I have made crusty bread in Dutch Oven, but this was my first time making loaf bread and it was amazing. I'll definitely be making this often! Question, since you say bread lasts 5 to 7 days in refrigerator if I freeze a loaf, how long can it stay frozen?
Chef Markus Mueller
You could freeze it however long you like as long as it stays frozen. Rule of thumb is usually no longer then three months.
Marissa
Hi! Can I use a 9x5 loaf pan or would I need to split the dough & bake two separate loaves for that size? Thank you!!
Chef Markus Mueller
Hi Marissa, you can use any loaf pan size you like, simply size the dough accordingly when shaping it before the final proofing step. If the pan is smaller, you may be able to get two loaves yes.
Sharon C
If using oil instead of butter, is there an oil you recommend? I'd love to try this recipe with olive oil but would like to hear your thoughts. Thanks! ????
Chef Markus Mueller
Hi Sharon, any cooking oil should work, you looking to add fat to the dough to make it softer. Butter is great for the flavor, but olive oil, canola oil, avocado oil, or even sunflower oil will all work. The stronger the flavor of the oil the more you may taste it in the end product.
Lynda Ramirez
This is the best bread for sandwiches! Kids loved it as it doesn’t crumb very much when cutting, has a really nice crust, and toasts up crispy compared to store bought loaves. Thank you for the recipe ❤️❤️❤️
Chef Markus Mueller
Hey Lynda, thank you for the review on our sandwhich bread! I'm so happy to hear the kids love the bread as well!
Rick
It is the perfect sandwich bread and it certainly rises well, Thank You
Chef Markus Mueller
You are very welcome Rick! Glad you like our recipe!
Marla B
Would love roll details as I don't have the larger bread pan. How big in size? Do you shape them at all? How far do they need to be placed from each other on baking sheet? I assume you bake at 350 based on where you mention them in the directions. I ended up making the well bc I don't have a standing mixer and that was a huge mistake for me lol I think next time I'll just mix it in a large bowl then transfer to the counter. Everything seems fine, even though I was chasing streams of butter/water/yeast/sugar haha Rolls are currently in the oven so I guess I'll find out for myself, but others might find it helpful. Thanks SO much! 🙂
Chef Markus Mueller
Hi Marla, If you don't have a loaf pan, I would suggest splitting the dough in half, and shaping two smaller french style loaves. (Shape it the same as if you were to do it for the loaf pan, just tuck the ends under for rounded ends, the seam from the 'roll' should be face down on the pan). Once shaped, the loaves should proof again prior to baking, and will almost double in size. When baking, the loaves will grow again very slightly due to an effect called 'oven-rise'(the heat from the oven sends the yeast into overdrive, causing the loaf to grow until the extreme heat kills the yeast in the dough.) As such make sure to keep the loaves far enough apart to account for the proofing and oven rise. I do bake mine at 350 until golden brown, (if making two smaller loaves, cut baking time in half). You can check the baked bread with a thermometer (should read 212F), or by knocking on the bottom with your knuckles. The loaf should sound hollow.
I hope the loaves turned out for you!
Kathy T.
Maria B. I made the well in a mixing bowl, used a big spoon to turn it until it had a good shape and everything was incorporated, then took it out and kneaded it.
Anita
Baked this bread yesterday and it was amazing. Loved the taste and texture. Very easy to slice and the interior did not loose its shape. I’m baking it again today!
Chef Markus Mueller
Thanks Anita! Glad you loved the bread! We'd love to see pictures..you can share them on Instagram or Facebook , @earthfoodandfire!
Lisa Banville
This is my go to bread recipe now! To make this whole wheat though, what would need to be adjusted or would it just be a simple flour change?
Thanks!
Chef Markus Mueller
Awesome! That's great to hear! To make the bread with whole wheat flour I would suggest using half whole wheat, and half all-purpose flour. You will likely also need to add an extra egg and a quarter cup of water. Whole wheat flour simply absorbs so much more moisture than the all-purpose flour, the bread would be very dry otherwise. Happy baking!
Heather in Ottawa
Can you tell me what size pan you used to bake the bread? It looks larger than a standard pan, so I might have to hit Amazon for the right one. Thanks for the great instructions and steps.
Chef Markus Mueller
Hi Heather, you are correct it is larger than a normal loaf pan. It is called a Pullman Loaf Pan. You can purchase them on Amazon (affiliate link: https://amzn.to/3um3Oz3). My pan doesn't have a lid so it comes out with a rounded top. Hope that helps!
Christa
Anxious to try your recipe. I see the print version says 1/4 cup of butter. Your picture shows a half cup and also your comment section. So I am going with the half cup. I wanted to also confirm the pan size, I plan on using my large Pullman loaf pan which it looks like that is what you used. You pictures really made me want to try this, so good job!
Chef Markus Mueller
Hi Christa, you can use either amount, I had updated the recipe a while ago to make the bread a little softer and not as dry. I guess I forgot to update the butter in the recipe card. I will do so now. Have a great day!
Shania
Hi!
I tried this recipe with instant yeast, I really enjoyed the outcome!
Is it at all possible to freeze the dough and bake it fresh when I need it?
Thanks!
Chef Markus Mueller
Hi Shania, it is in theory possible to freeze the dough. I would do so after initially mixing and kneading it. Then when you go to bake with it you only need to that and proof the dough. That said, if frozen to long, the yeast may die and not rise well enough once proofed.
Happy baking,
Markus
Renee
Hi! I was wondering if you could make rolls out of this bread dough ? Thanks
Chef Markus Mueller
Hi Renee, Yes you can make rolls out off this recipe:)
Teresa Doyle
Hi Marcus. I have been making bread & rolls with relatively good success for years but always like trying a new one. You can bet I’ll be trying this, it looks delicious. It’s always nice to find a recipe from a fellow Maritimer (I’m in N.S.) and I will also be sharing it with my daughter. (One of her best friends was born and raised in P.E.I. and is a wonderful cook. She has probably heard of Earth Food and Fire. I’ll share this with her as well!)
Can’t wait to try it, stay well!
Chef Markus Mueller
Hi Teresa! Thanks for saying hi! If you take a picture of the rolls, tag us on social media! @earthfoodandfire! Hope you are well.
Chef Markus
Alicia
Very easy to follow. Thanks!
Chef Markus Mueller
You're welcome Alicia. Thanks for the review! If you took pictures, tag us on social media! @earthfoodandfire
Marybeth
Excellent recipe, very easy, very tasty
Chef Markus Mueller
Thanks Marybeth!
April Kelly
This is the first time I am using this recipe I replaced 1/4 of the all purpose flour with wheat flour and used milk solids from clarifying butter. Amazing my family loved it
Jacqueline Frost Frost
What is the butter for?
Chef Markus Mueller
Hi Jacqueline, the butter adds flavor and richness to the recipe. You could also use oil in it's place.
Rhonda Sue
This is such amazing bread! I bake a lot but yeast has always terrified me. One bad experience ruined it. I decided to finally jump that hurdle using this recipe. The easy to follow instructions made it so easy! The bread turned out soft and delicious with the perfect crust! My family loves it! We'll never buy store bought again! Thank you!
Chef Markus Mueller
Glad you decided to give the recipe a shot Rhonda Sue! Enjoy!
Stacey
It's in the oven right now! This recipe made two loaves for me! I can't wait to try it! You broke it down so easy for me and I'm a new bread baker. Thank you!l so much!
Chef Markus Mueller
Yay!
Amelia
Loved this recipe. It was super simple and makes for excellent soft delicious bread! Mine came out absolutely perfect and I'm still new to bread making. This will be a staple in my recipe book from now on!
Chef Markus Mueller
Hi Amelia! Thanks for the feedback! Glad you loved the recipe. If you have a picture feel free to tag us on social media @earthfoodandfire
Heather
Really easy recipe to follow and I’ve made this 3-4 times now! I added chia seeds once and that turned out really well. I am adding raisins to this batch so here’s hoping it turns out well too ?? What are some different ways you modify the recipe when you make it?
Chef Markus Mueller
Hi Heather!, Glad you liked the recipe! I've added dried fruit to the recipe (like you are doing with raisins..I would suggest soaking them in warm water first to plump the fruit up.) I've also added fresh herbs, sundried tomato, and played with mixtures of various flours to make multigrain, or wholewheat loaves. I'd love to see a picture of your next loaf! Tag us on social media @earthfoodandfire!
Claudia J. Glennan
How do you substitute sourdough starter for the active dried yeast (in this or other recipes)?
Chef Markus Mueller
Hi Claudia,
In order to use sourdough starter instead of yeast, I would suggest using 1 cup of active sourdough starter in the recipe above. Mix everything together and if the dough seems a little tacky add a bit more flour. Knead the dough as you would if using yeast, and then let the dough sit to rise and proof (double in size). Punch the dough down, shape it and then let it rise again before baking.
I'd love to hear back how that works out for you!
Cheers, Chef Markus
Brittany Maas
I'm just putting the loaf in the oven. I halved the recipe since it's my first time making bread in while so I figured I'd make one.
I love your walk though of the recipe and how you broke it down easily for others to learn from and do. Thank you!
Chef Markus Mueller
You're very welcome Brittany! Glad you liked the recipe!
Anna Wall
How long did you bake it for half the recipe?
Chef Markus Mueller
Hi Anna, even if making half the recipe I would bake it at least for 30-40 minutes. You can always check it with a thermometer as well it should read 210F +.
Candice
Can I use a 9x5 loaf pan?
Chef Markus Mueller
Hi Candice, you can use any loaf pan size you like, simply adjust the size of the loaf as you shape it to fit in the pan.
Diana L
My husband loves homemade fresh bread from the oven. Like, really, really loves it. Can you blame him? I'm intrigued by your recipe. I'll have to try it out. To make my husband happy of course. 😉
My bread never turns out that pretty however. Ha!
Jared @ thehesitantchef.com
Hey Markus, I love the tutorial! It's easy to follow and the bread looks good! Now all I want to do is lather a slice of bread with butter and honey. I'm hungry.
Vicky Chin
I love to make bread ! Your recipe is nice and easy to follow. My kids love to help me punch down the puffy dough, especially my daughter ! Thanks for the recipe.
Markus Mueller
Awesome that your kids help you bake! I feel more kids should be taught skills like that!
Colleen Milne
I love homemade bread and your looks perfect!
Markus Mueller
Thanks Colleen!
Loreto Nardelli
I love fresh baked bread especially when it has that nice crust and good air pockets inside. Yours looks amazing almost reminds me of a brioche. Nice!
Loreto
Markus Mueller
Thanks! It is a very soft bread! Great for grilled cheese and other sandwiches!I'm hoping to put up a wide range of bread recipes in the weeks to come!