If you've been making your own bread at home, Kudos to you! If you haven't but it's something you've always wanted to try, you're in the right place!
You may have heard stories of sourdough starters being passed down from generation to generation. Even that these age-old starters can be closely guarded, and well taken care of secrets. Luckily learning how to make a sourdough starter from scratch requires neither a centuries-old 'hand me down', or any special ingredients.
I'll show you not only how to make your own sourdough starter, but also how to properly take care of it, use it to make your own sourdough bread, as well as a few tips and tricks I've picked up from doing this myself over the past few years.
This post contains affiliate links for which I may be compensated if a purchase is made through the links provided. For more information please read my affiliate disclosure.
A Quick History of Sourdough
Sourdough bread is essentially the 'historical' way of making leavened bread around the world. The very first loaves of bread where likely various forms of flatbread, which were made with whatever flour or grain was available in the region. At some point in history, an 'unlucky' (or very lucky depends on how you look at it), baker left his dough sitting in a warm spot for too long, and the water and flour mixture would have started to ferment. What a surprise he (or she) must have gotten when upon baking, a piece of soft fluffy bread was pulled out of the oven.
Sourdough bread was born.
This basic method of using naturally occurring yeasts to ferment flour products was the main method that would have been used up until the early 18th century for baking bread. Bakers would not really have had any control over the yeast itself, but strains 'local' to an area would have produced differing tastes and textures, especially when re-using old dough's to start a new batch.
This eventually led to the creation of making slurry based yeast starters which often contained barley malt, and various flours. These were often referred to as 'emptins' in old recipe books, and where essentially the scraps of the beer-making process (left-over wort), mixed with flour. It's interesting that leavened bread and beer were usually produced in the same regions, as the fermentation process for yeast is similar in nature.
In time the 'Vienna Process' for baking and making yeast was invented and bakers would have slowly started using press-yeast, a specially produced yeast meant for baking.
The Difference Between Sourdough and Regular Yeast Breads
As mentioned above, sourdough bread uses 'wild yeasts' to ferment a bread dough, while more modern yeast breads use what is knows as 'bakers yeast'. Baking bread always requires a starter or yeast of some sort, and bakers yeast comes in easy to store, shelf-stable variations that require little work:
- Fresh Yeast
- Active Dry Yeast
- Instant Yeast
Each have a different method of preparation, but in short: both fresh and active dry yeast need to be 'bloomed' or activated prior to use while instant yeast may be mixed right into the dry ingredients of the recipe.
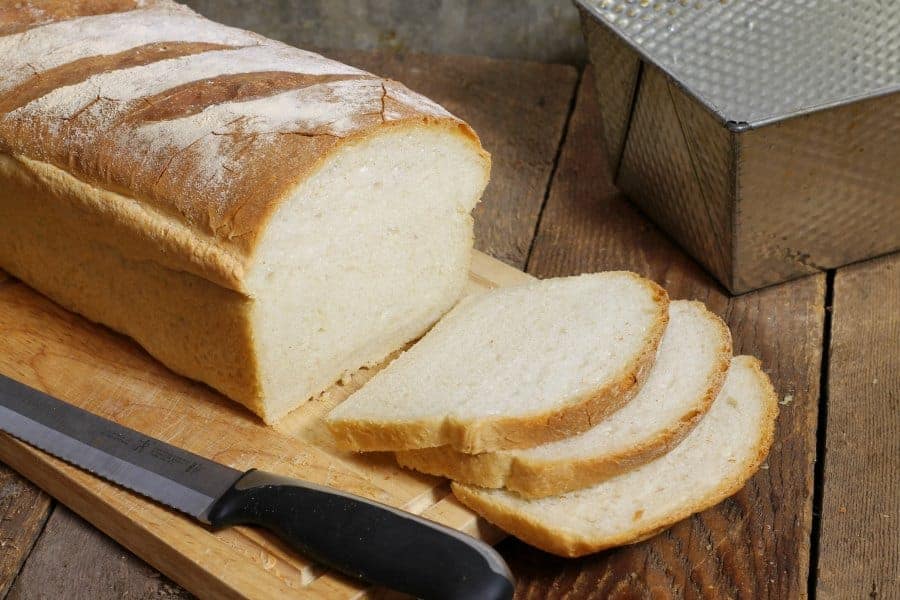
Modern breads leavened with bakers yeast (such as this white sandwhich bread) have a tendency to rise (or proof) fairly quickly in comparison to sourdough breads.
While this is convenient in a commercial setting, breads using bakers yeast often have less complex flavors and a lighter structure.
Sourdough breads are more complex in flavor due to differing wild yeasts, have a slightly 'sour' taste due to the fermentation process, and are usually a bit chewier then yeast breads.
Wild Yeasts
Naturally occurring wild yeasts, are present literally everywhere around us. On fruit, in the air, on plants such as wheat, barley, and Einkorn, in dirt and in water.
When flour is mixed with water and left in a warm environment these wild yeast will slowly start to multiply and ferment and turn natural carbohydrates present in the flour into carbon dioxide. This is the basis of how a sourdough is made possible.
The interesting thing is that, as a starter ferments and is 'fed', it picks up strains of yeast local to its surroundings and the flour used to feed it. This means that while you may receive a sourdough starter that is 'so many years old' and from a specific region, the starter will take on new local strains of yeast until the old ones have all but disappeared.
Using The Proper Ingredients For Your Sourdough Starter
When making your first batch of sourdough starter at home, it's important to use good quality ingredients. This is the biggest secret to success.
The very first time I made my own sourdough starter from scratch, nothing happened. Literally. It went moldy on the counter, and I was left wondering how I could have screwed up something 'so easy'.
Flour
I learned that since yeast is a living organism, giving it any old flour and water, will not exactly help it grow and multiply. Most often people have all-purpose flour at home which has been bleached and enriched. Freshly milled flour has a yellow appearance, and as such it is commercially bleached with a bleaching agent, (such as chlorine), to give the flour a white appearance. The bleaching process also makes it easier for the flour to develop gluten while kneading.
While this is fine and dandy, bleaching flour may kill the naturally present yeast and other beneficial bacteria. If it doesn't, the chemical inhibits the growth of wild yeasts that may be introduced through other means (such as through the air or your hands.). For this reason, it is best to use organic unbleached all-purpose or bread flour when making a sourdough starter from scratch.
Whole wheat flour and other flours can in theory also be used, but they may produce of flavors in your starter. Using an un-bleached organic all-purpose flour is my recommendation. - Chef Markus Mueller
Water
While most of us in North America have access to clean, potable tap water, if you live in any urban setting, you may not know that it is most likely treated with chlorine and fluoride for health and safety reasons. This is not a bad thing for us, just bad for the wild yeasts!
While this is done to kill any bad bacteria that can cause disease and other illnesses in humans, chlorinated water also happens to destroy the wild yeasts as soon as it's mixed into the flour. The easy way around this is to use filtered water, or distilled water in your sourdough starter.
If you don't have access to filtered or distilled water, you can leave the water sitting out on the counter for 30 minutes or so to allow the chlorine to evaporate. Alternatively, you can also use fruit juice as your liquid to feed the starter.
Making Sourdough Starter From Scratch
Let's get to the knitty gritty and actually make a sourdough starter from scratch! Keep in mind this is not something you will make start to finish in one afternoon. You'll need about 4 days to properly let the starter ferment and become active.
Over these four days, you'll periodically feed the 'sourdough starter' (about every 12 hours) with more flour and water to encourage yeast production. you'll notice the sourdough starter start to become gloopy, bubbly, and slightly sour smelling.
You'll need:
- A non-reactive container (such as a wide mouth glass jar or plastic container. Old yogurt containers work well for this)
- A clean spoon and measuring cup set
- a clean linen towel or cheesecloth
- unbleached all-purpose flour or bread flour
- warm filtered water or distilled water (fruit juice such as orange or pineapple juice may also be used for the first two feedings)
(Optional)
- plain greek yogurt
Using Greek yogurt adds a sour flavour to your starter, but is considered to be 'cheating' by professional bakers. Yogurt does not help the starter ferment as is believed by some.
What adding yogurt may potentially do is lower the pH level very slightly of the starter (as would happen when using fruit juice instead of water)discouraging bad bacteria and mold growth and encouraging the growth of wild yeasts.
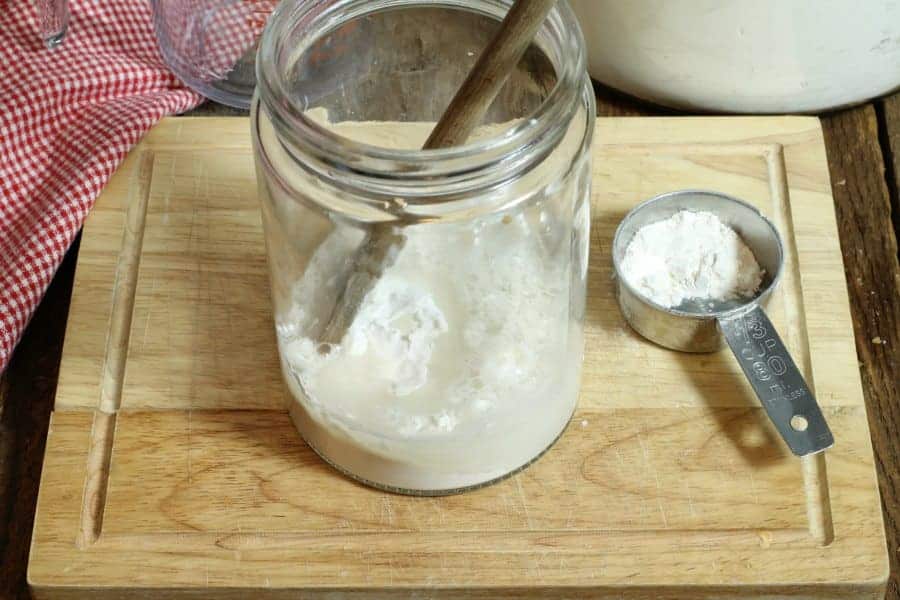
Day 1
Start by mixing ⅔ cups (85 grams) of the flour in your non-reactive container with ⅓ cup (80ml) of warm water. Vigorously stir the mixture with a spoon to incorporate air. Scrape down the sides of the container with the spoon, and cover the container with a clean linen cloth or cheesecloth. You want the starter to 'breathe' and be able to expel the carbon dioxide it produces. If the mixture seems VERY dry add another 1btsp (14ml) of water. The consistency should be paste-like, but not runny.
Set the container in a corner on your kitchen counter and forget about it for a day.
Optional: At this stage you may add 1 tablespoon of plain Greek yogurt to the starter, to help add sourness and decrease the ph level of the mixture decreasing the chances of mold growth. - Chef Markus Mueller
Day 2
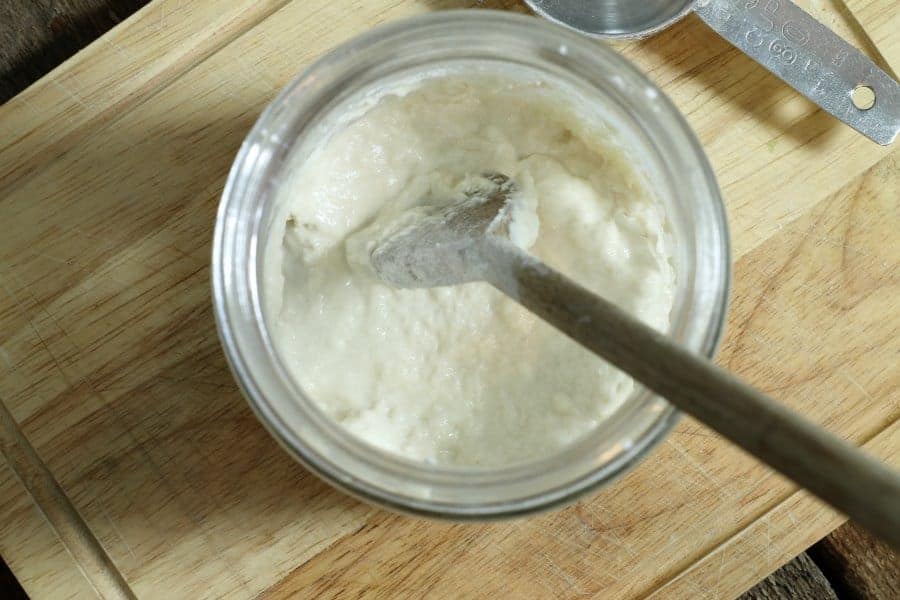
After 12 - 24 hours, it's time to feed your starter again. Over the past hours, the yeast present in the flour/air/water will very slowly start to begin fermentation. Depending on the temperature in your kitchen (especially if your ambient room temperature is under 20C or 68F) this may be closer to the 24 hour mark. Essentially the warmer the temperature the faster the sourdough starter will ferment. You may notice one or two lone bubbles in the mixture.
Add ⅔ cup of flour and ⅓ cup of water to the starter. Mix vigorously with a clean spoon, and again scrape down the sides and replace the cloth. The sourdough starter should be fairly gloopy and may start to appear gluey.
Day 3
Wait another 12-24 hours. At this point you should start seeing noticeable bubbles trying to break the surface of the sourdough starter. Don't worry if you don't, as long as there is no mold, or 'rotten smell' everything should be ok.
Feed the starter again with ⅔ cups of flour and ⅓ cup of water. Scrape down the sides of the container, and replace the cloth.
Day 4
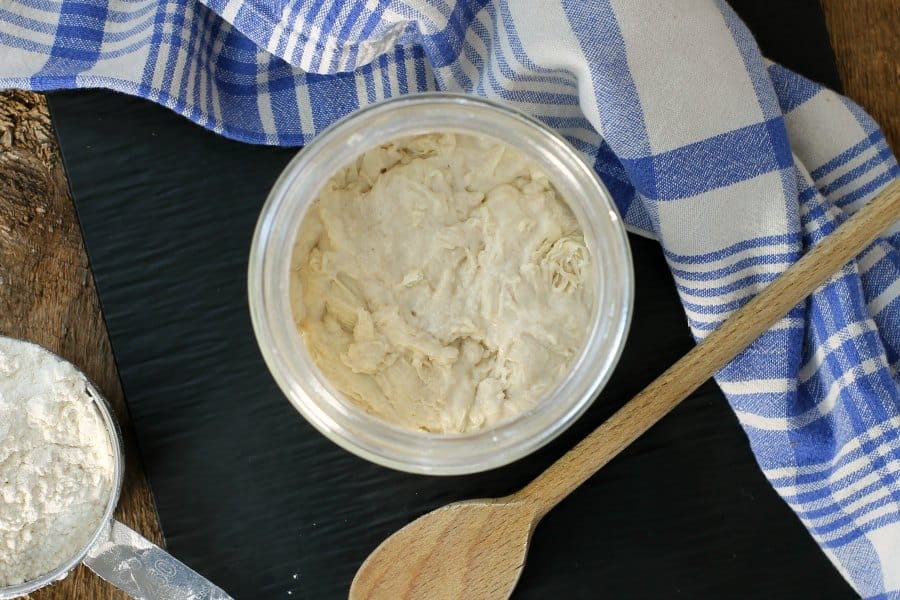
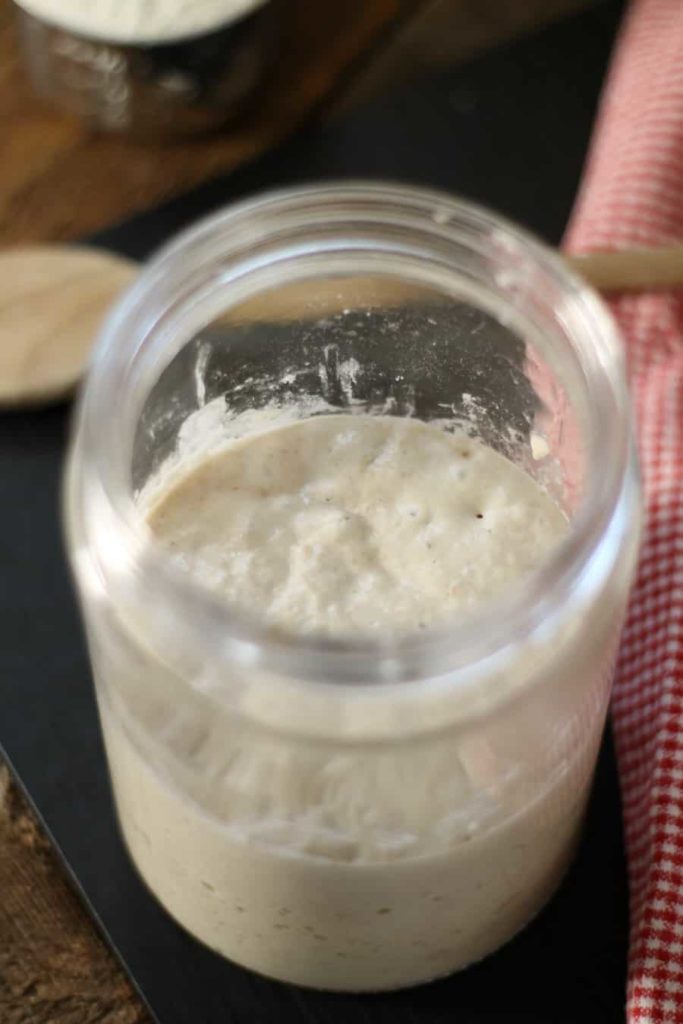
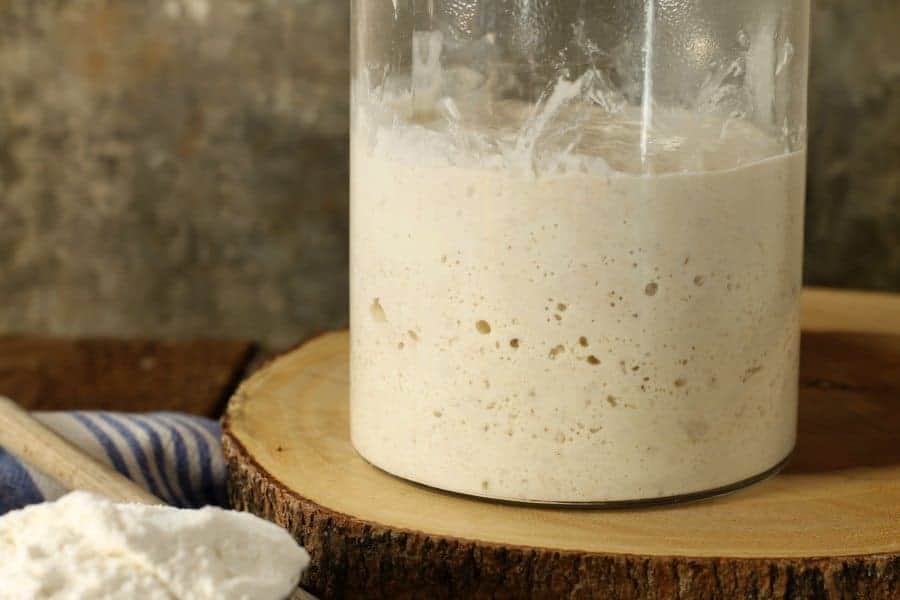
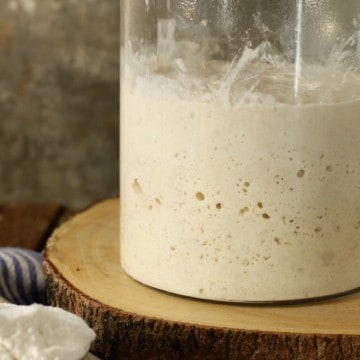
At this point another 12 - 24 hours will have passed, and you should be seeing the surface of the sourdough starter look bubbly. The starter may even start to grow in volume, and depending on the temperature may even have doubled in size.
Feed the starter one more time with ⅔ cups of flour and a splash of water to maintain consistency. Sit back and wait another 24 hours.
Day 5
This is it! Your sourdough starter should have at least doubled in size by now and smell quite yeasty. If you are still not seeing any visible signs of fermentation or notice a 'sour' smell, it's a good idea to start over and try keeping the starter in a warmer location to encourage yeast growth.
At this point, your starter is ready to use in a bread or other sourdough recipe, but if you aren't quite ready to bake, you can store it in the refrigerator.
Storing Your Sourdough Starter
Many people keep their sourdough starters on the counter, but unless you plan on baking every two or three days, I have found it best to keep it refrigerated and dormant to avoid the yeast from losing its strength.
If kept at a warm temperature the yeast will keep eating the carbs in the flour until all the food has been consumed(unless you keep feeding it). The yeast then starts to die and loses its potency.
To avoid this, store at least 1 cup of starter in the fridge in a non-reactive container. The cold temperatures will make the yeast go dormant. They are easily awakened by taking them out of the fridge and feeding again with another round of water and flour.
If the sourdough is left to sit for a long time, a brownish liquid may appear on the surface ( called hooch by some). This is normal, and usually a sign of a little to much water in the mixture. Simple pour it off and continue feeding as normal.
Check out our web story for a quick overview of this recipe: How to make sourdough starter from scratch!
Made the recipe? Comment & Rate it below, then take a picture and tag me on Facebook & Instagram: @earthfoodandfire . For more from scratch recipes follow me on Instagram & Pinterest
Recipe
How To Make Sourdough Starter
Ingredients
Sourdough Starter Ingredients
- ⅔ cup Un-Bleached All Purpose Flour Organic is best, but using un-bleached flour is most important.
- ⅓ cup Filtered Spring Water Chlorine and Fluoride Free
Optional
- 1 tablespoon full fat plain greek yogurt
Instructions
Day 1
- Start by mixing ⅔ cups (85 grams) of the flour in your non-reactive container with ⅓ cup of warm water. Vigorously stir the mixture with a spoon to incorporate air. Scrape down the sides of the container with the spoon, and cover the container with a clean linen cloth or cheese cloth. You want the starter to 'breath' and be able to expel the carbon dioxide it produces.
Day 2
- Add ⅔ cup of flour and ⅓ cup of water to the starter. Mix vigorously with a clean spoon, and again scrape down the sides and replace the cloth. The sourdough starter should be fairly gloopy and may start to appear gluey.
Day 3
- Feed the starter again with ⅔ cups of flour and ⅓ cup of water. Scrape down the sides of the container, and replace the cloth.
Day 4
- At this point You should be seeing the surface of the sourdough starter look quite bubbly, The starter may even start to grow in volume, and depending on the temperature may even have doubled in size.Feed the starter one more time with another ⅔ cups of flour and ⅓ cup of water. Sit back and wait another 24 hours.
Day 5
- Your sourdough starter should have at least doubled in size by now.At this point your starter is ready to use in a bread recipe, but if you aren't quite ready to bake, you can store it in the refrigerator.
Using the starter in a recipe
- After day 5, if your sourdough is bubbly, smells like sourdough, and isn't mouldy, it's ready to use in any sourdough recipe. Simply measure out the amount of starter the recipe calls for and proceed as is required.
- If using a previously refrigerated starter, simply take the starter out of the fridge a day before you plan on baking. Feed the starter to re-activate it. Once bubbly and 'active' it's ready for use.
Notes
Nutrition
Nutrition info is auto-generated. This information is an estimate; if you are on a special diet, please use your own calculations.
This post contains affiliate links for which I may be compensated if a purchase is made through the links provided. For more information please read my affiliate disclosure.


Ulika
Hey I love the start and I am in day 3. When it comes time to bake can I just use half my starter and keep my starter going as long as I keep feeding it. I’ve read articles where people have the same starters for years. Is there any harm in just keeping it alive and constantly feeding it?
Chef Markus Mueller
Hi Ulika, you can certainly do that!
Liz
Very informative and easy. I’m on day five so far it’s perfect can’t wait to bake,
Robin
OVER THE MOON HAPPY WITH THIS RECIPE! I've tried in the past without success, but this time it worked. It's only on Day 3, but it's smelling sour, it doubled and it had bubbles. I can't wait to see what Day 4 brings ????.
Chef Markus Mueller
That's great Robin! I love hearing when something works really well for our readers! You can keep us up to date with your baking by tagging us @earthfoodandfire on instagram and facebook!
Nell.
Hello Markus,
I am making my second attempt of making sourdough starter, and I am currently using you're recipe.
Leading up to day 5 tomorrow in the starter and I have noticed it has doubled in size & becoming more of a sourdough smell to the starter.
I've got a question with when I finish day 5. To keep feeding the starter once a day.
How much do I discard to maintain the starter and how much would I add water & flour?
I like to store my starter on the kitchen bench.
Chef Markus Mueller
Hi Nell, After day 5, you are ready to bake with your starter. Use as much starter (unfed, because adding the recipe ingredients to it is essentially feeding it) as the recipe calls for, and then either refrigerate the rest or feed it again as described in the post here to keep it going. I personally don't discard any starter because I feel there really is no need to unless you are feeding very large quantities of flour (which our recipe and method does not call for). I hope that helps!
Markus
Ryan
Hey there,
I’m trying out this starter and I’m a little confused. Many recipes I’ve seen call for you to discard a portion of the starter and feed a lesser volume. This recipe tells you to keep piling on the flour which has led me to have to transfer from container to bigger container a few times.
Is it possible that you may have accidentally left out that part of the instructions? Or am I doing it right?
Thanks!
Chef Markus Mueller
Hi Ryan, I simply find throwing out part of it wasteful especially in the first few days when trying to get the culture going, you can throw out half if you wish and then proceed with feeding if you find you are running out of container space.
barbara williams
hi....i see a little bit of a discrepancy in the instructions vs. the actual recipe....in the detailed instructions, you say on day 4 to add the flour and a SPLASH of water....but, in the recipe, you say to add the flour and 1/3 cup of water....i'm making the starter....i'm on day 6, and it's not doing very well...if it hasn't doubled by tomorrow, i will start over...but, i wish i knew which info is correct.
thank you
Chef Markus Mueller
Hi Barbara, Thanks for pointing out the inconsistency. You want the consistency of the starter to be thick and gloopy right after feeding it. As the bacteria break down the starches in the flour it will become thinner. The 1/3 cup measurement given is a ballpark figure and can vary greatly depending on the type of flour used. Whole wheat flour for example would absorb much more water and therefore be thicker, then using the same amount of water with all-purpose flour. Even different brands of all-purpose flour can behave differently. If at day six your starter isn't showing any signs of bubbling or fermentation of any sort, I agree, I would start over, but I would also try keeping the starter in a warmer location. The warmer the ambient temperature, the faster the starter will develop. Make sure you are using un-bleached flour, and un-chlorinated water (so not city water) to start the starter. Bottled spring water works great in my experience. Hope this helps!
Samar AbuDouleh
Hello.. Is it possible that starter would be ready to use in day 3? And how to be sure if it's ready or not. I'm in day 2 and want to make sure I'm doing the right thing.
Chef Markus Mueller
Hi Samar, It is possible yes, though just because it is large and bubbly doesn't mean it is strong enough to bake with. A simple test you can perform before using is to drop a spoonful of the starter into warm water before feeding it. If it floats it means the starter has created enough bacteria that are creating the air bubbles to allow it to float. If it sinks, I would continue feeding the starter.
Rick
The instructions from the “long winded expanded” section don’t match the “recipe”. Day 4 - add 2/3 cup flour and a splash of water versus add 2/3 cup of flour and a 1/3 cup water. Which one is correct.
Chef Markus Mueller
Hi Rick, I apologize for the discrepancy. I would feed it with the 1/3 cup of water. That said, by day four you should be seeing some action in you starter and should have gotten a feel for what the consistancy should be like. 1/3 cup of water may be a tad to much, but this can depend on your flour used etc.
Roberta Abbott
Thank you so much for this recipe! I love the comprehensive information on how sourdough works and the historical perspective, and your writing is accessible and engaging. My sourdough turned out great, but I really appreciate you mentioning that your first attempt failed, as did mine. But by using unbleached flour and water where the chlorine was allowed to dissipate, it turned out perfectly. At one point I put a bit too much water and developed hooch and the instructions on dealing with it worked great. Thanks again!
Chef Markus Mueller
Hi Roberta. Glad you found the instructions useful in your particular situation. Baking with sourdough I'd a bit of a trial and error process until you get the feel for it and really understand how it works.
Happy baking!
Ann
Hi there,
When I take the starter out of the refrigerator, how much should I feed it? Can I put it back in the refrigerator straight after?
Chef Markus Mueller
Hi Ann, just feed the starter as you did to originally get it going. It may take a little longer to activate since it also has to warm back up to room temperature. Once you've used the starter you can put any leftovers back in the fridge in a clean container.
Ann
Thank you. It’s day 4 and instead of putting a dash of water I put in the usual amount and now the growth has slowed down. What should I do now?
Claudia
Do you have a sourdough bread recipe you recommend to use for this starter? I am on day 5 and preparing to bake! Thanks!
Chef Markus Mueller
Hi Claudia, glad to hear you're starter is doing well and you are ready to begin baking. Make sure you do a float test to see if your starter is ready to go? If a spoonful of the starter wont float it's not quite ready to bake with.
I would suggest starting with our no knead sourdough bread. It is quite foolproof and will give you a good understanding of the sourdough baking process.
Let me know how it turns out! You can tag us on social media @earthfoodandfire
shiela
I am getting ready to start the starter. I've been wanting to do this for a very long time.
I am going to use your No Knead Sourdough Bread recipe when the starter is ready. My question is can I use a deep cast Iron fry pan with lid to bake the loaf of Bread? I don't have a dutch oven.
Thankyou!
Chef Markus Mueller
Hi Shiela, I don't see why you couldn't use a cast iron frying pan with a lid. You just want to ensure it is deep enough to properly accomodate the loaf of bread. Let me know how it turns out!
shiela
I am about to throw my first starter out. It has been 10 days. It does get a few tiny bubbles (less than 10) on the surface. It hasn't grown at all. It smells good. It does get a thick coating on just the surface. I remove it and it returns. I am clueless why? I used all purpose flour no bleach. I did use 1Tbl .Full fat Greek yogurt. I use distilled water.(should I be using spring water)? I feed once every 24 hours.
I am hoping the second go around to be successful. I went back and read that you said to feed every 12 -24 hours. How would I know whether to feed every 12 hrs or 24 hrs?
If feeding every 12 hrs. would this help to encourage growth and bubbles sooner than feeding every 24 hrs?
Also would it help to replace water with Fruit juice? If so all the time or just a few times? If I use frozen canned juice , do I dilute it with water?
As far as flour goes would it help to start off using whole wheat flour or 100% stone ground whole wheat flour? I have both. Or should I continue using the Unbleached All Purpose Flour? I appreciate all your help! Thankyou!
P.S. I haven't thrown out the old starter yet. And I got a dutch oven just waiting to be used.:)
Kevin
Thanks for the straight forward approach, I will set this up this afternoon, could you tell me how much starter I would use to make a loaf of bread.
Chef Markus Mueller
Hi Kevin, You would use as much as is indicated in whatever recipe you are using.
Payal John
Hi Chef! I just want to know that when we add flour and water the second day the water has to be warm each time or only the first day we have to add warm water? Do let me know please! Payal john
Chef Markus Mueller
Hey, The water should be luke warm at every feeding. If you add cold water it will just take longer for the starter to activate.
Nancy Shreve
What can I expect if I use gluten-free flour for my starter and bread?
Chef Markus Mueller
Hi Nancy,
I assume it would work. It would probably depend on the type of gluten free four used etc.
I have never made a gluten free starter so can't offer to much insight unfortunately.
I would simply give it a go and see what happens!
Chef Markus
Wendy
It seems like you don't ask to discard half the starter before feeding is that correct? Yet, still adding the same amounts (2/3 cup of flour and 1/3 cup of water) each time. All other recipes I see are asking for discard. Your recipe will be much less wasteful if that's the case!
Chef Markus Mueller
Hi Wendy, You are correct, Our recipe uses smaller amounts to get the starter started to avoid having to discard some. I simply find it wasteful. By day 5-7 you should be able to start baking with it, negating the need to throw any out because you 'have to much starter'.
Wendy Lai
Hi Markus,
So with each feeding we also don't need to feed the equivalent weight of the existing starter?
Chef Markus Mueller
Hi Wendy, you don't need to feed the weight of the existing starter each time as you would end up with an enormous amount of starter. At each feeding feed the starter with 2/3 cups flour and about 1/3 cup water. You want the consistency to be like a thick pancake batter.
Victoria garcia
Hi Markus,
I started your starter just over 24 hours ago, I have only fed it once but it seems to have almost doubled in size already, should I continue feeding it as it is or should I discard some before I feed it again?,
Victoria
Chef Markus Mueller
Hi Victoria, I would simply feed it as the recipe says and maybe move it to a larger bowl.. Keep in mind it will shrink again as you mix in a new feeding.Keep us posted!
nichole
I'm at day 5 tomorrow and ready to bake. I'm use bread tins this time. At what temperature do you recommend baking it at?
Chef Markus Mueller
Hi Nichole, I would suggest baking it at 375 for 20 minutes, then lowering the temperature to 350 and baking for another 40 minutes. Check the bread after the one hour, it should sound hollow when tapped or have an internal temperature of 210+ when using a thermometer.
Enjoy! Chef Markus
Holly
Any advice on maintaining this starter . It worked so perfect for me. I have it in the fridge for now. Now what do I do if I wold like to reactivate it?
Chef Markus Mueller
Hi Holly, to maintain the starter you simply take it from the fridge and feed it again as you have been. Wait for it to become active again and then use it in a recipe. Any leftovers can again be refrigerated or left on the counter and be fed again if you plan on baking more often.
susan
hi can you please give me some advice,, I'm on day 3 and mine has some water on top, it is bubble looking but with a layer of water on top, what did I do wrong? must I through it away and start over or must I add more bread flour? hope to hear from you soon.
Chef Markus Mueller
Hi Susan, I don't think you did anything wrong and you don't need to throw it away. I would simply scale back the water you add at the next feeding. The mixture should be like a thick pancake batter, not thin or runny. Sometimes when water collects at the top it's simply a sign of to much water, or that it wasn't mixed in well enough. As long as it's bubbly smells sour and isn't mouldy, you are good to go!
Shannon
Hi there! SOooo stoked about this starter! Thankyou! The instructions were super easy and at the end of day 5 (had to give it one extra feeding) my starter was floating! Made 2 beautiful loaves of your no knead sourdough! So... after baking I had a small amount of starter left (maybe 1cup) so I fed it with the same amounts of water and flour and now it looks like I need to feed it again about 12 hours later. I am thinking that it will need a few days before it will pass the float test again is that right? I am not putting it in the fridge because I am excited to try more recipes as soon as it is ready so just wondering exactly what I need to do now while it’s on my counter...
Chef Markus Mueller
Hi Shannon, if you have a picture of your bread tag us on social media! (@earthfoodandfire) we live seeing our readers' creations!
As for the starter, you simply need to feed it once or twice to get it going again. Do a float test to be sure but it should be fine now that it has matured.
Happy baking!
Lorraine
This is my second attempt at sour dough starter. The last recipe call for very warm water. I am on day 4 of your recipe and it doesn’t rise or increase in volume. I mixed up the two recipes and I now know that the water I used for the past two days was too hot (100 C). Should I continue or start over?
Chef Markus Mueller
Hi Lorraine, I'd be happy to help you troubleshoot.
I just want to double check, you're using 100C water(boiling?) If so that is way to hot. Even 100F would be to warm.
The ideal temperature range for sour dough starter to ferment is between 68F and 72F. At this temperature range it will take about 10-12 hours to fully ferment. Between 72F -80F things will go significantly faster. Above 80F your getting into the danger zone of killing your yeast especially once you hit 90F and up.
I would suggest trying with cooler(barely like warm) water and trying again.
Cheers, Chef Markus
Lorraine
It was 100 F. Started a new batch with 68F. Fingers crossed!
Maria
Chef Markus...my first time making a starter! Excited, now on on my 5th day ,all has gone well,good smell,doubled in size on the third day,ready to us today...but didn’t pass float test.
What to do now?
Feed,not feed?
Help,please!
Maria
Chef Markus Mueller
Hi Maria, sorry for the delayed response, we just moved and I didnt have Internet for a few days.
If the starter doesnt float yet easily doubles in size, you can always try a loaf of bread and see what happens. The float test is simply a measure of the amount of air bubbles in the starter.you want to do the float test before feeding the starter.
Otherwise you can keep feeding the starter and try a float test after 10-12 hours.
Good luck!
Michelle
Hey Chef Markus!
I'm on day 3 of my starter, which I've been feeding every 24 ish hours. It's doubled in size and has a bubbly surface, which I've attributed to the warmth of my kitchen, but now I'm concerned that the container will overflow! Can I simply split the starter in half and into another container without any problems arising? If I were to split the starter in half into ~250 ml each, would I keep feeding it 2/3 cup of flour and 1/3 cup of water, or would I have to adjust the measurements?
Chef Markus Mueller
Hi Michelle, you can easily and safely split the starter and keep feeding both, give some away, discard some, whatever you prefer. Just make sure to use clean bowls/spoons to do the work.
Glad to hear your starter is doing well!
Kathy
Hi Chef Markus!
I noticed that you studied at the NSCC! Are you from NS? I am... Cape Breton, actually ?
Anyway, I’ve been RESEARCHING how to make sourdough starter! Your site & instructions seem the most clear ... and I’ve read most of the comments, which also help.
So ... thank you for all your wonderful info.
Started my starter this evening ... wish me luck!
Kathy
Chef Markus Mueller
Hi Kathy! Yes I am originally from NS. Moved to PEI a few years ago. Love it here!
I'm glad you found the instructions easy to follow. Good luck!
Alison
Once I take it out of the fridge to feed it again - how soon will it be ready to use make bread again? Can you walk through the process of using it again after being stored in the refrigerator?
Chef Markus Mueller
Hi Alison, once the starter is out of the fridge, you need to feed it and let it warm up and double in size again. Do a float test and if the starter floats its ready to bake. If not then keep feeding it till it's strength is rebuilt. The starter should be used in a recipe once it's doubled in size (floats) and is ready for another feeding.
Raven
I've been playing with this start recipe for 6 days (second attempt). Reduced it by half and continued the "feeding schedule( 2:1 flour water)." Regardless, it doesn't seems to want to take off. I'm using unbleached flour, distilled water (95° at interdiction) and keep the medium at a fairly constant 80° environment. It smells like a "delicate sourdough" bread. No signs of mold or bacteria, but gas bubbles and density are not good. It doesn't float and the bubbles are limited. Each morning there a crust at the top of the mix. There doesn't seem to be the "growth" everyone is talking about.
Comments, solutions, placations?
Chef Markus Mueller
Hi Raven, I'd be happy to try and help. It could be the water you're adding at 95F is to warm and killing some bacteria before it cools down. Given that you are also storing it at a fairly high temperature (80F) you may simply be keeping it to warm. Generally speaking yeast will stop growing and begin dying at 95-99F, but keeping it at a constant 80F may be to much.
I have found the ideal temperature range for having the bacteria thrive in the starter is 68F-72F. At the lower range it can take 10-12 hours for the starter to double at the higher range that time is easily cut in half.
I hope this helps!
Virginia Shain
Hi. Thanks for the recipe. I'm on day 4 at this time but have a question about using after it's been in the fridge for storage. You say take from fridge the day before, feed it and use the next day. Do i feed it again after i use some and leave it out for a day before return to fridge? O?r do i not feed it and return to fridge.?Or not feed again and return to fridge? Thanks.
Chef Markus Mueller
Hi Virginia, I would make sure to feed it for minimum of five days before attempting to bake. You can also do a float test to see if some of the starter floats in water..if it sinks it's not ready and needs to be fed more.
As for refrigerating, once the starter or any amount of starter is refrigerated, it goes dormant. You then need to wake it back up before it becomes active again. This is done by taking it from the fridge, feeding it, and letting it sit. It should become active and bubbly again.
Once it's active you (do a float test again first to determine it's strength), you can use it in any recipe that calls for starter.
Whatever starter is left over, you can feed and keep on the counter as before( ie:. if you plan on baking again soon), or refrigerate it again. It's a good idea to add a little spoon of flour to the starter before refrigerating to give the bacteria some food to stay alive as they slowly go dormant.
You then repeat the process as needed.
Shifali Malhotra
Hello, so I started yesterday around 10 pm and in 17 hours I have double the quantity of what I started. Is it okay to double up so much and should I continue feeding the same quantity as mentioned in your recipe? Thank you!
Chef Markus Mueller
Hi Shifali, going 17 hours between feeding is quite long, I would recommend shortening the time to 8-12 hours as mentioned in the recipe. Depending on the ambient room temperature yes the starter can double that quickly. It will collapse down again as you feed it for the next round. An active starter is not a bad thing.
Leena Addanky
I have read in many blogs that we need to discard the flour and water mixture before feeding it. But in your blog I didn't find any sort of discard .
Do we need to feed the dough continually everyday without discarding it?? I am eager to make and learn the process of starter making but quite confused.
Chef Markus Mueller
Hi Leena, the reason this guide doesn't call for any discard is because this recipe uses smaller amounts of flour and water. After day five you should have about a cup and a half of starter. Other recipes use larger quantities that may cause most bowls or containers to overflow.
I also find discarding it is a waste of perfectly good flour. If you do need to split or discard some I would much rather feed and get a 'second' starter.
Lori Ryan
I started my starter on Tuesday and am on day 4 and the consistency looks right and I have large bubbles forming but it has not doubled in size and is not passing the float test. I have been feeding once daily smells yeasty. Do you ever find it that you need to go beyond the 5 days?
Chef Markus Mueller
Hi Lori, yes it may be you have to feed it more then five days...that is the minimum in my experience that it takes to get it going. Try moving it to a slightly warmer location to help speed up the growth of the bacteria.
Lori Ryan
Day 8 and my sourdough floated this morning at 6 am but did not float a couple hours later so I fed again. Is this correct?
Chef Markus Mueller
Hi Lori, it's difficult to say, I would think this could be due to the natural growth cycle (and subsequent death) of the bacteria as it feeds. It not floating could be you waited to long after feeding it and some bacteria started dying. I would try feeding it again and if it floats again then bake with it.
Lori Ryan
Yes, floated again this morning and is proofing! Time will tell - thank you for your tips!
Lori Ryan
I did weigh everything so I am interested to see if I am close to your ingredient weights. Science project continues!
Stephanie M.
Hello! How large of a container would you recommend using for this? Thank you!
Chef Markus Mueller
Hi Stephanie, I usually use a 750ml yogurt container to make my starter. By the end of the 5 days its usually full. This gives me half the container to bake with to test it's strength, and then I keep feeding the remaining starter to help it grow stronger.
Aja
Hi Markus,
Similar to another commenter, I have a starter that looks more like it should on day 4 based on your description, but it's only on day 3. Should I proceed through all 5 days, as directed? It's getting so big I might have to discard half of it at the end of the third day.
Also, in case someone is reading this, and perhaps you'll think it's kind of neat too: I have a cold house. I microwaved a cup of water and then put my starter in there and closed the microwave to keep it at a reasonable ~70 degrees Celsius. Obviously seems to have worked quite well...
Thanks, in advance, for your input!
Chef Markus Mueller
Hi Aja, the reason for your starter being so active is likely the higher temperature environment you created by heating some water in a microwave. (Great idea by the way if you live in a colder climate!!) I would feed it for 5 days as this seems to be the minimum length of time I have seen a starter be fed before it is strong enough to bake with. You can always do a float test and see if a spoonful of starter will float in a cup of water. If it does it should be ready to bake with.
If you have a very large amount of starter, you can use some of the excess to make some of these recipes that require starter but arent bread!
Happy baking!
Mohan Anand
I've reached 8th day of my starter, I've noticed all the activities in the starter, but after putting it in water it's not floating, hence not ready for baking. Please advise
Chef Markus Mueller
Hi Mohan, if the starter is not floating it means there is not very much gas in it (hence it sinks), which could indicate that it hasn't had a lot of fermentation. I would keep feeding it till it does float, or very easily doubles in size in 12 hours or less. Keep in mind the cooler the temperature it is stored at, the longer it will take to become strong and active.
Britta
Hi Chef!
Thanks for this recipe! I started this recipe 4 days ago and today I see that the starter is quite dry and thick (like moist dough), is this okay? I did the float test which failed so I’m assuming it’s not ready yet. I also fed it another 2/3 cup of flour and a bit more than 1/3 cup of (distilled) water to make it a bit more runny. It smells sour like sourdough though so hopefully I don’t have to start from scratch!
Chef Markus Mueller
Hi Britta, I doubt you need to start over if it smells sour and is doubling in size between feedings. I would feed it another one or two times, let it double between feedings and then try the float test again.
Liz C
Hi Markus, thank you for your blog. I’m currently on day 5 of making the sourdough starter. The dough smells yeasty with bubbles, however it did not pass the floating test. It’s fluid but when I try to pour it to another container, it flows like ribbon strips. I’m just wondering if the starter is ready yet? Thank you!
Chef Markus Mueller
Hi Liz, if it didn't pass the float test, it's not yet strong enough to bake with. It should also be a bit thicker then fluid, more of a very thick pancake batter consistency. You'll have noticed that when you first add the flour to the starter for a feeding it gets quite thick but thins out as it feeds on the new flour, this may be why it's so thin.
I would suggest feeding it again, but with a tad less water, it will become stronger the more you feed it...once it passes the float test it is ready to bake.
Sara
Hi Markus thanks for the recipe. I’m on day 4 all going well. If I store in the fridge do I then take it out and feed it before using it to bake? And if so how long do I wait after feeding before I can bake with it?
And should I continue to feed it every day regardless or how often should I feed it?
If I store it on a work top how often should I feed it?
And do I feed it same as I have been? 85g flour and 80ml water?
Last question. If I want to give some to a friend how much can I give them that will be well established and how much do I need to keep to have a good strong starter myself? I’m on lockdown so can’t easily replace what I’ve made. I’ve put it in the fridge as of Saturday and plan to feed it and then use it on Friday; will this be ok? Thank you for all your help!
Chef Markus Mueller
Hi Sara, If you store the starter in the fridge, it will go dormant. So yes you will need to take it out and let it warm up, then feed it once as described in the steps above. Let it double and when it needs to be fed again, that's when you use it in a recipe. How long this takes is entirely dependant on the strength of the starter, the temperature in your home etc. If you store the starter on the counter you will probably need to either feed or bake with it every second day to keep it alive. You can test how strong your starter is by doing the float test. Simply plop a spoonful in a glass of water, it should float at the top and not sink. If it sinks keep feeding it till it does float.
If you were to give some to a friend, simply give them half of what you have, then continue to feed your portion and let it grow until you have enough to use in a recipe.
Mei
Thanks for this helpful and easy to follow guide!
I'm at 36 hours and my starter is already VERY bubbly and doubling in volume...I'm not entirely sure what happened, but I'll keep feeding it and see how it goes? I did use whole wheat flour, and I'm keeping it pretty cozy and warm with a heating pad on low in an insulated grocery bag.
Chef Markus Mueller
Hi Mei, the reason your starter is growing so quickly is because of the heating pad, I would remove the pad and just keep feeding it as described above. It seems it is off to a very good start!
Jayan
Hello Markus....
Greetings from Kerala (India)!
I am on day-4. Getting yeasty smell and frothy look. As it's a warm.weather I need to feed it in every 12-13 hours. The first step I am planning to wait for nearly 24 hours before taking for a float test.
I wish to make the bread for Easter.
Thank you so much for sharing!
Best regards
Jayan
Chef Markus Mueller
Hi Jayan, great news! I would suggest baking a loaf before then to ensure the starter is strong enough, you can always reserve half the starter and keep feeding it to have enough to keep baking by easter.
Tawny
I accidentally added 2/3 cup flour and 2/3 cup of water-oops. So I added more flour to get to the approximate ratio. I’m thinking I just need to wait another 24 hours to see if it is still active. It was already sour smelling and had doubled in n size by end of the 3rd day.
Thanks!
Chef Markus Mueller
Hey Tawny, if the starter was already bubbly and sour smelling, you should be fine!
Good luck!
Sara McConnell
I have been wanting to start this for YEARS and am so excited to do it today! I have to say, it really bugs me when people rate recipes before trying them, and now, here I am doing just that! Ha! I just wanted to thank you for creating a recipe that doesn’t use up all my quarantine flour and throw half of it away. (My stomach fell when I read those recipes!!) you just can’t buy flour anywhere these days and I refuse to waste! So off I go, to start a starter, I’ll let you know how it goes and leave. “Real” rating. Thank you!!!
Chef Markus Mueller
I look forward to your rating! Tag us on social media with a picture when your done!
Loyalee
Love this! I am really wanting to try alternate flours. I was thinking lentil flour. Any thoughts about whether it would be worth a try or not??
Chef Markus Mueller
Hi Loyalee, I honestly don't know if it would work, but why not give it a try! I'd love to hear your results!
MaryAnn Geertsema
Most recipes I see say to discard some of the starter before feeding it. Yours does not, yet you do talk about using discard in, for example, the banana bread. Would you please clarify this? I am on Day 4/5 and have only removed enough today to make said banana bread. The Start looks and smells good, and I am looking forward to this new adventure. I have made my own yeast bread for many years, but now is the time to finally get into sourdough! Thank you.
Chef Markus Mueller
The reason some starter recipes say to discard some starter is because they start with a larger amount of water/flour and feed it a larger amount each time...they say to discard some because otherwise you would have a huge amount of starter that would overflow most normal sized containers when it doubles. I scaled my recipe down to avoid unnecessary waste.
Kimberly
Thank you for this simple easy to follow recipe. I have wanted to try sourdough for awhile but I was intimidated by all the different ways people do it. Today was day 4 so tomorrow morning I plan on using some of my starter to make some sourdough pancakes. I am also looking forward to sharing with friends and family. Thank you!
Chef Markus Mueller
You're very welcome Kimberly! I am glad you are enjoying the process!
Jen Dale
Hi there! I’m on day 3 of my starter and it is already bubbling and has almost doubled in size! Is this normal?
Chef Markus Mueller
Hi Jen, it is normal yes, feed it one more day then use it to bake. How quickly the starter doubles can be influenced by many things such as the specific flour used as well as room temperature , humidity and more.
Allie cosler
My starter has a firm layer on the top. Is that normal?
Chef Markus Mueller
Hi Allie, did you cover the starter with a cloth or a lid? I'm not sure what would cause a firm layer on top. Do you mean like a 'skin'? Or more like a thick layer of flour with water underneath?
Allie cosler
I did cover it with cloth. More like a thick layer With a soft underneath. Once I fed it again the layer hasn’t come back.
Angel
Hi! Great article, thanks! This made me excited to start making my own bread again! ?? questions for you... how long can you keep the starter in the fridge for? Also, Would you take it out and use some, feed it again and return it to the fridge?
Chef Markus Mueller
Hi Angel,you can keep the starter in the fridge indefinitely as long as you feed it periodically. If it grows mold, throw it out.
To use refrigerated starter, take it out, feed it as described in the guide above, let it become active again, and then use it. Refrigerate any leftover. If you don't have enough leftover starter, keep feeding it until you have enough starter to bake with.
Melody Taylor
My first attempt at starter has reached day 5! I'm currently in the process of using some of this to try making bread. The rest I have in the fridge in a jar. Should I have put a tight lid on it? Then when I go to use some of my refridgerated starter, how much do I take out to feed the night before use? How much of what do I feed it? Do I feed the starter I took out of the fridge another round of 2/3 c flour and 1/3 c water, let it set overnight and then measure the amound needed for the recipe?
Chef Markus Mueller
Hi Melody, yes you should put a tight lid on the starter when in the fridge.
When you go to use the refrigerated starter, take it out, feed it as described in the recipe above, wait for it to become active, and then use it in the recipe.
Christine Berry
Thanks to the Covid 19 virus I now have the time to create this, however I don't have any unbleached wheat flour at home. Could I use sprouted buckwheat flour or light spelt flour instead or should I just try my whole wheat flour and see what happens?
Chef Markus Mueller
Hi Christine, You sure can use buckwheat or spelt flour. My advice would be to start a starter with each flour, as I have no clue how they will turn out, I am sure one will take hold and work well though! You may even end up with three! Keep me posted, I would love to know how it goes! You can follow and tag us on Instagram and facebook @earthfoodandfire .
Mary-Ann
Hi Marcus
This is my first time making a sourdough starter, it is working perfectly. I am on day four. How do I feed the starter after day Five, it was mentioned to feed every 2 weeks . What are the measurements? Thank you
Mary-Ann
Chef Markus Mueller
Hi Mary-Ann, Glad you're enjoying making your own sourdough starter! On day five the starter should be ready to use in baking. Instead of feeding it you would add it to a sourdough bread recipe. The flour in the recipe would act as the 'food' for the starter thereby growing in size. Any leftover starter is stored in the fridge, and when you are ready to use it again you simply feed it the same amount as you have been all long. It will 'wake up' and then be ready for use in a recipe again. I hope this explains it!
Chef Markus
Annette
I finally did this due to COVID-19 also. Working great so far. On day 5. Now I need to figure out how to use it. Haven't been much of a baker in the pass. Have had pancakes before. Any recipe ideas for pancakes?
Chef Markus Mueller
Hi Annette, glad to hear you are enjoying making the starter! To use it simply use the active starter (that needs to be fed) in any recipe that calls for sourdough! You can find a few of our favorite recipes here: 9 recipes that use sourdough starter.
Mary Howard
Is there a way to make the starter without using wheat flour? I have 2 who are allergic to wheat, not gluten, but wheat. They don't like the commercial wheat free bread so use potato bread, sparingly, for sandwiches. Also wondering if there is a way to keep ants out of the starter? I have been fighting ants for several years and will keep fighting them, just wondering if you have any tips.
Thank you.
Chef Markus Mueller
Hi Mary, I have never made a starter with any flour other then a wheat flour, so I can not be of much help here. I would suggest searching google for a gluten-free starter recipe and see what you find.
Veronika
Hi! I have started my ... well, starter.
I’ve read a few recipes. Some of them suggest throwing away half of the starter once it doubles. Is this a necessary step? If not, why throw anything away?
And also, if you do choose to remove half the starter, can you use the “throw away” starter to bake something else.... ?
Thank you for your suggestions and knowledge.
Chef Markus Mueller
Hi Veronika, The reason some recipes suggest to discard some of the starter is because as it grows and you keep feeding it, you will end up with a very large amount of starter. You'll notice many of these recipes start with a cup of flour or more and feed with half a cup each time. You do this for six days you need quite the container to contain the amount of bubbly sourdough starter. My recipe starts out quite small, so you should be ok and not need to discard any starter. If you do have extra, just save it in the fridge and keep feeding it when you are ready or wish to make a new starter.
You could in theory bake with the portion you are going to discard, but if it is still very young and not strong enough, it won't provide any proofing power to your baked goods.
Happy Baking!
Brenda
Can I use this starter in my regular bread recipe instead of yeast?
Chef Markus Mueller
Hi Brenda,
You should be able to substitute the sourdough starter in pretty much any bread recipe for yeast.
That said, using the starter will add some liquid to the bread recipe so I would maybe start by adding 1 cup starter to any given bread recipe and reducing any liquid that recipe calls for by half a cup. The starter also needs to be fully active and ready to be fed before adding to a bread recipe. It then feeds on the recipe ingredients as it proofs.
Another thing to note is that the sourdough will take much longer to proof then yeast. Yeast will proof or double a bread dough in size in about an hour where a sourdough starter can take up to 12 hours depending on how active the starter is.
I'd love to hear back how it goes!
Chef Markus
Judith
My house is quite cool - what would you suggest for placement to begin the process? Would placing it in the oven with the light on be a good start?
Chef Markus Mueller
Hi Judith,
In response to your question about the sourdough starter, if your home is fairly cool, inside the oven with the light on isn't a bad idea. You could also set the starter beside a radiator or at least near one for the first few days till it gets going.
Hope it goes well,
Chef Markus
Denise Poirier
I've seen some ask about non wheat flours! I've tried this recipe with a rye flour and it worked great! I think it would work with most flours... (I will be trying spelt eventually too!)
Chef Markus Mueller
That's great to know! Thanks Denise!
Dawn
Thank you for this recipe! I just recently started making different kinds of breads, this will be my first attempt at sourdough. My starter looks great, but I was just wondering if you should cover with a lid, or keep the cheesecloth on the jar when refrigerating? Thank you so much!
Chef Markus Mueller
Hey Dawn, if you are refrigerating the starter, I would suggest covering the starter with a lid. Fridges have a tendency to dry things out.
Sabrina
Hi there! I've fed my starter only twice and it's looking great, in fact, it's growing so rapidly! My wide mouth 1L mason jar is almost completely full, is grown so big. Does this mean it's done in only 3 days? Or should I discard some and keep feeding it as some other recipes say to do?
Chef Markus Mueller
Hi Sabrina! I would simply discard some and keep feeding the rest. Or move it to a larger container!
Sue
Hi! Can I use this sourdough starter to make injera, the Ethiopian flat bread? N also do I have to follow the exact same procedure for an injera starter? Thanks slot for your help, highly appreciated ?
Chef Markus Mueller
Hi Sue, I have never made Ethiopian flat bread so I can't be of much help there. If the recipe you have calls for a sourdough starter though I would guess this would work.
Patel
Hi. I am one day 5 my starter look little bubble but it has not risen. What do I do?
Chef Markus Mueller
Hi Patel, If on day 5 nothing has started to happen, I would suggest starting over and placing the starter in a warmer location. After 5 days you should have started seeing some kind of bubbling action. I hope that helps!
Lisa
Thanks for the recipe, Markus! One question - once in the refrigerator, how often should you feed the starter?
Chef Markus Mueller
Hi Lisa, it depends, I usually feed mine about every two weeks, basically when I bake bread again.
Holly Salimaki
How much starter does this accumulate?
Chef Markus Mueller
Hi Holly, sorry for the delayed response, the starer recipe makes about 2 cups give or take.
Hannah
When using fruit juice instead of water for the first couple feedings do you warm the juice up?
Chef Markus Mueller
Hi Hannah, warming the juice is not required, though room temperature is best. The warmer the temperature the faster the yeast will multiply...until it's too hot of course and kills the yeast.
Amanda Jerowsky
Heyo,
Great recipe, I've had mixed results with different sourdough starter recipes, but this one has thus far been a success.
I do have one question: I've noticed that many of the recipes call for olive oul, and I was wondering if I could use melted butter in it's place, or does the oil play a specific role?
Cheers,
Amands
Chef Markus Mueller
Hi Amanada, yes you could use melted butter instead of oil when baking bread. Just make sure to measure it after melting!
Glad you like the sourdough starter recipe!
Iwona
This is a great recipe and I'm eager to try it out. I have organic rye flour. Would that make a good starter? I would think the rye would be more tangy too.
Chef Markus Mueller
Hi Iwona,
You are correct, the rye flour would create a different flavor profile. Let me know how you like it with the rye!
Jeff Dawes
Hi. Thanks for this! So once the starter is made, how do you use it to make sour dough bread?
Chef Markus Mueller
Hi Jeff, so once the starter is ready to be used ( bubbly, doubles in size after feeding, smells sour, etc) you simply add it to your favorite bread recipe. Knowing how much to use can be a little tricky, but i generally try and use at least a cup worth of starter. If you search 'no knead sourdough bread' on our website here, you'll find a recipe that uses the starter. I'll be working on more sourdough recipes this fall!
Karin Kozlowski
This recipe is perfect! I used King Arthur unbleached whole wheat flour, I'm on day 4, and the starter looks (and smells) amazing! Thank you!
Chef Markus Mueller
Glad to hear it Karin!
Scottie
This is my second time to try this starter. I’m not sure what I’m doing wrong. I’m using spring water and unbleached flour. My starter has a good scent to it and has bubbles but it never grows. I’ve tried the float test and it doesn’t float. I’ve tried making bread with it and it doesn't rise. I’m not really sure how to make it work. I live in Texas so my kitchen is on the warmer end. Any suggestions?
Chef Markus Mueller
Hi Scottie, I've never had that happen. I would suggest trying it with distilled water? It could be that if it is really hot in Texas the heat may kill the bacteria before it can really get going? I would love to hear if you try it again and what happens!
Terry Bower
Hello Chef Markus,
I'm on Day 4 of the process of making the sourdough starter and will soon be ready to make my bread. I have two relatively large pizza stones which I would like to use when baking my "Roggenbrot" (rye bread) rather than using the dutch oven method. Is this possible and, if so, would you please explain the directions to do this. (N.B. - I'm planning to place a small container of water in the lower part of the oven to create steam to make a nice crust.) Thanks, in advance, for your assistance in this matter. Terry
Chef Markus Mueller
Hi Terry, Apologies for the delayed response. You could certainly use the pizza stones as a baking surface. The difference with the baking stone and regular baking sheet is that it needs to be pre-heated. So when you are shaping your dough and getting it ready for the final rise, I would suggest starting the oven and putting the stone in then. Let the bread rise on a well-floured surface or board. Once ready to go in the oven, gently slide a spatula underneath the loaves to make sure they don't stick, then slide the loaves onto the hot stone. Bake as the recipe directs. Keep in mind the stone is fairly hot so the crust on the bottom of the loaf may bake faster/become thicker.
Sarah
Hi. This is my first time making a sourdough starter. I will probably make bread on day 5 or 6. Do I refrigerate the starter after day 5?
Chef Markus Mueller
Hi Sarah, don't refrigerate the starter before baking with it. Use what you need, and then refrigerate any leftover starter. To wake the starter up, simply take it from the fridge and feed it/let it sit for 24 hours. Then use it in a recipe.
Julia
Hi Markus! I had tried a starter before and it exploded all over my bookshelf! I used your method this time and it worked like a charm! I’m not very familiar with baking bread so I want to be better- the starter was incredibly sticky, is this how it should be? I tried baking a loaf using it this way (with your no knead sourdough recipe!) and it turned out fairly well! Very dense though, do I need to let it proof longer? Or do I need to feed the starter longer before using it in a recipe? Thank you for your great recipes!
Chef Markus Mueller
Hi Julia, glad to hear the starter worked for you and didn't explode this time! The starter is fairly gooy by nature yes this is normal.
As for the bread being dense, there could be many reasons for it. One like you mentioned the starter may be week, and needs to be fed a few more days before being used in baking.
No knead recipes will inherently be denser then a recipe which you knead as the gluten isn't developed. When kneading a dough you develop gluten strands which stretch as the dough proofs.
I would suggest kneading the dough with a little more flour (the dough should still be tacky but not wet) and see if that lightens it up at all.
Chef Markus
Vicky P.
Hi,
I’m on day 3 and my starter triple in size... I used a 1L mason jar and its pretty much full what should I do?
Chef Markus Mueller
Hi Vicky, I would simply take some of the starter out of the jar and keep feeding it. Or move it to a larger container. Keep in mind that once you feed the starter again, the volume will decrease a little as you let the air out of it.
Megan Cartier
I'm on day 4 following your starter recipe. I did decide to add a tablespoon of Greek yogurt because it appealed to me. My starter smells vibrantly of vanilla / bananas which doesn't exactly sound normal but does make my whole kitchen smell pretty tasty.
Chef Markus Mueller
Hahah that sounds great Megan, the smell could be from the yogurt,as long as there is no mold growing on the starter or the sides of the container, you can rest assured it has not 'gone bad'. Happy baking!
Sheree Rice
After the 5th day any recipe recommendations? Do I just bake it like is? This it is my first time
Chef Markus Mueller
Hi Sheree, after the 5th day simply use the sourdough starter in any recipe that calls for starter. Use as much or as little as the recipe requires. You'll find my sourdough bread recipe here
Sonia
So once I start using the starter, how do I know how much flour and water to feed it to keep it growing?
Chef Markus Mueller
Hey Sonia, so once you start using the starter, you simply refrigerate any leftover starter, and then when ready to use it again, pull it out, and feed as described in the post above. You basically just need to keep feeding it flour to keep it going. How much is irrelevant, you just need enough water to moisten the flour each time and keep it gloupy.
Dan Todd
Thanks for this. However, you should be more careful making statements you're not quite sure about given the popularity of your site. Water treated in Canada and the US is the healthiest in the world. Your description of how treated water would harm the production of sourdough starter lacks a scientific backing and helps feed into the anti-science conspiracy. The water is not treated with "multiple" chemicals - you make it seem like something out of Chernobyl. It goes through particulate filters where anything heavier is removed, and is then chlorinated. That's it. Chlorine will evaporate from the water almost right away, but you can leave the cup on the counter for 5 mins and it will be gone. If you're that concerned, leave it for an hour and other than the fact it will be dirtier due to particulate in the air, it will be guaranteed to be chlorine free. "Spring" water goes through this same process except it seeps through sediment in the earth - ie layers of different clay and soot and rock meaning it is cleaned that way. The commercially sold spring water is in fact chlorinated for safety reasons so I have no idea what you get by recommending people to buy it - more plastic? Humans are ridiculous. Yes, it is possible that the water in your tap is better than the stuff inside plastic containers.
Finally, yeast as a fungus and bacteria inhibit each other's growth. So what do you get by adding a spoon of yogurt? The more bacteria the less yeast and vice versa - I can see how it might improve flavour but not what the point would be to "start" the process - bacteria are to yeast what water is to fire. Penicillin is a type of natural anti-bacterial defense mechanism developed by fungi.
Finally, "plain Greek" yugurt - you probably mean Balkan-style yogurt. Greek yogurt is thicker and made in individually set cups, Balkan style is the natural yogurt that is made in a larger vat without stirring. Greek yogurt is stirred.
Chef Markus Mueller
Hi Dan, thanks for your comment, I think there is a little mis-understanding. I don't claim the water is treated with multiple chemicals as you state, only that it is treated with chlorine and flouride.
The chlorine in city tap water will kill wild yeasts found in organic in bleached flour.
I agree I did make an error in saying spring water (as bottled water also contains chlorine as you kindly pointed out). What I meant to write was to use distilled water. (I have edited this in the post).
Alternatively as you also suggested you can leave the tap water out and let the chlorine evaporate. You could also use a fruit juice such as orange or pineapple juice which will lower the pH value and help discourage mold growth.
In regards to the yogurt you are correct and I was mistaken. The yogurt does not actually help fermentation. What it may actually do is very slightly lower the pH value of the mix, reducing the chances of mold growth before the yeast takes hold.
The yogurt will also add some sourness to the starter, though this is considered to be cheating by some.
I did mean Greek yogurt and not balkin yogurt.
I appreciate you taking the time to point out my error.
Chef Markus
Lorraine
OMG that is a bit technical good on you for knowing all this but a bit irrelevant to making Sourdoughs. The explanation in the recipe is a guide line any how and I for one do not like the thought of chlorine in my body Now I am being a bit OTT. As you are with the yoghurt ??
Nova
Hi,im on my 4th day today(friday),my 5th day is Tomo(Saturday) and im planning to make the bread by Monday...i understand i need to put it in the fridge,but after i take it out from the fridge on Monday,shall i feed it first before using on my bread or can i use it straight on my bread? So sorry,my question is complicated?
Chef Markus Mueller
Hi Nova, If you plan on baking bread on Monday, I would suggest not refrigerating it, and instead simply keep feeding the starter until then, the same as you have been doing until now. Bake on monday, use whatever amount of sourdough you need, and then refrigerate any leftover starter. When you are ready to bake again, remove the starter from the fridge and feed it to re-activate it. It's ready for use again when kit's actively bubbly.
Hannah
So I'm on day 5 and my starter looks great but I have no idea what to do with it from here. Do I just leave it on the counter? How much and how often do I feed it? What do I do when I take a cup out for baking a loaf of bread?
Chef Markus Mueller
Hi Hannah, I sent you a more detailed e-mail but I will also answer your question here.
After day 5 of 'starting' your starter, you are basically ready to start using it in any sourdough recipe you like. Any leftover sourdough can simply be refrigerated for future use. When you are ready to use it again, take it out the day before, feed it 'as normal' and let it become active again before using. You can repeat this process as many times as you like. If you notice mould growing inside the container, you should throw it out and start over.
Hope that helps!
Chef Markus
Tana
I had that exact question! I'm on day 5 and wondered "what do I do now?" Thanks!
Aleta
Wow this is such a great tutorial. I wish I had it back when I was just starting out with my sour dough starter. You have made it so easy to understand!
Chef Markus Mueller
Thanks Aleta! I'm glad you where able to tackle making sourdough at home yourself!
Jessica
I've been making bread for a few years now and have been wanting to give the sourdough starter a go! Well I've finally done it! I'm about to feed it for the 2nd time and already saw a few bubbles! I just always came across different "recipes" and instructions for keeping and caring for the starter. This one seems easiest. I am eager to make my own sourdough bread as it is my favorite!
Meg
Thank you for this recipe. Your steps are very clear. I am on day 3 of my starter and it has almost doubled in size by the next day, but fell during the day...is this bad?
Chef Markus Mueller
It's not necessarily bad, it could be that the starter simply used up all the food you gave it, it goes faster and faster, the larger the starter gets, try feeding it again and see if it still bubbles and doubles up again! Make sure it isnt to liquidy either.
moriah frazier
Should I be throwing away any of the starter when I feed it? Or just adding to what I already have?
Chef Markus Mueller
Hi Moriah, Don't throw any of the starter out, just add to it each day as you initially get it going. If you throw any out you risk reducing the bacteria count, and then it will take even longer to become forthy and bubbly. Once the starter is going dtrong, you can take some 'out' for use in recipes, such as my no-knead sourdough bread, and simply refrigerate the rest. Once you plan on using the starter again, simply take it out , feed it, and then let it sit overnight to re-activate. I hope this helps!
Kelley Odom
If I pull out two cups of starter to make pancakes, do I replace the starter w/1 cup flour and 1 cup water or the original amounts for making the starter. Or do I have to feed it before pulling any out to use? can you please email your response so I don't have to wade through all the responses again - if possible
thanks for the help.
Chef Markus Mueller
If you are pulling the starter out of the fridge to use in pancakes, you'll need to feed it first to activate it. I have never used sourdough starter in pancakes though!
I would just take out two cups and feed it, and wait for it to become active again. Then measure out two cups of active starter to use in your recipe.
To feed the two cups cold starter you would only need 2 or 3 tbsp of flour and a splash of water to get it back to the proper consistency.
Myra
I've just tried this recipe for the first time. The dough is on the counter proofing for the night, we'll see how it turns out tomorrow!
I'm just curious to hear your thoughts on other sourdough starter recipes. Any other starter recipes I've read instruct you to throw away a portion of the fermented starter each day before adding more flour and water (this always seemed kind of wasteful and complicated to me). Do you know whats the reason behind the discarding each day? I was interested to try your recipe because it was the first one I'd come across that didn't look like you needed to be a bread guru to have success with it.
Thanks for your time!
Markus Mueller
Thanks Myra, I'm glad you found the instructions easy to use.
I'm not sure why other recipes tell you to discard part of it. To me this also seems wasteful. The only reason I can think of is that it's meant to prevent you ending up with a huge amount of starter.
I've also seen other recipes use yeast to help kickstart the process but this seems counter intuitive to me. As I mentioned though its important to use unbleached flour and un chlorinated water to be successful in breeding the bacteria.
Basically once your starter is ready to use, use what you need and put the rest in the fridge to put its growth on hold. Next time you go to bake, take the starter out and feed as you did here. After 2 feedings it should be ready to go.
myra
Thank you for the reply back! The throwing out seeming really wasteful and complicated to me as well. I was just always curious what the reasoning behind it was...
Anywho, happy baking! I always enjoy reading the bits of history/extra information on recipes that you include in yours.
holly wall
hi Mark - excited to try this recipe, but not sure if I am supposed to mix the entire 1 1/2 cups starter with the sourdough ingredients, or hold back 1/2 cup for future use and feed it, and use just 1 cup of the bubbly starter. (i might have missed something in the instructions, but i'm confused) Thanks!!!!!
Markus Mueller
Hi Holly,
Use the entire 1.5 cups of the starter! My error, thanks for pointing it out!
Linda
I’ve never done a sourdough starter before. I am starting this for a fund raiser breakfast for dinner and was wondering if I can continue adding to the starter to make sure I have enough. If not could you please give me some pointers!
Thanks Linda
Chef Markus Mueller
Hi Linda, if you are just trying to make a bigger batch of starter, yes just keep feeding the starter with more flour, add enough water to make it floppy and then let the starter get to work. Eventually the entire mass will turn into a starter once the bacteria has had a chance to multiply.
Carrie
Can whole wheat pastry flour be used? After mixing the first 2/3rds flour and 1/3 cup water should it be doughy or more liquid like? Mine is doughy
Markus Mueller
You can yes , though for your first sourdough starter I would suggest using all purpose instead of whole wheat as whole wheat an create weird tasting starters due to a bigger variety of wild yeasts.
After mixing the first 2/3rds flour and 1/3 cup water the mix should be fairly doughy and thick. Almost like a thick pancake batter. As the yeast start to eat the carbohydrates and bubbles start to appear it will thin out a little. It should not be watery.
Diana
This is great information. I tried making a sour dough starter before but it exploded on me the first night. What a mess! I kept my starter in my microwave, since we rarely use it. Your step by step instructions are great! Can't wait to try again.
Markus Mueller
Ouch! I had my starter bubble over the first time I made it as well. I was very surprised at how quickly it starts to double in size!
Nathalie
What a good post Markus! You explained so well that I think I’m going to put my fear away and try to make sourdough bread. I baked traditional bread but never try sourdough. As I’ m gluten intolerant I make bread for my family... But I love bread! Could it be possible to make sourdough without gluten? Or at least make bread with a flour with less gluten like kamut using your sourdough recipe?
Markus Mueller
I am not sure if a 'sourdough' style starter would work with kamut. It's worth a try! I know that my mother is sensitive to processed flours, but my parents make bread with an organic whole white flour from Spearville Mills. While it still contains gluten, it's a heritage breed, not as processed as grocery store flour, and it seems to not bother her at all.If you do try it with a gluten free flour I would love to know if it works!
Gabby G
Wonderful post! Many years ago, I made my own starter but stopped and have been wanting to get back at it ever since! Wild yeast are so good and much better than commercially made yeasts (which nowadays is often GMO). This wild fermentation is exactly what our bodies need. Thank you for explaining all this information!
Kristen
Hi I'm on day four with my starter it has alot of bubbles and has grown in size but there isn't a smell it still just smells like flour am I doing it right or do I need to start over?
Chef Markus Mueller
I would say everything is going good. Try moving it to a warmer location and keep feeding it.(even if it's a smaller amount) it will take off once the yeast takes over.
Ann
I am SO doing this Markus! I love sourdough bread and have thought of making it myself so many times. These detailed instructions and tips for success are exactly what I need to give me the confidence. Pinned for my next baking project!
Markus Mueller
Please share how it turns out! With proper planning, making sourdough really is quite straight forward.
Kristen
I have always wanted to make bread and even took a class once, but I have aril been to nervous to try. Your recipe is very thorough and clear and I look forward to giving it a go!
Markus Mueller
I would love to hear how your sourdough starter turns out! I'll be posting a 'sourdough bread' recipe next week to show how it's actually used!