A lot of people are intimidated by baking their own bread at home, let alone sourdough bread. It seems to be portrayed as this difficult task that only professional bakers can accomplish. This 'no knead sourdough bread' recipe is meant to change that.
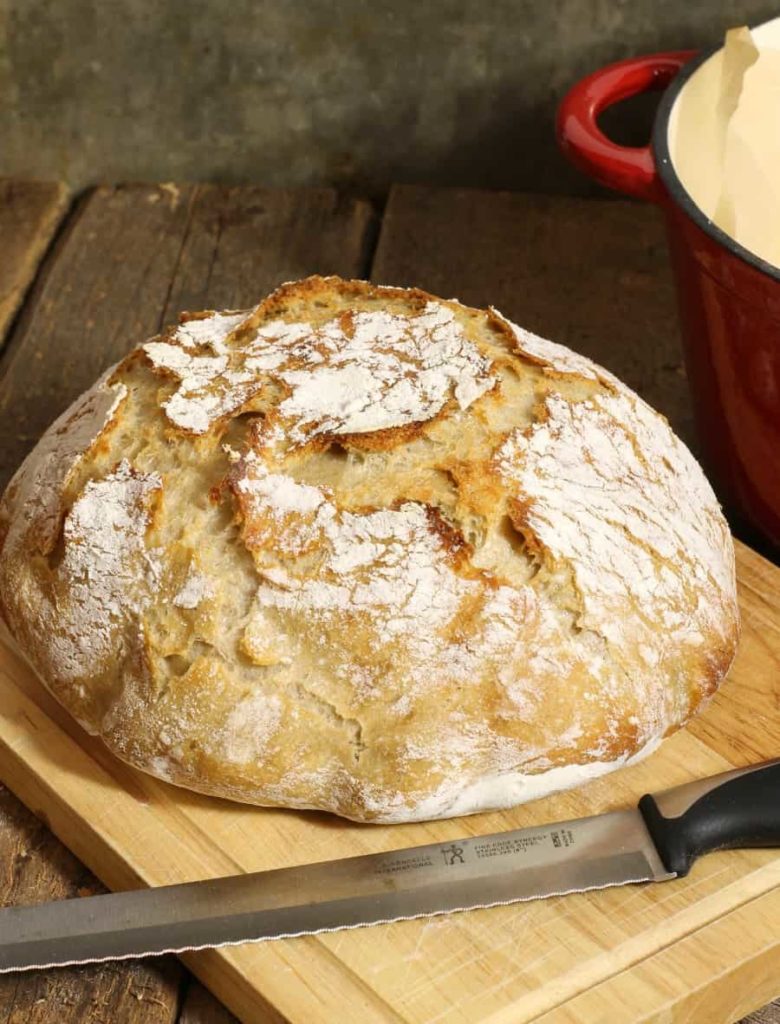
I love baking at home, and usually bake at least once a week. Sometimes I'll make a loaf of my homemade sandwich bread, which is great for weekday lunches, breakfast toast etc. When I'm in the mood for something heartier though I reach for this recipe and make a rustic loaf of old fashioned sourdough.
This post contains affiliate links for which I may be compensated if a purchase is made through the links provided. For more information please read my affiliate disclosure.
Before You Start...
There are a few things to keep in mind before starting this sourdough bread. As this is a 'no knead' recipe, (which also incorporates whole wheat flour), don't be surprised if the bread turns out denser then store bought sourdough.
Usually, kneading the dough develops the gluten strands which allows the dough to stretch while proofing, by not kneading this dough it will not become as stretchy.
To get around this, you can add ¾ teaspoon of instant yeast to flour. This helps create a stronger 'lift' in the dough especially when using whole wheat flours.
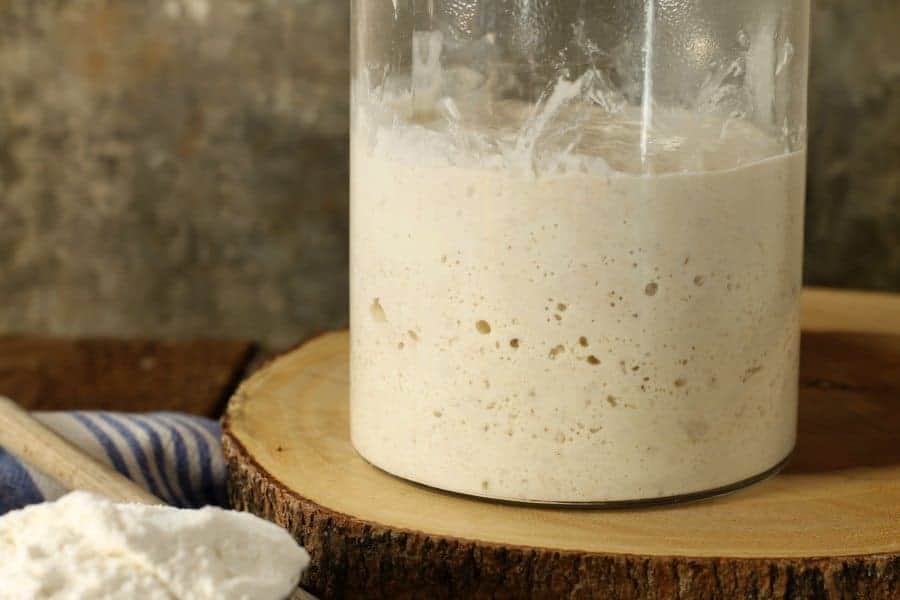
Before you begin, you will also need to have a mature sourdough starter which is active and ready for feeding.
The bread in this recipe has about 75% hydration. This means that 75% of the weight of the bread dough is water, making it quite soft and tacky.
In order to successfully bake this recipe, it is important to properly weigh out the ingredients. Wet your hands where indicated in the recipe to prevent the dough from sticking to your hands.
Prep Your Sourdough Starter
If you do not yet have a sourdough starter in the fridge or are planning on making one from scratch now, you'll need to plan ahead before making this recipe. Read how to make your own starter from scratch with the link below.
If you already have a starter, it's a good idea to take it out of the fridge in the morning, a day before you want to bake and feed it once with a little flour and water.
This will reactivate the wild yeasts and make them stronger for baking.
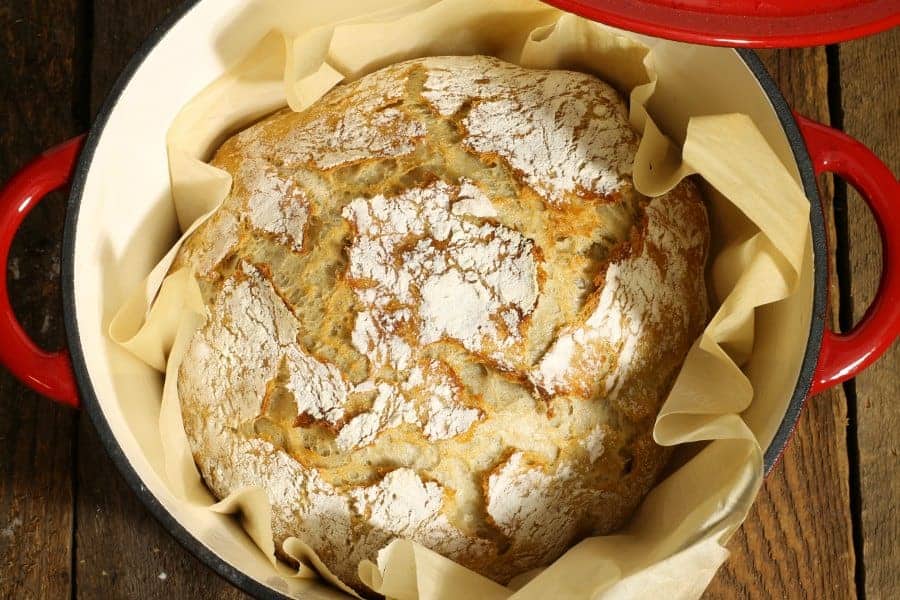
Equipment
In order to create the light texture and crackly crust of this rustic sourdough bread, a cast iron or enamelled dutch oven is used to bake the bread. We used a 6 quart dutch oven for this recipe.
Professional bakeries will use specialized ovens that have steam injection to create moist heat. The way around this is to use the dutch oven which locks in the moisture in the bread, preventing it from drying out as it bakes.
You'll also want a digital scale in order to accurately measure out all the ingredients. We've recently updated the recipe below to use weights instead of volume measurements as different brands/types of flour may measure differently.
Finally, we recommend using some parchment paper as well to prevent the dough from sticking to the dutch oven. I use PaperChef parchment paper (affiliate) which is designed to withstand high temperatures.
No Knead Sourdough Bread Ingredients
- 100 grams(½ cup) active and bubbly sourdough starter
- 300 grams (2 cups) unbleached all-purpose or bread flour
- 200 grams (1 ½ cups) whole wheat flour ( For all white sourdough, simply use all-purpose flour here)
- 375 grams (1 ½ cups) warm water
- 1 tsp. salt
- Extra flour for dusting
Measuring Out & Mixing Your No-Knead Sourdough Bread
The night before you plan on baking, measure out all the dry ingredients and check your re-activated sourdough starter. It should be nice and bubbly, and wanting to be fed. Feed the starter with at least ½ cup flour/ ½ cup water to ensure it is ready to go for the morning and that you'll have enough.
Note: The times listed below are meant to give you an idea of how long it takes to bake the bread. You can change these times to fit your schedule, for example by mixing and then fermenfing the dough overnight before shaping/baking in the morning..
Mixing - 8:00 am
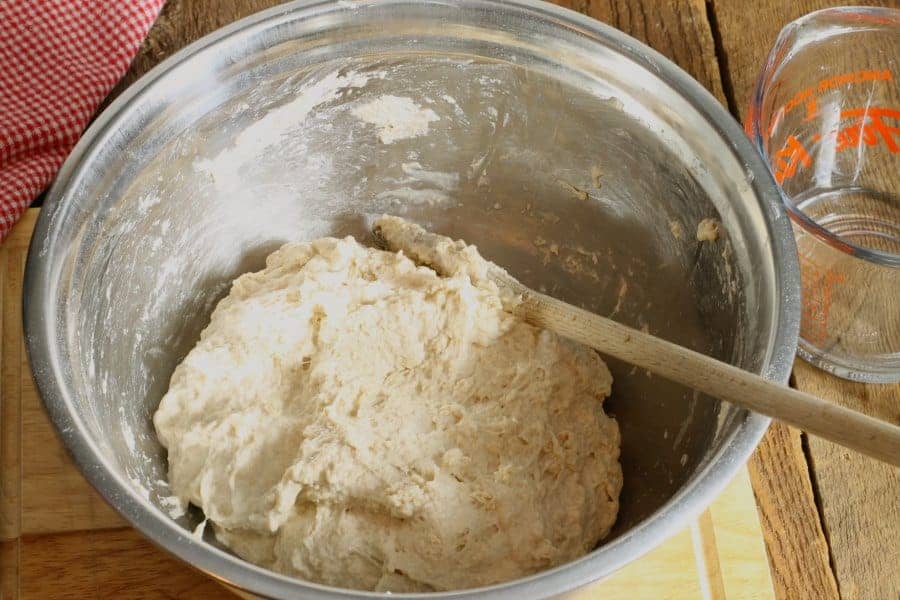
Mix all the pre-measured dry ingredients together in a large mixing bowl. In a separate bowl, weigh out the 100 grams of bubbly sourdough starter. Add the 375 grams of warm water to the starter and mix it all together. Pour the liquid ingredients into the dry, and mix with a wooden spoon until it forms a shaggy, sticky mass.
Cover the bowl with a clean linen cloth and let the sourdough sit on the counter for 20 minutes. This allows the flour to properly absorb all the water and become more workable.
Stretching - 8:20 am
After twenty minutes, wet your hands, and grabbing one end of the dough lift it up, and stretch/fold the dough over on itself. Repeat this 5-8 times turning the bowl a quarter turn each time until the dough starts to become smooth. You'll notice how much more structure and less shaggy the dough appears after doing this.
Fermentation - 8:30 am - 12:00 pm
Once you've stretched and folded the dough, it's time to let the dough have its first rise and ferment. This produces the distinct sour taste and helps leaven(rise) the dough. Cover the bowl with a clean linen cloth and set it in a location that is approximately 75F - 80F for roughly 3.5 hours.
(Note: If your home is cooler then this, the time frame may need to be pushed to 5 or 6 hours of fermentation. You can also let the dough ferment overnight for a more sour flavor.)
After the first 30 minutes of fermentation (at 9:00am), stretch and fold the dough 4 times with wet hands as you did in the last step. Do this a second time at the 1 hour mark (9:30 am). This helps provide structure and give shape to the final loaf as we are not kneading the dough.

Pre-shaping the dough - 12:00 pm
Wet your hands to prevent the dough from sticking to your hands, and scoop it out onto a clean countertop. Working quickly, shape it into a rough ball, and let it sit uncovered on the counter for 30 minutes to relax. It's ok if it sticks to the counter at this point.
Shaping a boule - 12:30 pm
Lightly flour a clean section of counter. Then flour your hands, and the top of the dough. Turn the dough over by using a bench scraper or a large chefs knife to scoop the dough up and turn it over. You'll have to do this quickly as the dough is fairly soft and will start to droop and stretch otherwise.
Once you've flipped the dough over, fold the bottom edge of the dough up to the middle. Take the sides and fold them inward, then fold the top edge down. Kind of like folding an envelope.
Roll the dough over so the 'seam' is down, then gently drag the dough across the counter to create tension across the top of the dough. Watch the video from The Perfect Loaf below to see how it's done!
Proofing - 12:45 pm
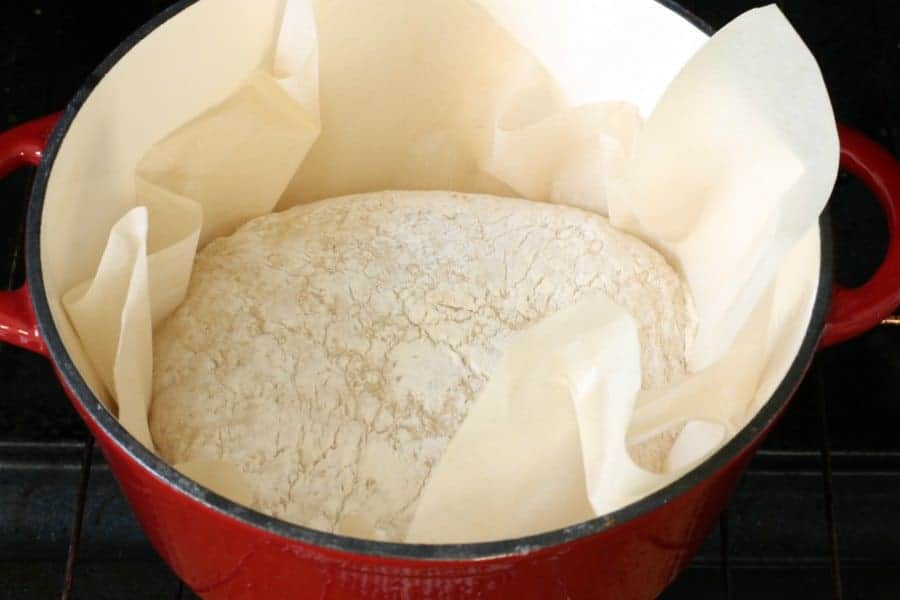
Gently transfer the shaped boule to a piece of parchment paper and then lift the parchment into a clean bowl with roughly the same diameter of your bread boule. This helps the bread keep its final shape as it proofs, and prevents it from spreading outwards. Cover the bowl and let it proof for about 1.5 -2 hours.
Baking - 2:15 pm
As the bread proofs, pre-heat your oven to 450F with the dutch oven and lid inside. Once you are ready to bake, very carefully remove the hot dutch oven from the oven.
At this point dust the shaped boule with flour or score it with a sharp knife. Gently lift the boule out of the proofing bowl using the parchment paper and transfer it to the hot dutch oven.
Return the hot Dutch oven to the oven with the lid in place and bake the bread for 30 minutes covered. After 30 minutes remove the lid and bake for another 10 minutes to crisp up the outside.
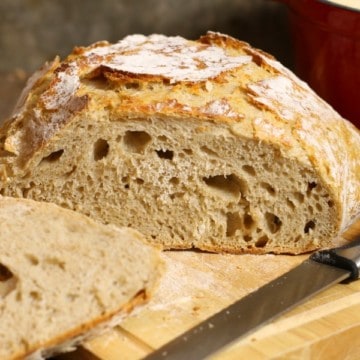
Remove the baked loaf of sourdough bread and let it cool on a wire rack. The no knead sourdough bread is best served within the next day or two, but it can be kept in the fridge for up to 4 days to extend its shelf life. Note that refrigerating the bread will make it denser and less fluffy.
Additional Notes
Here are a few additional notes, and tips many of which have been posed as questions about this recipe and will help you bake a successful loaf of bread:
- Can I Make This With 100% AP Flour? Yes you can. When first mixing the dough though, withhold about 30 grams of water. If after mixing the dough it seems very very dry, add a little more until it becomes tacky.
- Nothing Is Happening, My Bread Dough Hasnt Risen At All. In all likelihood, something has killed your starter or the starter was dead, to begin with. Make sure the starter has doubled in size from the night before, smells sour, and is visibly active. Using Unbleached flour will increase your chances of success.
- Can I Make The Bread More Sour? This sourdough bread is mildly sour due to the relatively short fermentation time. In order to increase the sourness, you can refrigerate the dough in the 'proofing' phase for 8-10 hours to slow and lengthen the time the bacteria has to make the dough more sour. Make sure to properly cover or bag the bowl to prevent the dough from drying out.
- My Dough Is Very Wet & Hard To Work With. With 75% hydration, this recipe is 'wetter' than a regular loaf of bread which has generally 60%-65% hydration. Make sure to let the dough rest for at least 20 minutes after mixing to properly hydrate the flour and then do the 'stretch and fold' to give it some structure. Make sure your hands are wet, and work quickly when doing so to prevent the dough from sticking to your hands. It does take some practice! If you still find the dough hard to work with, hold back 20-30 grams of water the next time you try the recipe.
- Switch It Up & Add Some Flavorings. Add 120 grams of chopped nuts, olives or dried fruit to the recipe. Or add ½ tablespoon chopped herbs and brush it with garlic and oil before baking! The options are endless!
Made the recipe? Comment & Rate it below, then take a picture and tag me on Facebook & Instagram: @earthfoodandfire . For more from scratch recipes follow me on Instagram & Pinterest
Recipe
No Knead Sourdough Bread
Ingredients
- 300 grams unbleached all purpose or bread flour
- 200 grams whole wheat flour
- 100 grams active and bubbly sourdough starter
- 375 grams warm water
- 1 tsp. salt
- Extra flour for dusting
Instructions
The Night Before
- The night before you plan on baking, measure out all the dry ingredients and check your re-activated sourdough starter. It should be nice and bubbly, and wanting to be fed. Feed the starter with at least ½ cup flour and ½ cup water to ensure it is ready to go for the morning and that you'll have enough.
Day Of Baking - Mixing
- Mix all the pre-measured dry ingredients together in a large mixing bowl. In a separate bowl, weigh out the 100 grams of bubbly sourdough starter. Add 375 grams of warm water to the starter and mix it all together. Pour the liquid ingredients into the dry, and mix with a wooden spoon until it forms a shaggy, sticky mass. Cover the bowl with a clean linen cloth and let the sourdough sit on the counter for 20 minutes.
Stretching
- After twenty minutes, wet your hands, and grabbing one end of the dough lift it up, and stretch/fold the dough over on itself. Repeat this 5-8 times, turning the bowl a quarter turn each time until the dough starts to become smooth.
Fermentation
- Once you've stretched and folded the dough, cover the bowl with a clean linen cloth and set it in a location that is approximately 75F - 80F for roughly 3.5 hours.After the first 30 minutes of fermentation, stretch and fold the dough 4 times with wet hands as you did in the last step. Do this a second time after another 30 minutes. Cover the bowl and let the dough finish fermenting.(Note: If your home is cooler then this, the time frame may need to be pushed to 4 or 4.5 hours of fermentation.)
Pre-shaping the dough
- Wet your hands to prevent the dough from sticking to your hands, and scoop it out onto a clean countertop. Working quickly, shape it into a rough ball, and let it sit uncovered on the counter for 30 minutes to relax.
Shaping a boule
- Lightly flour a clean section of counter. Then flour your hands, and the top of the dough. Turn the dough over by using a bench scraper or a large chefs knife to scoop the dough up and turn it over. Once flipped, fold the bottom edge of the dough up to the middle. Take the sides and fold them inward, then fold the top edge down. Kind of like folding an envelope. Roll the dough over so the 'seam' is down, then gently drag the dough across the counter to create tension across the top of the dough.
Proofing
- Gently transfer the shaped boule to a piece of parchment paper and then lift the parchment into a clean bowl with roughly the same diameter of your bread boule. This helps the bread keep its final shape as it proofs, and prevents it from spreading outwards. Cover the bowl and let it proof for about 1.5 - 2 hours, or until double in size.
Baking
- As the bread proofs, pre-heat your oven to 450F with the dutch oven and lid inside. Once you are ready to bake, very carefully remove the hot dutch oven from the oven.Dust the shaped boule with flour or score it with a sharp knife. Gently lift the boule out of the proofing bowl using the parchment paper and transfer it to the hot dutch oven.Return the hot Dutch oven to the oven with the lid in place and bake the bread for 30 minutes covered. After 30 minutes remove the lid and bake for another 10 minutes to crisp up the outside.
- Remove the baked loaf of sourdough bread and let it cool completly on a wire rack.
Notes
Nutrition
Nutrition info is auto-generated. This information is an estimate; if you are on a special diet, please use your own calculations.


Justlyn
This is my go to recipe for making the perfect loaf of sourdough bread! I found it at the start of the pandemic and have been using it ever since. My family LOVES it and I no longer buy store bought bread. Stores beautifully on the counter and freezes exceptionally well!
Sage
Can't wait to try this recipe out! I recently redid my kitchen, I'm talking refinished cabinets, new appliances, the whole shebang. Now that it's all done, I'm feeling so inspired to cook and bake. Homemade sourdough is top of my list! Thank you for sharing!
Holly
I’m so excited. I’ve followed your recipe this last week for the starter and I’m attempting my second loaf tonight! First loaf didn’t go too great because I forgot to pull my starter out of the fridge the night before to let it completely reactive. Instead I pulled it out of the fridge morning of, fed it, waited 2 hours and used it in the dough. Bad idea, don’t do this lol. My dough didn’t really rise at all and just didn’t work out. But I made the dough again today with my red starter that I left on the counter instead and I got great rises on each of my proofs. My oven is currently preheating with my Dutch oven in it and I’m so excited to bake and taste my hard work! Thank you for your awesome instructions!!
Chef Markus Mueller
That's great Holly! We'd love to see the finished results! You can tag us on Instagram and Facebook @earthfoodandfire !
Amber
I used your recipe for starter then this for making bread, it turned out amazing, my husband was so impressed. However, the second time I tried to make a loaf, it was not nearly as good—very dense and doughy. I ended up throwing out my whole starter and doing it all over again with same result. First loaf was perfect, two weeks later second loaf dense doughy. Can you provide more information on maintaining the starter? When I made the first loaf from freshly made starter, I scooped out 100g for recipe then put remainder in refrigerator. One week later I took it out, added 2/3c flour and 1/3c water, stirred it up and put it back in refrigerator. When I went to bake again, nite before I scooped out 50g, added 50g flour and 50g water, let stand on counter with linen cloth cover over nite then made bread as directed using 100g and discarded the left over that had been out. I know your recipe suggests feeding starter nite before with 1/2c flour and 1/2c water but do you mean the entire tub of starter from the refrigerator or a specific portion? I feel like my second loaf problems lay with the starter, could be wrong of course, I’m new on the sourdough scene. Help me, please.
Chef Markus Mueller
Hey Amber, Glad you had such success with your first loaf. What I would do if you are storing the starter in the fridge (which is fine), is to take the entire starter out and feed it and let it become fully active again before measuring out the 100 grams needed for the bread recipe. Depending on your local room temp/humidity etc, how long it takes to become active again may vary. Generally speaking though, I would take the whole starter out a day or so before you plan to bake in order to get it a good feeding and warm up before starting the bread making. Once it's fully active again (so doubled in size, bubbly, and sour-smelling), take the 100 grams of active starter, and 'feed' it with the bread recipe ingredients. Any leftover starter not used to make the bread is returned to the fridge for next time. I hope that clears it up.
Teri
Any recipes for cracked wheat sour dough? Or how to incorporate cracked wheat into your no knead recipe? I love this recipe! Would really like to make it with cracked wheat. Thank you.
Chef Markus Mueller
Hey Teri, I have never added cracked wheat to this recipe, but I would simply try and start by adding 1/4 cup of cracked wheat into the recipe and see what happens. You'll probably need to soak or boil the cracked wheat first...take this into account when making the recipe as it will be adding moisture to the ratio. Never hurts to try and see what happens!
Cynthia Lockhart
Hi! Can I save the starter for another batch of bread?
Chef Markus Mueller
Hey Cynthia, you certainly can. If you have any starter left, just feed it again to 'grow' it until you have enough to bake with.
If you used it all, you can take a piece of dough from your sourdough loaf before baking and 'feed' that. It will act as the starter does. You'll just need to adjust it's consistancy as you feed it.
Barb
Hi! At the Proofing step, if the dough is refrigerated overnight, does it need to be at room temp before putting in the oven? Or can it go right in cold?
Chef Markus Mueller
Hi Barb, If the loaf has been shaped and proofed in the fridge, it should be able to go right into the oven. I would suggest doing the fermentation overnight in the fridge as opposed to the proofing though, as you'll have more control over the size of the boule if you only let it proof for an hour or so at room temp before baking as opposed to letting it proof overnight, and it might get way to big and collapse in the oven as it bakes.
Teri
When is the best time to add olives & some fresh rosemary? Love this recipe & instructions. I’m new to the sourdough baking (quarantine) and have made my share of mistakes— I just keep trying. Thanks for your time.
Chef Markus Mueller
Hi Teri, I would personally add the ingredients after initially mixing the dough, but before fermentation. After fermentation, you begin to shape the boule, and if you then have to re-mix the entire dough to incorporate new ingredients, I would worry the loaf will become too dense.
Kristin
I've tried this recipe several times and get rave reviews from my family and friends. Today after I let the dough rest on the counter and before creating the boule I divided the dough into four and four little loafs. We did bread bowls with broccoli cheddar soup and they turned out amazing! I just shortened the cook time to 25 minute with lid on and 8 with lid off and they were perfect...and really the 8 with the lid off was only cause our oven tends to have a hard time holding heat. Love it!
Chef Markus Mueller
Thanks for the review Kristin. What a good idea making bread bowls for soup! I should do that as a recipe post!
jennifer
My 4th loaf just came out of the oven! And this one looks like it is going to be the best.
I like the new directions- (first 3 loaves were with the old directions)
Holding it in a bowl before baking made a huge difference for me- it mostly held shape baking and rose nicely.
My question is- I have a larger oval Dutch oven- can I add an additional 50% or double this recipe to fill the pot more and make a larger loaf? What might the baking time look like?
Thanks!
Chef Markus Mueller
Hey Jennifer. Glad you like the new instructions.
Yes you can double the recipe you will have to adjust the cooking time though. Probably not twice as long, but I would go 10 minutes longer to start, and then check it...etc.
Erin
I have not made this yet, however, as I was reading it through, I wanted to say how much I appreciate your actual timeline where you set specific times to do each step. That is a lifesaver and I cannot wait to try this ?
Chef Markus Mueller
Hi Erin, I'm glad you like the timeline. I thought it might be helpful to give an overview of the process. Keep in mind the times are approximations and proofing/fermentation may take longer or go quicker depending on your starter, room temperature etc. Happy baking!
Owen Kemp
In reading your bread sourdough bread recipe, it says: The bread in this recipe has about 75% hydration. This means that "75% of the weight of the bread dough is water", making it quite soft and tacky.
Does that mean the water is 3 times heavier than the flour in this recipe? That's the way I read it, so I am a bit confused. Or is the water actually 75% as heavy as the flour... I am about to make my first loaf of sourdough bread and want to make sure I understand the ratios. Thanks!!! 🙂
Chef Markus Mueller
Hi Owen, The percentage given is the baker's percentage indicating the amount of water in relation to the amount of flour. Bakers percentages are used to easily and accurately scale bread and other baking recipes. In this case, the hydration level (75%) is obtained by dividing the amount of water(in grams) by the total amount of flour in the recipe and then multiplying by 100. In this case 375/500x100=75. You can read a more detailed description of what bakers percentages are here : What are bakers percentages?
Jacky
I've used this sourdough recipe and also the starter that goes with it. These two recipes turn out the best of all the ones I've tried. I will definitely keep this one and continue to use it!
Chef Markus Mueller
Thanks Jacky! Glad you are enjoying both recipes. Take a picture and tag us on social media if you like! (@earthfoodandfire)
Kristin
I skipped the second stretches during fermentation both times I made the bread because for one I’m forgetful, and for two, the first loaf came out fine without it. Now that I’ve made it again and it came out perfectly, I’d say those two additional stretches during fermentation are definitely optional. I tagged the page in my Instagram!
Chef Markus Mueller
Hi Kristin! The Sourdough can be very forgiving especially when it comes to stretching the dough in this recipe. The stretching does help create structure though, which in turn helps the boule hold its shape as it proofs. Again, depending on the flour used though, you may not need it especially if you are not fermenting it that long. Glad you enjoyed the recipe and the bread!
Ria
Perfection! I used a combination of 3 different starters for my 1st attempt, as I am not really a baker but, more of an experimental chef, (equal parts slurry delicate white, sturdier whole wheat & a bold rye starter). All the rest of your steps were followed faithfully & I used Sarah Owens scoring style. I wish I could add a picture. Best bread baking results EVER! TY TY TY!
After letting it cool & cutting a slice I will let it proof in the fridge for a bit longer next time. This will be my go-to sourdough recipe.
Chef Markus Mueller
Way to go! Baking is very much trial and error, especially sourdough baking as the starter cultures ill vary so much from household to household. We'd love to see pictures if you have them! Tag us on social media @earthfoodandfire (Facebook & Instagram) or @earthfoodfire on twitter.
Alisha
Chef Markus, help! My crumb keeps coming out super dense and loaf doesn't really rise. What am I doing wrong?
Chef Markus Mueller
Hi Alisha, I'll need a little bit more info to help you troubleshoot. What kind of flour are you using? How old is your starter? How warm is your home?/ What temperature are you fermenting at? How long are you fermenting the dough for? Are you weighing out the ingredients properly? Are you doing the 'stretch' & 'fold' at the various stages as described in the recipe?
Let me know and we can try and figure out what is going on!
Erika
I am making this bread for the second time. My family loves SOUR sourdough, so I have been letting the dough rise overnight. The first time, I think the bowl i let it rise in was too small as it had risen so much that it stuck to the towel draped over the top. I picked off the hard crust, continued with the recipe and it came out wonderfully. This time, I used a larger bowl and when i checked it before going to bed it had risen quite a bit, so i changed the towel for plastic wrap just in case. When I checked it this morning, it had fallen and is looks very wet. I removed the plastic wrap and replaced the towel and put it in a warm spot. Is this dough going to be okay?
Chef Markus Mueller
Hi Erika, I apologize for the delayed response. The dough will likely be fine, though it may come out dense when baked. What you described sounds to me like the perfect description of the sourdough bacteria completing its life cycle. The dough rises as the starter feeds on the newly added flour and water during the initial fermentation, then as it sits overnight the bacteria slowly start to become less active and die off as they have consumed all the food, resulting in the dough sinking back down. To me it sounds like fermenting it overnight may be too long in your case (this can be due to very rapid fermentation at a warm temperature for example). The second time when the dough seemed so wet was likely because you covered it with plastic wrap and it wasn't able to breathe as it fermented and condensation likely dripped back onto the dough making it appear wet.
It sounds like you had let it ferment for a little while already before going to bed. Couple that with a solid 6-8 hours overnight fermentation, there simply may not be enough active bacteria left to produce a fluffy loaf.
My advice would be to either mix the dough literally right before bed to cut down the fermentation time, or fermenting it in the fridge overnight. Take it out in the morning, shape it and then proof it for 2-3 hours before baking.
I hope this helps!
Erika
I cut my losses and tried again a few days later. A little less time on the proofing and it came out beautifully! Thank you so much for your response.
Chef Markus Mueller
You're welcome Erika! Glad you loved the recipe!
Pane-Bistecca
I made the bread and blogged it on my food blog. It is one of the best breads I have ever baked!!! Thank you for that, I will bake it over and over again, as it really is very much to our taste!
http://pane-bistecca.com/2020/05/02/sauerteig-no-knead-brot-sourdough-no-knead-bread/
many thanks
Wilma
Chef Markus Mueller
Hi Wilma, Glad you enjoyed the recipe! It looks like it turned out great!
Kristina
I just found your recipe last month and have been making it several times a week with my new starter. When I found the changed recipe tonight I was kind of bummed because the previous instructions were so quick and easy. That’s why I loved it! And it was the best sourdough bread I’ve had anywhere outside of San Francisco. Truly perfect and simple. Could you possibly post the previous “old and unimproved” directions?
Chef Markus Mueller
Good Morning Kristina,
We changed the recipe to weights in grams because it is much more accurate than measuring by volume(cups). We were receiving a lot of questions from people about the recipe not working etc due to the fact the volume measurements can vary significantly depending on the type of flour used to the measuring cups themselves. By using weights everyone can be sure they are using the same amounts as when we tested the recipe. We lowered the amount of starter in the recipe because it’s not really necessary to have that much starter if yours is active and mature. Since everyone’s starter is different(texture, strength etc) it removes some of the variable results people are getting.
As you noticed we also updated the method to make it easier to follow. It now includes a few stretches of the dough as well as being able to bake the dough in one day as opposed to two, and provides a timeline people can follow if they choose to. These re-written instructions will help create a moister, lighter loaf of bread with easier to follow instructions. The times shown are just a guide, and you can alter then to suit your own schedule.
If you look closely, the method is not really that different then before though. The only ‘steps’ added are letting the dough rest as well as stretching the dough a few times before fermenting it. This will help give the loaf a better shape and allow it to become lighter and less dense as it proofs.
I encourage you to try the new method, I am sure you will enjoy the results. If you do want to follow the old instructions just mix all the ingredients the night before, let it ferment overnight, then go right to the shaping step in the morning. Let the dough proof on the parchment until double in size and then bake it at as directed.
Chef Markus
Kristina
Thank you so much for your response. It continues to be the best bread I've ever made.
Shannon
Hi there! Just passed this recipe on to a friend, and looking at it again I noticed it says 100 gr or 1/2 cup of starter. When I made mine yesterday the recipe had asked for 1 1/2 cups... pretty sure it should be 1 1/2 right!?
Second time making this bread and absolutely LOVING it by the way! Thankyou!
Chef Markus Mueller
Hi Shannon, Glad to hear you love it!
We actually just updated the recipe to use weights in grams because it is much more accurate than measuring by volume(cups). We were receiving a lot of questions from people about the recipe not working etc due to the fact the volume measurements can vary significantly depending on the type of flour used to the measuring cups themselves. By using weights everyone can be sure they are using the same amounts as when we tested the recipe. We lowered the amount of starter in the recipe because it’s not really necessary to have that much starter if yours is active and mature. Since everyone’s starter is different(texture, strength etc) it removes some of the variable results people were getting.
Happy Baking!
Christie
I've pinned this recipe and made it at least 5 times with great success. I went to put it together tonight to find it has all been changed to grams. Could you include your old measurements as well? Why mess with a good thing?
Chef Markus Mueller
Hi Christi I'm glad you've enjoyed the recipe so far. I've just re-added the cups measurement in brackets in the post itself.
We changed the recipe to weights in grams because it is much more accurate. We where receiving a lot of questions from people about the recipe not working etc due to the fact the volume measurements can vary significantly from type of flour used to the measuring cup itself. By using weights everyone can be sure they are using the same amounts as when we tested the recipe.
You'll notice we also updated the method to make it easier to follow. It now includes a few stretches of the dough as well as being able to bake the dough in one day as opposed to two. This will help create a moister, lighter loaf of bread.
If you are so inclined though, you can still mix and then ferment the dough overnight as you did before, then shape and bake the bread in the morning.
Chef Markus
Bev
Hi. Just wondering if the starter should smell like vinegar? I’m on day 4. Can’t wait to try the recipes. Thanks for making it so easy.
Chef Markus Mueller
Hi Bev, the starter should smell sour. A vinegary smell can occur depending on how quickly your starter is fermenting. It's not a bad thing, each starter is different. As long as its bubbly, and actively rising with no signs of mold you are fine.
Jan Erickson
This made a beautiful loaf! My first time making sourdough a sourdough starter and bread. I used all white flour and kneaded it for maybe 5 minutes. Everything went just like the recipe. I live at 6200 ft altitude and followed the recipe exactly. Thank you—
Chef Markus Mueller
You're welcome Jan! Glad you liked the recipe. If you have a picture tag us on social media! ( @ earthfoodandfire)
Colleen
Unfortunately we don't have parchment paper or oven-friendly wax paper. Can we just grease the pan before putting the bread in?
I made this once before and loved the bread, but I made the mistake of using a wax paper that seeped into the bottom of the bread during cooking. Trying to avoid that this time around!
Thanks!
Chef Markus Mueller
Hi Colleen,
Yikes! Yes wax paper won't be heat proof at that temperature. If you don't have parchment paper simply greasing the Dutch oven should be fine.
Kfkoy
Hi Chef,
I will be using a pizza stone for baking. Will the temp and time be the same? I am a first timer with this bread making thing. Please let me know soon as I am on my second rise and I don’t want to mess it up.
Kfkoy
Chef Markus Mueller
Hey there, I would only guess that the temperature and time would be the same as I have not made this recipe on a pizza stone.. The dutch oven helps contain some of the moisture the bread releases as it bakes, giving it extra oven rise. You obviously won't get this with the pizza stone. I would recommend putting a heatproof dish of water in the oven as it pre-heats to 450. leave it in as the bread bakes. The bread will be done when it reaches an internal temperature of 200-210F.
Kfkoy
Thanks! I’m going to give it a go!
Sharon
My absolute go to recipe for sourdough- can be adapted in so many ways. Thanks you for finally making my sourdough dream come true!! Even in lock down we can enjoy fabulous bread.
Chef Markus Mueller
You're very welcome Sharon! So glad you love it. The dough can be tricky at first especially since different types of flour absorb water differently, but once you get the hang of it, it's a great little loaf!
Monica Dupuis
Two different amounts of starter and flours were given. FIrst when you were describing the different procedures, after “EQUIPMENT”, then later on in the recipe itself. Very confusing! First time it says 1 c. of starter and a total of 3+ 2 1/2 c. different flours. Then later the recipe says 1 1/2 c. starter and 2+ 1 1/2 c. flours. First I followed the first batch of measurements, then I came upon another different amounts, which were quite different. I added more starter but too much flour had been added. Most likely I will have to throw out my dough. Usually I can depend on Allrecipes.
Chef Markus Mueller
Hi Monica, Our apologies we are working on updating the recipe to include weights as well as make it less dense (though no-knead bread is naturally denser since it's not kneaded.) It seems there was an error on the back end that resulted in different measurements being shown in two places(the post and the recipe card), we have updated the post to fix this, and will update the recipe with weight measurements once we have finished testing to make the recipe even better.
Chef Markus
Ashley
Hello, at the top of this page the Ingredients calls 1 cup sourdough starter and 5 1/2 cups of flour, and then at the bottom of the page it lists the ingredients again and there is 1 1/2 cups starter and only 3 1/2 cups flour so I’m confused. Can you help clarify which is the right recipe to follow? Thank you!
Chef Markus Mueller
Hi Ashley, Our apologies we are working on updating the recipe to include weights as well as make it less dense (though no-knead bread is naturally denser since it's not kneaded.) It seems there was an error on the back end that resulted in different measurements being shown in two places(the post and the recipe card), we have updated the post to fix this, and will update the recipe with weight measurements once we have finished testing.
Chef Markus
Lara
I made this recipe a couple times, LOVED it, and passed it on to a few friends. Now I came back to make it again and the recipe is different (besides just the conversion to weight measurements). I liked it exactly the way I made it about a month ago. Is it possible for you to send me that version of the recipe (That called for 1 cup starter)? I’d like to try this new version too, but I want to use the tried and true first if I can.
Chef Markus Mueller
Hi Lara, Glad to hear you love the recipe!
We changed the recipe to weights in grams because it is much more accurate than measuring by volume(cups). We were receiving a lot of questions from people about the recipe not working etc due to the fact the volume measurements can vary significantly depending on the type of flour used to the measuring cups themselves. By using weights everyone can be sure they are using the same amounts as when we tested the recipe. We lowered the amount of starter in the recipe because it's not really necessary to have that much starter if yours is active and mature. Since everyone's starter is different(texture, strength etc) it removes some of the variable results people are getting.
As you noticed we also updated the method to make it easier to follow. It now includes a few stretches of the dough as well as being able to bake the dough in one day as opposed to two, and provides a timeline people can follow if they choose to. This new method will help create a moister, lighter loaf of bread with easier to follow instructions. The times shown are just a guide, you can alter then to suit your own schedule. If you look closely, the method is not really that different then before though. The only 'steps' added are letting the dough rest as well as stretching the dough before fermenting it. This will help give the loaf a better shape and allow it to become lighter and less dense as it proofs.
I encourage you to try the new method, I am sure you will enjoy the results. If you do want to follow the old instructions just mix all the ingredients the night before, let it ferment overnight, then go right to the shaping step in the morning. Let the dough proof on the parchment until double in size and then bake it at as directed.
Chef Markus
Lesli
I just tried this. Thanks for the great instructions! Did you notice that the recipe is written twice In this post and the ingredient amounts are different? I only used 1 c. starter accordI got to the first list. I added some yeast and only used white flour as it’s all I can get right now in quarantine. Hopefully it won’t rise too much overnight.
Chef Markus Mueller
Hi Leslie, Our apologies we are working on updating the recipe to include weights as well as make it less dense (though no-knead bread is naturally denser since it's not kneaded.) It seems there was an error on the back end that resulted in different measurements being shown in two places(the post and the recipe card), we have updated the post to fix this, and will update the recipe with weight measurements once we have finished testing.
Chef Markus
Caroline
This was my first attempt at making sourdough bread and I was rather nervous! No need! The starter took about 6 days before it was ready and the dough was so easy to make. The result was a perfect loaf that looked and tasted good. Thank you for such a great recipe!
Chef Markus Mueller
Awesome!If you took a picture, feel free to share it with us all and tag us on social media! (@earthfoodandfire)
Frances
Thank you for such a user friendly recipe. Worked wonderfully and resulted in my first successful artisanal loaf! The fermentation was quick (4 hours+), and it rose well. Been babying my starter for a few months with sluggish results, using discard for various recipes but nothing like this. I almost killed her last week accidentally by preheating the oven while inside resting but strained the inner liquid into a new jar immediately and it seemed to have shocked her to life!
Chef Markus Mueller
Hey Frances, yikes! Glad the starter didn't die on you, and you got it back to life! That's an easy mistake to make though.
Glad you enjoyed the recipe!
Megan
Is there a version using weight measurements instead of by cups?
Thanks
Chef Markus Mueller
Hi Megan, I am currently working on adding that to the recipe. Give me a few days to get it tested.
Ashleigh
I’m going to echo what others have said. I’m disappointed with the changes you made to the instructions. You took something that was wonderful in its simplicity and made it complicated and slightly overwhelming. The new measurements are fine but what was wrong with “mix everything together and leave it on your counter overnight”?
Chef Markus Mueller
Hi Ashleigh, as was mentioned in the previous responses, the change was made to make the recipe more workable for everyone.
The only thing that was changed in the directions was adding in the half-hour for 'stretching' of the dough as well as a half-hour for resting it before shaping. The'example timeline' to help readers get an idea of how long it could take to make the bread is just that, an example. Feel free to start the bread the night before just as you had been doing and simply let the bread sit overnight to ferment, then shape, and bake in the morning. When you start the bread doesn't matter. Where you will see the biggest change in results is by doing the stretching and resting of the dough. The bread will have much more structure, and become fluffier and softer.
The problem with the previous instruction of "mix and let sit overnight" is that as we have readers all across North America, some are located in warmer climates. If they were to let the dough ferment at those very warm temperatures all night long, all the bacteria would be done feeding before you get to the 'shaping' part, essentially using up all the rising power before the bread has even been shaped. This results in a dense loaf of bread. By shortening the fermentation period to 6-8 hours over the course of one day, everyone is guaranteed to have a wonderfully soft loaf of bread. We aim to help all our readers bake, and cook successful recipes, not just have the shortest instructions around.
Hopefully, you will still use the recipe. You can, of course, change the timeline to suit your own needs.
Have a wonderful weekend,
Chef Markus
Amy
I followed this recipe & measured using cups but ended up with a very soupy dough that I couldn’t form I to a loaf. Could you please add weight measurements? I’ve been baking bread with a scale for about a year and it’s much easier. That might help with the liquid to flour ratio.
Chef Markus Mueller
Hi Amy. I am actually working on this at the very moment (my dough is currently proofing on the counter), as not all measuring cups are made the same. Stay tuned for an updated recipe in the next few days.
Anne
What is the minimum size of the starter jar? What size is the dutch oven please?
Chef Markus Mueller
Hi Anne, do you mean the starter jar used to make a sourdough starter? I use a 750ml yogurt container for that. Once I mix the dough in this bread recipe I simply use a large metal mixing bowl. The dutch oven I used is a 5 quart size.
Brianne
I'm not sure if mine will work. Like others, there was confusion regarding measurements. I only had 1 cup of starter and the dough was ridiculously dry with 3.5 cups flour. I added a little more warm water to get the dough sticky. I used a linen towel to cover my dough while it rose but in the morning I discovered that the top had dried and crusted so it wouldn't rise much. I tried to shape it but it just went flat. Hoping I can get something edible out of this! Disappointed since it is my first time making sourdough bread. Should have read comments and other tips on internet first so I'd know that a towel or cloth is NOT recommended so it won't dry out.
Chef Markus Mueller
Good Morning Brianne, sorry to hear you are having trouble with the recipe.
I'm a little confused by your comment. Why would the dough dry out more by covering it with a linen cloth?
It's important to remember that different flours absorb water differently, (ie:. Whole wheat flour can take much more water then all purpose, ) so depending on what kind of flour used it can make the initial mixture drier then anticipated. Add a little more water was a good idea.
Even with just one cup of active starter, this should have easily doubled in size overnight while fermenting.
I am working on adding weights to the recipe and using a levain to make it more accurate for everyone.
Douglas Murray
I did not have 1.5 cups of sourdough starter (and my starter was rather soupy), so I used only a cu and (mistakenly?) made up for some of the missing liquid by adding 1/3 cup buttermilk. I also added 3/4 tsp instant yeast just in case my sourdough wasn't very potent. The bread rose beautifully and had a wonderful fragrance--nutty and really delicious--and delightful look, with lots of airholes. But ive iwhen I turned it out on the floured board, the dough was too sticky and really impossible to work I went ahead and did the best I could. I suppose I will give it a bit more time to proof and rise again., then bake as directed. I will let you know what happened. My two questions: is it ok to combine some yeast with this recipe and should I try to make up for the lost liquid?
Chef Markus Mueller
Hi Douglas, Using some yeast to help boost the rise is fine. Adding some extra buttermilk won't hurt, though maybe why your dough was so liquid. I am currently re-testing the recipe as I've had a few readers say the dough is very wet. It may be due to the types of flour used etc, but I would like it to be more foolproof. Keep an eye out here for the updated version in the next few days.
Allison
My dough has been proofing from 11am till now 11pm. It still has not doubled in size yet. I don’t know what I did wrong, I followed the Recipe exactly. Does this mean I need to start over?
Chef Markus Mueller
Hi Allison, if after 12 hours nothing has happened, your starter is likely dead or was not strong enough to make anything happen in that time. You can test your starter with the float test( see if a spoon full of starter will float in water..if it sinks it's not ready).
If you are sure the starter was good to go, using chlorinated water for example may kill it in the recipe itself.
You will likely need to start over, or add more starter/ flour to your current bread dough batch (or double it...a strong starter should bring it back.) , but that may of course skew the end result.
jaime
This is easily the best result I have gotten from a dutch oven bread! I did knead it for a few minutes after initially mixing, and it rose beautifully on my counter in just 7 hours. One thing both my husband and I noticed though, was that it really had no sourness to it. I used the sourdough starter that I've had for ages.
Would letting it sit in the fridge all day/overnight after that initial mixing help develop the flavour?
Chef Markus Mueller
Hi Jaime, Glad you loved the recipe. Yes letting the dough sit out longer should make it more sour! If snapped a pic, tag us on social media! @earthfoodandfire !
Jaime
Great! Would you suggest putting it in the fridge overnight?
Stephanie
Loved this recipe! And the sourdough starter was just as easy and wonderful to make! Thank you
Chef Markus Mueller
Glad you enjoyed the bread recipe Stephanie! Thanks for tagging us on social media!
jude
With our social distancing I don't have whole wheat flour - just all purpose. Will this be OK or should I wait until I can get bread flour and whole wheat? I am anxious to try the recipe as written but for now substitutions are all I have . . .
Chef Markus Mueller
Hi Jude, all purpose flour should be the. Though I would initially reduce the amount of water by 1/4 cup to ensure the dough is not to wet.
Julie
I too have a big bowl of soupy dough. It is still very liquidy. There 3 cups of liquid when you consider the starter. I used all purpose flour for all 3 1/2 cups of flour. Should there be more? I am going to try baking this anyway to see what I get. Any advise?
Chef Markus Mueller
Hi Julie, I'm sorry to hear your having some troubles.
To start, the sourdough starter shouldn't be soupy or liquidy...it should have a thick bubbly consistency. Thinner then a bread dough but not liquid. As such I would disagree that you have 3.5 cups of liquid.
After mixing the starter, flour, water etc the dough should be a sticky mass as shown in the pictures in the post. If it's liquidy after initially mixing, I would add half a cup of flour at a time until you get a thicker texture.
After the dough has proofed and doubled in size, yes it will be quite thin and wobbly, but if you add to much more flour, you will get a very dense loaf of bread.
I will try and put together a video of the recipe soon to help give better visual queues to what the individual steps look like.
Markus
Susan
Seriously easy, beautiful and tasty. I altered it slightly. Using only 1 c whole wheat flour and the rest white. Wish I could send a picture. Don’t think I’ll ever buy bread again!
Chef Markus Mueller
Fantastic! That's great Susan! If you make another loaf, snap a quick picture and tag us on social media! I'd love to see it! @earthfoodandfire
Tammy Hall
Absolute perfection!! Followed recipe. Delicious!!
Chef Markus Mueller
Thanks Tammy! Glad you loved it!
Dan
Hi Markus,
I am new to cast iron dutch oven baking.
I follow instructions to the T on your recipe---and others, and the bottoms are always over done.
Any advice would be appreciated.
Chef Markus Mueller
Hi Dan, glad to hear you love using your cast iron Dutch oven! These types of recipes will naturally have a 'more well done' bottom due to the fact that the cast iron is already hot when you place the dough inside it. It essentially starts cooking the bottom right away. You could try putting it in a cold (or slightly warmed) Dutch oven and then playing with the baking then to make sure the loaf is fully baked. This way you don't get that extreme heat from underneath right away. If your oven is a conventional oven(no fan circulating air) make sure the rack is not right on the bottom above the heating element, as this will also increase the heat from beneath.
Hope this helps!
Dan
Thank you, I am going to do that on the next go.
Thanks again and I will let you know the results.
Dan
Beth
Wonderful!! Great in every way! Used all white bread flour and added 1/4 tsp yeast. Let rise 8 hours in warm home (74 degrees). Baked as instructed. Perfection! Thank you Chef Markus!
Chef Markus Mueller
Glad to hear it, Beth! Thanks for your comment! If you have any pictures of the bread, I'd love to see it! Tag us on social media @earthfoodandfire!
Lisa DePoorter
I’m not sure what I did wrong ?? I tried this recipe and let it sit overnight in the oven. No draft. Next morning couldn’t do anything with it way too sticky. I added a bunch more flour just so I could work with it Any ideas ?
Chef Markus Mueller
Hi Lisa, after sitting overnight, the dough will be quite wet and tacky, this is normal. While it will easily stick to your hands, it shouldn't be 'liquid' though and still be one large gloopy mass. Turn it out onto a well-floured surface and follow the instructions for shaping it as described above. If you add to much flour to make it 'drier', the bread will be very dense.
Hope that helps,
Chef Markus
Jenny
I apologize if I missed this possibly being answered already. Does putting a small amount of water in the oven separate from the dutch oven help make it yummier?
Chef Markus Mueller
Hi Jenny, adding water in a separate dish helps create a crispier crust! So arguably it is yummier yes!
Julie
So if my starter isn’t doubling in size by the 24hrs what do I need to do? I see that it is bubbling so it has something going on. Do I wait to feed it or feed it anyway. I’m moving it to a warmer location.
Chef Markus Mueller
Hi Julie, I would suggest being patient, it can take a little while to get going, keep feeding it as normal and move it to a warmer location. If you don't see any real action within the first 3 days I would suggest starting over.
Nancy Mcleary
One more question,
I do not have a linen cloth, is it ok to use cheese cloth instead?
I can’t rate the recipe yet as I have not baked my first loaf yet. Two more days to go! My mouth is already watering!
Chef Markus Mueller
Hey again! Yes, you can use any breathable cloth or cover. The key is to keep dirt/dust/flies out as the dough proofs/rises!
Nancy Mcleary
I am on day 3 of making my starter. Looks great! I have only been baking my own bread for a few months and I’m hooked! I’ve only made no knead artisan bread though. I just love sourdough and decided to use your wonderfully clear and easy to follow recipe! All my other breads are very yummy! But they don’t rise more than about 2-3 inches. Is this normal? I do not want this to happen with my sourdough bread.. I’m using cast aluminum, due to arthritis I can’t lift cast iron.
Chef Markus Mueller
Hi Nancy, the aluminum shouldn't affect the rise. It is most likely due to a week starter, I would try feeding the starter a little longer before using it in a recipe. The starter should easily double in size after feeding, (and within 24 hours) before using it in a bread recipe. I'm glad you enjoy the recipes though!
Naiomi Weiss
Hi there, I was wondering where I can buy the sour dough starter.
Chef Markus Mueller
Hi Naiomi,
The sourdough starter is unfortunately something you are better off making from scratch. You can ask around at local farmers markets, depending on where you are, someone may be willing to sell you a starter.
Otherwise I would suggest making your own starter with this guide :
https://www.earthfoodandfire.com/how-to-make-sourdough-starter/
Good luck with the baking!
Chef Markus Mueller
David Humphrey
Sorry, computer acting up. Just saw the answer to my question below. 🙁
Chef Markus Mueller
No problem David! Hope you had it work out ok!
David Humphrey
During the overnight rise, should the bowl be left uncovered ?
Laurie Maruschak
For anyone that is looking for a sourdough recipe and can't decide on one. Pick this one, it is easy to follow, the recipe is bulletproof,the instructions are clear and the bread is top notch. My first attempt at went perfect right up to 15 minutes into baking the bread and that's went the power went out. I fired up the bbq got it up to 450 finished the baking with the lid on, still no power so I removed the lid and finished baking the bread on the bbq. It turned out perfect. I have shared this recipe and loaves of bread with friends they all love it.
Chef Markus Mueller
Hi Laurie, So glad to hear The bread turned out great despite the power going out! Good thinking with the BBQ! Thank you so much for sharing the recipe with your friends!
Annie
Great recipe!! Tastes wonderful and really good texture. Very well written and understandable instructions, thank you!
Chef Markus Mueller
Thanks Annie, I'm glad you enjoyed the recipe!
Donna Wooldridge
Great recipe! Super easy too. I've made sourdough bread twice now and had excellent results.
Chef Markus Mueller
Wonderful! Glad To hear you enjoyed the recipe Donna.
Chef Markus
Susan L Sanderson
I tried it again with a "sturdier" sourdough starter and it has turned out great. My starter had been 100% hydrated but I revamped the process and this is delicious!
Chef Markus Mueller
Wonderful! Glad that it worked out for you this time Susan.
Chef Markus
Hope
Hi Chef Markus,
Could you please say something about the dough should "look quite loose in the bowl"? My dough never looks like that - it sticks to the bowl. Is it perhaps too wet?
Chef Markus Mueller
Hi Hope, by "quite loose' I mean that it will be fairly wet and jiggly, not thick and firm as a 'yeast dough' would be at that stage. As the sourdough ferments and works its way through the dough, it will double in volume and become a lot thinner in texture making it seem wet or lose.
Hope Maltz
Thanks so much for your response!
Susan
Not sure what went wrong but there was NO WAY this was forming into any kind of a boule. The dough was super wet. 3.5 cups of flour and 3 cups of liquid doesn't compute--what did I miss here!
Chef Markus Mueller
Hey Susan,
I'm sorry to hear the recipe didn't work out for you.
You said you used 3 cups of water and 3.5 cups of flour.
While the dough is fairly wet, I would encourage you to try the recipe again, but note that the recipe only calls for 1.5 cups of water and not 3 cups
I've copied the full ingredients below.
(Also note that your sourdough starter should by no means be liquid, but rather a thick gooy texture.)
1 1/2 cup active and bubbly sourdough starter
2 cups unbleached all purpose or bread flour
1 1/2 cups whole wheat flour ( For all white sourdough, simply use all purpose flour here)
1 1/2 cups warm water
1 tsp. salt
Extra flour for dusting
Happy baking!
Chef Markus
Krystyna
Hi Mark,
I just made it. It SOOOO good!. Thank you for this!
Do you think that it would be possible to add some black olives in the first mixing? Just for a different variety?
Chef Markus Mueller
Hi Krystyna, so glad you enjoyed the recipe! You sure could add olives, I would suggest letting them drip dry first though so you dont throw off the moisture content! Have fun baking!
Lesley
Chef Markus,
Once again, thank you kindly!
Best,
Lesley
Lesley
Hi again Chef Markus,
Thank you so much for your lengthy and informative reply!
I too hate using plastic so your suggestion to wet the cloth is a great one. Thanks! I’ll certainly do that and I never place it directly on the dough.
Getting back to higher altitude and it being hotter and drier, what you can you recommend I do to accommodate this? Add more liquid when I’m mixing the dough, raise and/or reduce oven temperature and bake time? Can I add whole-wheat flour when feeding the starter to strengthen it?
I have made a number of loaves now and thrown them out ?. They have beautiful holes as sourdough should have but they are heavy and most times don’t have a good rise. I’m determined to get this right because I’ve just moved from Vancouver to the Kootenays and in Vancouver I made beautiful sourdough (never bought bread) but I lost my starter when I got here. I really want to make bread again and will work at it until I get it right!
Your time and professional input is greatly appreciated!
Lesley
Chef Markus Mueller
Hey Leslie, I would suggest cutting the flour back first before adding more water. Start by removing maybe 1/8th of the overall flour and see what happens. If you find your sourdough starter weak, simply adding whole wheat flour will not strengthen it. You need to feed it longer increasing its mass and bacteria count. It should easily be able to double in size after feeding and letting it sit for a few hours. Here is a link on a few other tips when baking sourdough at high temperature ( I have personally never done so). https://www.culturesforhealth.com/learn/sourdough/how-altitude-affects-sourdough-baking/
Chef Markus
Lesley
Hi Mark,
I have made my starter which is bubbly and sour smelling. I added 1-1/2 cups to the rest of the ingredients. Firstly .... should it be 1 or 1-1/2 cups and secondly by covering the rising dough with a linen cloth it seems to create a hardish crust over top of the dough which I’m thinking is preventing it from rising. Can I use plastic wrap to cover the bowl instead? Also, note that I’m at an altitude of just over 3,000 ft where it’s hot and dry. How would it alter the bread if I were to knead it in a machine with a dough hook?
Your thoughts would be greatly appreciated!
Thanks.
Chef Markus Mueller
Hi Lesley,
You are correct it is 1.5 cups of sourdough starter you add to the rest of the bread ingredients. You want to add enough of the starter to give the bacteria the best chance possible to ferment quickly and rise the bread dough.
Using a linen cloth should not really affect the dough while it is fermenting. You mention hot and dry conditions, which are likely the cause for this instead. It could also be that your starter is simply not strong enough. You could try feeding the starter for another week to build strength before using it. You could use plastic wrap sure, but I hate using it and always advocate for a waste less option. You could try wetting the cloth and draping that over the bowl to keep moisture in. (note the cloth should not touch the dough directly in any case).
Baking at high altitudes always affects cooking and baking. Generally baking at higher altitudes results in bread which rises faster due to lower air pressure. Drier air also has a tendency to dry out flour/ dough.
You could use a mixer to mix the dough sure, with a mixer though you run the risk of over kneading the dough which could lead to a denser loaf. But go ahead and try it out!
Have Fun,
Chef Markus
Cheryl
Would you be able to give the dry ingredients in grams? I find it hard to measure accurately in cups, and I've not found a reliable conversion website. Thanks.
Chef Markus Mueller
Hi Cheryl, sure thing! A good thing to note with bread, it is not as finicky as baking a cake for example, if you are off by a gram or so it won't make a huge difference. It's more about the ratio being correct.
256 grams unbleached all purpose flour or 280 grams bread flour
169.5 grams whole wheat flour
1 1/2 cup active and bubbly sourdough starter (don't currently have an active starter to weigh, but I can guarantee measuring out 1.5 cups with any measuring cup will work)
5 grams salt
354 ml warm water
Hope this helps!
Cheryl
Thank you, Markus. I asked as, although I am not new to bread-making, I am new to making sourdough and everything went really well until I got to putting the dough together. I used a well-known flour manufacturer's conversion chart, but the actual dough seemed really wet. Not knowing whether this was right or not, I went ahead and baked it, but it came out way too dense (even for sourdough) - tasted great though! I'm going to have another try this Easter weekend.
Rachael
I dont have a dutch oven. Could I use a cast iron skillet?
Chef Markus Mueller
Hi Rachael, you could use a cast iron skillet yes! Snap a pic for us and tag us once you bake it! @earthfoodandfire
Tana
Chef Markus,
I've wanted to learn how to make sourdough starter and bread and I found your guide and recipe and I made this bread tonight after successfully making my own starter with your handy guide. Turned out great! My first loaf of sourdough bread, after 30+ years of bread baking, I have graduated to sourdough, yay! Thanks for great instruction!
Chef Markus Mueller
So glad you had tried both the recipes and they worked wonderfully! I always love hearing back from my readers, so thank you!
Chef Markus
Juliana Fendez
I did a little variation and found that the bread turned out better if I didn't preheat my cast iron pan. I extended the cooking time to 35 minutes with the lid on and 10 ore with the lid off, all at 450. It also raised a little higher and the sourdough flavor seemed to stand out more. I think the natural yeast shocks easier and gradually raising the temp makes a difference.
Chef Markus Mueller
Interesting, i'll try it out as well and update the recipe with both sets of instructions!
Anthony Horahan
I used Rye flour in place I'd the wheat flour and this is easily the best loaf of sourdough that I have ever made. I also cheated and used yeast to cut short the time frame.
Chris
Ohh, I love this idea! My bread is cooling now. My next loaf I'm going to use the rye flour in, too!
Chef Markus Mueller
Fantastic! Let me know how it turns out! @earthfoodandfire
Claudia Lamascolo
my husband loves sour dough bread. I will have to get some starter going so I can make this one
Chef Markus Mueller
Awesome! Let me know how it turns out! I have an easy to follow sourdough starter guide, if you need to make one from scratch!
Adrianne
I wish I was having some of this hot on the table for breakfast today! Yum.
Chef Markus Mueller
Slathered with butter and a fresh jam perhaps!? MMMMM!
Suzy
Nothing like freshly baked bread!
Chef Markus Mueller
Agreed!
Pam Greer
I haven't fed my starter in a while. I need to give him some good feedings and then make this bread! Your instructions are perfect and your bread is gorgeous!
Chef Markus Mueller
I'd love to see how your bread turns out when you bake it! tag us on instagram! @earthfoodandfire
Ellen
That is one gorgeous loaf of bread. My son loves sourdough. I'll have to make a starter so I can make some for him.
Chef Markus Mueller
Do it!! I have a super easy sourdough starter guide you can use here! I hope it helps!
Randy
I don't have a dutch oven, can I bake this in an uncovered bread loaf pan wih the same results. If I need to adjust something, what will I adjust
Markus Mueller
Hi Randy, I have to say that I have never tried this. In theory, sure you can bake it in a uncovered bread pan. It may not have quite as much 'oven rise' though. The covered dutch oven helps keep moisture in the bread and allows the bacteria to 'rise the dough' a little longer before being killed by the high heat.
I would suggest baking it at 375F in this case. If you try this, please take a picture and tag me on social media. I'd love to see how it turns out.
Chef Markus
Deborah Leader
What a beautiful loaf! And your step by step instructions are so divine, I feel like I'm standing in the kitchen with you. Thanks for sharing. Will be pinning this for later.
holly wall
hi again Mark - in the instructions it says 1 1/2 cups starter, but in the 'ingredients' it says 1 cup...
2 cups unbleached all purpose or bread flour
1 1/2 cups whole wheat flour
1 cup active and bubbly sourdough starter
1 tsp. salt
1 1/2 cups warm water
Extra flour for dusting
thank you Mark - your step by step is AWESOME!!!! i can't wait to try it!!!!