
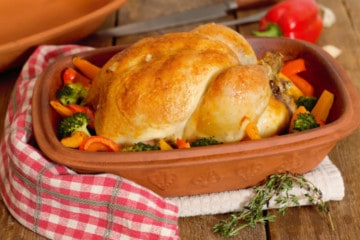
Whether you've used a clay pot (such as a Römertopf) before or this is your first try at using one, this clay pot chicken with sweet bell peppers and broccoli is an easy recipe to follow.
We'll walk you through all the steps to ensure your clay pot baked chicken comes out perfectly! The best part is there is 'almost' no work to be done!

You may have read about the wonderful cooking attributes that a Römertopf or other similar clay baking dishes lend to the food that is prepared in them. If not you can read more about the history of clay bakers, why they work, and how to use them in our guide: What is Clay Pot Cooking.
This post contains affiliate links for which we may be compensated if a purchase is made through the links provided at no extra cost to you. For more information, please read our affiliate disclosure.
Baked Clay Pot Chicken With Sweet Bell Peppers And Broccoli
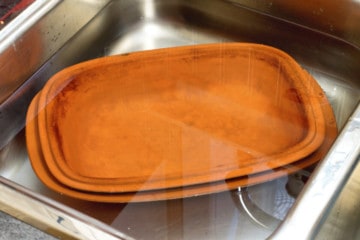
Before we jump into the recipe, it goes without saying that you'll need a clay pot such as a Römertopf or a EURITA CLAY ROASTER. You can purchase one online brand new, or check out second hand stores in your area. Sometimes you'll get lucky and find a used one cheap!
The secret to properly using a clay baker to roast your chicken is to make sure it has been soaked in water for about 15 minutes before cooking with it. This ensures the clay can absorb enough moisture to properly cook all the food we're going to place inside it.

As the clay baker (and this is regardless of brand), is soaking follow the directions below to prepare your chicken and vegetables for cooking.
Ingredients
Make sure you have:
- 1 clay pot
- 1 whole 3-5lb chicken
- 1 medium Spanish onion
- 1 small red bell pepper
- 1 small yellow bell pepper
- 1 small head of broccoli
- 4 cloves garlic
- 2 lb baby red potatoes
- ½ white wine
- 2-4 sprigs of fresh thyme
- salt, pepper, and paprika
Instructions
- As mentioned above, the very first thing you should do is fully submerge your clay baker in cold water.
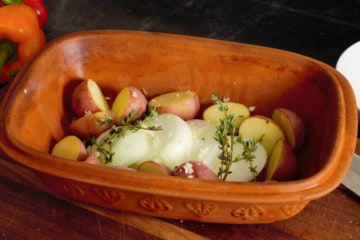
- Start preparing your food items by washing all the produce. Cut the baby red potatoes in half. Peel and roughly chop the Spanish onion and garlic cloves. Remove the bell pepper cores and seeds, then slice the pepper into finger-width sticks. Remove the broccoli stem, and cut the remaining broccoli into little florets.


- Set aside the bell peppers and broccoli as they will be added later in the cooking process.
- Next, wash the chicken and remove any neck or giblets that may be inside the body cavity. (Set these aside, or freeze them for later use in chicken stock.) Pat the chicken dry, and brush it with a splash of oil. Season the chicken with salt, pepper, and paprika.
- Remove the clay baker from the water and add the roughly chopped garlic, Spanish onion, and white wine to the bottom of the pot. Add the halved baby red potatoes and thyme sprigs around the outer edges. You can also add the neck and giblets here if you wish.

- Place the whole raw chicken on top of the chopped onion mixture. Season the veggies with salt, and pepper.

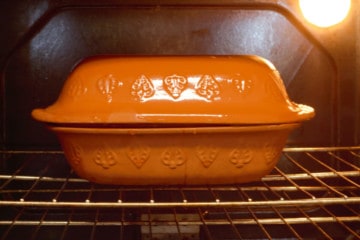
- Place the clay baker cover on top of the clay baker base, and place the entire dish in the COLD oven on the middle rack. (If your oven heats with elements from above, place the clay baker closer to the bottom of the oven.)
- Set the oven to 425F and then set a timer for 90 minutes. It is important to place the filled clay baker in a cold oven to prevent sudden temperature shock and breaking of the clay dish.

- After 90 minutes, check on the chicken by opening the oven, and gently removing the clay lid with oven gloves. Place it on a dishtowel to prevent damaging the clay or your counter! Remember it is very hot!
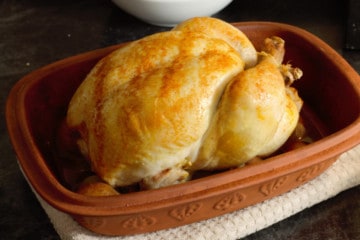
- Mix the reserved bell peppers and broccoli florets in a bowl and toss with a little oil. Carefully place the bell pepper slices and broccoli florets around the chicken, making sure it is evenly distributed. Return the clay baker to the oven without the lid, and roast for 10-15 minutes. This will help crisp the chicken skin, and lightly broil the peppers and broccoli.

Once the chicken skin has crisped up, carefully remove the hot clay bake from the oven, and place it on a heat-resistant cloth or pot holder.
The chicken and accompanying vegetables are now ready to serve!

What About All That Liquid In The Bottom?
Once the chicken has been cooked, you'll notice a bunch of liquid that seems to have appeared out of nowhere in the bottom of the pot! This is a natural pan jus that seeps from the chicken and vegetables as it cooks.
It is absolutely jam-packed with flavor and makes a fantastic gravy! Just strain out the liquid, and thicken it in a separate pot on the stove. You can find out how you could use various thickeners to make gravy with this liquid in this guide: How To Thicken Soups, Sauces, and More!
You can also use this liquid to make a wonderful chicken soup with any leftover chicken meat!
Clean Up
Once you've feasted on this delicious chicken, make sure you pack up any leftovers in appropriate containers and refrigerate them.
The clay pot should then be scrubbed with a stiff bristle brush and hot water to remove any baked-on bits. Stains are ok, but you want to avoid using soap if possible to prevent the porous clay from absorbing it.


Can You Make This Recipe Without A Clay Pot?
Don't have a clay pot at home, or ordered one but it hasn't arrived yet? You can in theory still make this recipe at home! Simply follow any other roast chicken recipe for times and temperatures, and sub in the veggies listed above. Of course, the chicken won't be as tender and juicy though!
Made the recipe? Comment & Rate it below, then take a picture and tag me on Facebook. For more from scratch recipes, follow me on Facebook & Pinterest.
Recipe

Clay Pot Chicken With Bell Peppers & Broccoli
Equipment
Ingredients
- 1 3-5lb whole chicken
- 1 medium Spanish onion
- 1 small red bell pepper
- 1 small yellow bell pepper
- 1 small head of broccoli
- 4 cloves garlic
- 2 lb baby red potatoes
- ½ cup white wine
- 2-4 sprigs fresh thyme
- 1 tablespoon paprika
- 1 pinch salt
- 1 pinch pepper
Instructions
- Fully submerge your clay baker in cold water and let it soak for 15 minutes.
- Cut the baby red potatoes in half. Peel and roughly chop the Spanish onion and garlic cloves. Remove the bell pepper cores and seeds, then slice the pepper into finger-width sticks. Remove the broccoli stem, and cut the remaining broccoli into little florets. Set the bell peppers and broccoli aside as they will be added later in the cooking process.

- Wash the chicken and remove any neck or giblets that may be inside the body cavity. Pat the chicken dry, and brush it with a splash of oil. Season the chicken with salt, pepper, and paprika.
- Remove the clay baker from the water, and place the roughly chopped garlic, Spanish onion, and white wine in the bottom of the pot. Place the halved baby red potatoes, and thyme sprigs around the outer edges of the pot. You can also place the neck and giblets here if you wish. Place the whole raw chicken on top of the chopped onion mixture. Season the potatoes with salt, and pepper.
- Cover the clay pot with the wet lid and place the entire dish in the COLD oven on the middle rack. Set the oven to 425F and then set a timer for 90 minutes.
- After 90 minutes, check on the chicken by opening the oven, and gently removing the clay lid with oven gloves. Place it on a dishtowel to prevent damaging the clay or your counter, remember it is very hot!
- Mix the reserved bell peppers and broccoli florets in a bowl and toss with a little oil. Carefully place the bell pepper slices and broccoli florets around the chicken. Return the clay baker to the oven without the lid, and roast for 10-15 minutes.

- Once the chicken skin has crisped up and the bell pepper and broccoli is lightly broiled, carefully remove the hot clay bake from the oven. Place it on a heat resistant cloth or pot holder, and serve.


Notes
- Always soak your clay pot in water for 15 minutes before using to ensure enough moisture is available to steam the contents.
- It is important to always place the filled clay baker in a COLD oven to prevent sudden temperature shock and breaking of the clay dish.
- After cooking strain the flavor packed broth from the clay pot and thicken it for the best gravy you'll ever eat!
Nutrition
Nutrition info is auto-generated. This information is an estimate; if you are on a special diet, please use your own calculations.


Bernadette Finzel
The recipe was wonderful and the chicken tasted amazing but I think I'll go with a lower temperature next time around as my clay pot (which is a hand down from my in-laws) got quite dark, almost black around the rims and edges after 90 minutes and there was little moisture left in the pot. It was soaked over 20 min. before hand. I added plenty of vegetables. I think next time I'll try 400f or even 375f and see how it goes. Otherwise it was very good.
Chef Markus Mueller
Thanks for the feedback on the temperature Bernadette. Different ovens do heat differently and the higher temp could very well be to hot in your situation. I agree a lower temperature with adjusted cooking time may be good to try. Don't be afraid to add liquid to the pot if you feel it's to dry ..just be careful and gentle moving the hot clay lid during cooking!
Kate
The chicken tasted amazing! The ingredients complimented each other well and the clay pot chicken was so moist! Great recipe