If you found your way here, you're probably in the same boat I was in about a year ago:
Sick and tired of working yourself to the bone and no longer enjoying your work. You need a change, at the very least a new hobby. So you want to start a blog and maybe even make some money blogging!
I love food, cooking, and gardening, and I wanted to be able to share that with other people. What better way to do that I thought than with my own blog?
There is a lot to learn though as a beginner blogger, and I want you to be able to avoid all the mistakes I made,and the things I had to learn along the way myself. With this guide I want to show you how you can go about starting your own blog without the headaches.
Some of the links in this post lead to affiliate sites through which Earth, Food, and Fire may earn a small commission (at no increased cost to you) should you make a purchase. This allows us to stay online and keep creating awesome content! For more info check the Affiliate Disclaimer. All opinions are 100% my own and I never recommend anything I wouldn't use myself!
So You Want To Start A Blog | PART 1
In this guide, you'll learn the basics required to actually starting a blog on WordPress, how to customize it, what essential plugins you should have installed to start, and some basic legal stuff that every website should have before being launched. All this can be applied to starting a food blog, lifestyle blog, travel blog, the basics all stay the same.
Feel free to jump between the sections if you're looking for specific information.
Things to Know Before starting a Blog
-Choosing a name for your blog
-Choosing a Host - Free or Self-Hosted
The Fun Stuff - Customizing Your Blog
-Introduce Yourself & Going Live
Earth, Food, and Fire has been live for just over a year now, and despite not being able to say I can retire from my day job(yet), the blog has become self-sustaining.
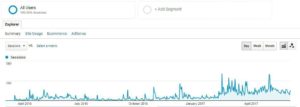
In other words, the site is generating enough income through ad impressions, to pay for hosting on Bluehost and other tools I use to make blogging easier (which we will go over in more detail in So you want to start a blog | Part 2 which is coming soon!). This was really one major goal I wanted to accomplish in my first year of blogging. I really wanted prove to myself that besides starting a food blog for fun, it could also turn into something more and make me some money on the side.
Before You Start Blogging
The internet is a vast space, and with the right information and tools, anyone can become a successful blogger despite the seemingly overwhelming odds. Do me one favor though and don't be fooled by all the posts out there stating they have thousands of page views and are making hundreds of dollars after just a few months.
While this is certainly possible, it is absolutely not the reality for the majority of bloggers. Unless you devout yourself to a food blog 100% (building a blog takes time), most bloggers who do this for fun or just on the side see a slow yet steady increase in traffic and income as the blog progresses. That being said, don't be discouraged, there are a lot of things that I didn't know, which would have made my journey that much smoother and easier.
So how do you go about setting up your own food blog (or any blog really)?
Before you do anything technical like buying a domain and setting up hosting, claiming social media accounts and signing up for accounts on Google, Yahoo, and Yandex, it's a good idea to figure out what you really want to blog about first. Take notes, write down ideas, and brain storm what your goals are. Laying things out on paper helps you plan, set goals and figure out why you really want to start a blog.

Pick a topic or subject that you are:
- Passionate about
- Knowledgeable on
- Can teach others about
You want to be able to provide information others are looking for. The easiest way for people to find their way to your site is by providing an answer to a question they have. Think about how you use the internet yourself. When using a search engine like Google, what do you search for? Do the results provide the answer or solution to your problem/question? Ideally, you want your content(blog posts/recipes, whatever you blog about )to provide what your audience is searching for. Tools such as the ones created by MOZ are wonderful for doing content research, and finding out what people are looking for and searching online.

Take this guide for example. I created it because I see so many new bloggers asking the same questions. How do I properly set up my blog? Which hosting service is best? What are the basics I need before going live? Should I have content posted before going live? What is SEO and how do I implement it?
Picking a topic such as food itself is very broad and there are already so many food blogs out there it can be hard to stand out, especially at the beginning of your blogging journey.
PICK A NICHE
This where a niche comes in. If you can narrow the topic down to something more specific you can more easily target a specific group of people (your target demographic or audience) who are interested in that. Baking, for example, is a very popular niche, although healthy eating and diet specific blogs seem to be growing in number these days.
For me, the topic(s) I wanted to blog about were food, gardening for food, and outdoor cooking. I love the outdoors and connecting that with what I do professionally (cook good food!) seemed like a natural fit.
CHOOSING A NAME FOR YOUR BLOG
Once you have your topic and demographic identified, its time to pick a name! For many, this can take some time, but that's ok! Ideally, you want the name of your blog to be catchy, and relevant to your subject.

In my case, the name Earth, Food, and Fire was an evolution from the idea of the natural elements Earth, Water, Wind, & Fire. Earth, Food, and Fire are the basic elements needed to grow, prepare, and cook good food at home.
Once you have a name picked out, run it through a domain name checker such as this one from Bluehost and see if it is available as a domain name (your website address.)
Having your blog name as your web address is great for several reasons:
- It's an important component of good SEO practices.
- It will make your blog look and feel more professional.
- It's easy for people to remember and find you.
If a domain name is available with your chosen blog title, make sure you claim this name on social media channels as well. Even if you don't plan on using all social media channels right away, it's a good idea to create an account under your chosen name so that it can not be claimed by someone else. This can lead to headaches and even costly issues later on. If you are dead set on using your chosen blog title you may need to buy the name back from someone else! Once you have this squared away you're ready for the next step.
You may also want to consider having a logo created for your blog!
CHOOSING A HOST - FREE OR SELF-HOSTED
In order for your website to be visible and searchable by other people, it needs to have a home. Here you have two options. Picking a self-hosted site or hosting your site on a free service such as WordPress.com
While signing up for a free service such as WordPress.com is certainly an option and can be a good to start, (especially if you only ever want to blog as a hobby or are not sure if blogging is right for you), there are some basic restrictions you'll face in the long run.
-You won't be able to fully customize your blog with themes, plugins etc
-Your domain name(web addresses) will look something like this:
mynewfoodblog.wordpress.com
-most importantly, you won't be able to make any kind of revenue with ads unless you have over 25 000 page views a month.
For a full comparison of self hosted wordpress.org vs the free wordpress.com read the Beginners Guide to Self Hosted WordPress.org vs. Free WordPress.com over on WPBeginner.
If you are serious about starting a blog and potentially turning it into a business or making some money on the side, you'll need to self host a website. This means you'll buy a domain name, and then "rent" space on a server where your website will operate from.
Unless you are incredibly tech savvy and can set up your own server at home you will need what's called a web host. There are a large number of free and paid web hosts available, all offering various benefits and incentives to get you on board. You will want to pick a Shared Hosting Plan or a Managed WordPress Hosting Plan to get started.
The difference between the two is that with Shared Hosting your website will be sharing space with many other sites on a single server, and while the server may not be geared directly towards your site, shared plans generally have unlimited amount of monthly visitors and are a great starting point for hosting a blog.
Managed WordPress Hosting often dedicates more server space to your site and is optimized to specifically hosting a WordPress site. Unfortunately the number of monthly visitors is usually capped at a set amount, at which point you'd need to upgrade your hosting plan in order for people to keep visiting your site. WordPress Hosting generally costs more but provides better service for your website. I'll cover some of the more popular hosting options below, but ultimately picking the host and plan is up to you.
So many decisions right!?
If you want other bloggers and companies to take you seriously I would highly recommend choosing a self-hosted domain that offers the WordPress platform such as through Bluehost. Bluehost is who I am currently hosting with and would recommend as a starting point for your blog.

Bluehost offers an easy to use dashboard that even beginners can use, an integrated email account, unlimited amount of monthly visitors, web security, 24/7 customer service, and they will even take care of registering your domain name for free (which may cost extra with other services, you need to own the domain name before you can park it on a server)! Most importantly for anyone starting out blogging, Bluehost offers very affordable price plans and 1-click WordPress installation.
Starting at 3.95 dollars per month for the basic shared hosting plan you will get everything you need to start a food blog. More expensive shared plans will offer features such as extra security, more storage for larger sites, backups and dedicated IP addresses which will increase the speed of your site and allow for an SSL certificate(a feature that google is now placing more importance on).
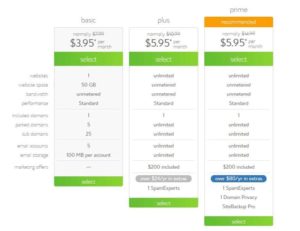
Bluehost also offers optimised hosting for WordPress starting at 19.99 /month, which includes a dedicated IP (and free SSL certification), 30gb of backups and more, but limits monthly visitors to 100 million ( though this should be way more than enough for you to start out with).Once you've decided on which plan you want to use, you simply need to register and set up your blue host account.

Siteground is another very popular hosting option for setting up a blog. While both shared and managed WordPress plans begin at 3.95/month they limit the monthly visitors to 10,000 people before having to upgrade to the next plan which is 5.95/month.
The nice thing about Siteground is that all plans offer a full suite of services from the get go, which you would have to pay extra for with other hosting services. Included are a dedicated IP and SSL certificate, automatic WordPress updates and security, one daily backup, drag and drop website builder, email and more. Check out the full list of features here. If you can get past the limit of monthly visitors Siteground is the way to go. I personally didn't want to risk hitting that limit early (since you have no idea how popular your site may be!), and have my site become unavailable to visitors which is why I chose Bluehost in the beginning.

The last hosting service I want to talk about is WPOPT. If you are serious about blogging long term and can afford it, this is the hosting service you want to choose. Specializing in managed WordPress hosting for 19.95/month the beginner plan offers essentially everything Siteground offers but with a higher limit of 100,000 visitors. A privately owned company run by a tech specialist( Charles), you will essentially never have an issue with your site and his hosting service comes highly recommended by many food bloggers. He also offers one on one website design and optimization services (SEO audits) to help your site run at its best. Make sure to read the detailed info on all his hosting plans.
These three hosting services for self hosted WordPress sites offer everything you need to get started blogging, and showcase the variety of plans available to you. Make sure to read through the information each company provides for their hosting plans, and then pick the one that best suites your needs. If you're just looking to quickly get set up with a basic plan, you can feel safe knowing any of these plans will have you covered for your first few years of blogging (at least!!).
Once you have registered a domain name and set up a hosting service, spend a few hours browsing your Hosting Dashboard to familiarize yourself with everything you can do here. Some tasks you can complete include things like installing the WordPress software on your website, accessing your email account, lots of advanced technical stuff (things you don't need to worry about yet), and usually site security options such as backup options and Content Delivery Network options.
CUSTOMIZING YOUR BLOG
Once you have registered & set up your domain(website) and installed the WordPress platform, your site is not yet live and will display an "under construction page" if any one happens to stumble upon it (we'll talk about how to get people to visit site in a bit).
You will need to set up a theme, install a few plugins and maybe even create some content before 'going live' and making your website searchable and visible to the general public.
CHOOSING A THEME
The first thing you will want to do is select a theme for your new blog. The theme is the basic visual layout your website will display to your visitors. Your theme will dictate fonts, color schemes, menu locations and more for your site. There are many free and paid themes available and as with anything in life, you get what you pay for.
Paid themes are generally more user friendly, have a professional look and feel, are accompanied by support and regular updates, and often offer a mobile version as well. A good theme will ensure the site structure uses proper SEO practices to make you more visible in search engines such as Google, Bing, and Yandex. A paid theme will usually cost you anywhere from 40-100 dollars depending on the theme and what's included.

Theme forest offers a vast collection of paid themes by various developers. Essentially a large theme library you can search for specific features instead of searching google for individual developers and themes. You can even just search 'food blog' to bring up a list of themes suitable for creating a food blog.
Themes such as:
are all popularly used in food blogs. Notice how they offer similar features, yet the look and feel of each layout is different? Check out the live demo for each theme to really get a feel for them and find out what you like.

A favorite theme developer of mine is WPZOOM. They offer a large selection of professional, yet reasonably priced themes with great customer service and regular updates. I am currently saving up for the Foodica Theme and am hoping to upgrade the look of Earth, Food, and Fire this summer! Check out the Foodica Theme Demo and stay tuned for upcoming changes on Earth, Food, and Fire soon!.
Keep in mind that themes are generally quite customize-able and you can change the colours and layouts to an extent. Most themes will offer an 'import demo' option to quickly set up your site with the same look and feel of the themes preview.

If you don't want to or don't have the money to start with a paid theme, you can always choose a free theme from the WordPress Theme Directory. The theme I started out with and am currently using is called Shamrock.
It's a simple theme that is easy to customize with logo, colors etc, and had everything I wanted at the time!
ESSENTIAL PLUGINS
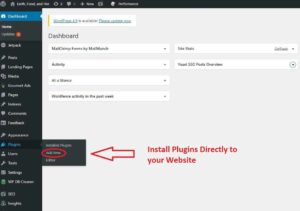
After installing your theme, the next step required in learning how to set up a blog is very easy. Installing essential plugins! Plugins are extensions you can add to your site which make it easier for your visitors to use, provide you with analytics, improve the over all search engine optimization, and create email signup forms to list a few functions. There are literally thousands of plugins available (both free and paid) so I will only go over the ones which I feel will give you a head start in creating a professional website.
You can search for any of the plugins listed below in the WordPress Plugin Directory. For easy installation to your site search for the plugin from your sites Dashboard. Click the links below to read more about their functions and detailed information.
Yoast SEO - this plugin is a must have in my opinion. While it can be intimidating to set up at first, it provides a number of functions that other plugins do individually, and honestly I've found yoast to give better results. The plugin will automatically create an .xml site map for you which you will have to submit to search engines such as Google and Bing in their respective webmaster consoles. This is essentially a road map for your site that the search engine will use to index your blog. YOAST has an easy to use wizard that will configure your site to make it easier for search engines to find. The plugin also offers a nifty checklist to your post editing window which shows what you can do to increase the seo for that post. If you are new to blogging and not to well versed in best seo practices, this is the easiest way to boost your position in search engine ranking. With both a free and paid version there really is no excuse to not have yoast installed!
Akismet Antispam- A free and full featured antispam plugin that will block junk comments on your posts! It's surprising how much spam you will get!
Jetpack- While a lot of bloggers claim that Jetpack will slow down your site, any test I have run has not shown a significant change in site speed. Jet pack does however offer a full suite of options such as photon which will load your images faster, protection against brute force attacks, options to automatically share new posts across your social media accounts, a related posts section underneath your content and more! If your theme does not have a mobile friendly version, Jetpack will create a standardized mobile friendly version with the flip of a switch. Jet pack easily integrates with Akismet to provide antispam protection and will show your site stats which can be compared with google analytics for a comprehensive breakdown of your audience.
Google Analytics for WordPress by MonsterInsights- An essential plugin that will install the tracking code required to use google analytics. Make sure to sign up for a google analytics account with google to be able to use this plugin.
Meal Planner Pro Recipes- If you plan on starting a food blog you will need a plugin that easily allows you to build a recipe card. Recipe cards use various types of code to automatically show up as a 'recipe' in, Google search, Pinterest etc. This helps your post stand out and makes it easier for readers to find what they are looking for. Meal Planner Pro offers a slew of features allowing you to create beautiful looking recipes. Nutritional info, star ratings, print and save buttons, easy recipe conversion from other plugins are just a few of the features available. After having tried three different recipe plugins, can say this is the easiest to use!
Social Warfare - Have you ever seen those social media icons on other websites that pop up on the side/top or bottom of the screen making it easy to share and show how popular the post is on various platforms? (You'll see them in action on this page). There are many plugins that offer this service but none as complete and easy to use as social warfare. I quickly found after installing a few of the popular free options, that while they each offered various features none offered everything I was looking for in one package. Social warfare makes it easy to set up share settings such as the image and description used, a dedicated Pinterest image and description, click to tweet quotes in your post body, where social sharing buttons are displayed and what they look like. Since social media is one of the easiest ways to drive traffic to your blog this is one plugin worth paying the yearly fee for!
WP Smush- this plugin is incredibly easy to use and runs in the background of the site. What it does is automatically reduce the size of images you upload to WordPress making your site load and react faster. Since faster websites do better in search engine rankings and are more popular with users(would you wait 20 seconds for an image to load!?) this is the easiest way to give your site a speed boost. I am satisfied using the free version but if you want more compression there is a paid option available with more features.
Update July 26,2017:
ShortPixel- An Alternative to WP Smush, ShortPixel is a newer and more lightweight, compression plugin on the market which offers image and file compression of your WordPress site. It is also the compression plugin recommended by the Mediavine Ad Network for optimal site speed increases. I recently switched to Shortpixel from WPsmush, and am very pleased with the results so far. An easy to use interface, three types of compression,(lossy, loss-less, and glossy) and support for the newer Webp image format, ShortPixel offers 100 free image compressions per month (which is plenty for me) at the same level as the premium version of WPSmush. After this limit you can pay for more image credits or simply wait for next months free 100 compressions. This plugin will automatically compress, all images already on your site and new uploads going forward. Since I had more then 100 images already on the blog, I bought one month of 5000 image credits to compress all files at once.
W3 Total Cache-When it comes to speeding up your website and making it more responsive, W3 Total Cache is the best all in one option for anyone that does not have a whole lot of coding knowledge. With thirteen menus to optimize your site it's quite overwhelming but if you follow this guide on setting up the W3 Total Cache Plugin, you'll be good to go! With this plugin you can set up a basic slew of settings that will increase your page load times by at least 50%. I took my load time from 16 seconds to just over 1 second.
Wordfence Security- Last but not least you will want to make sure your brand new blog is fully secured. While Jetpack and Akismet offer some basic defences, Wordfence goes all the way. With a firewall, scans checking for malware, and bad plugin files, login protection and regular notifications of potential problems, Wordfence will make sure you're blog is fully protected.
While there are literally hundreds of other plugins for you to browse through, these plugins will provide the basics you need to get started blogging. As your blog grows, you will inevitably add other plugins that offer features such as an Instagram Picture Carosel or email sign up form and landing pages(mailmunch) , an index for your recipes(easyindex) and the capabilities to monotize your blog such as with Adsense or Gourmet Ads.
Legal Stuffs
After customizing your site there are a few more things you should consider doing. While a blog is written from your perspective and anything you write is essentially just your opinion on any given topic, (despite any qualifications you may have) it is a good idea to protect yourself from any potential legal fallout. The easiest way to do this is by creating a basic Privacy Policy, Terms & Conditions, and Affiliate Disclaimer.
A privacy policy is required by law by most countries in the world, especially if you plan on collecting user information, (think e-mail addresses, browser cookies etc.). It details what information you will be collecting and how it will be used. Having these policies on your site will show professionalism and build trust with your audience. While you can get a lawyer to draft up any of these policies, when you're just starting a blog from scratch a generalized basic policy will do. I created mine using the Privacy Policy Generator from freeprivacypolicy.com.
A terms & conditions policy will inform your audience of the rules and guidelines to using your blog. This includes any use and re-production of text, images, and logos by other people, and allowing you to exclude or ban people that are abusing these terms. Again there are many sites which can create a free template, customized to your site. Consider using TermsFeed to create your own terms & conditions.
Finally a Disclaimer Policy is required if you plan on becoming an affiliate to any companies, (such as Amazon) or running any ads on your site, (such as with Gourmet Ads). Essentially if you plan on making any money with your site, or plan on receiving free goods in exchange for a review etc, you need one of these! You can create your own Disclaimer Policy here.
Besides creating these basic policies on your blog, you will also have to consider whether or not you will register your blog as a business. The easiest way to do this is to start an LLC or Limited Liability Company if you're in the United States, or a Sole-Proprietorship if you're in Canada. There are annual fees involved with this, but if you are making any money of the blog it is a good idea to do so to cover yourself on all legal fronts.
Please note I am not a lawyer and this should not be considered legal advice in the case of any legal actions you may face. This information is merely provided to bring attention to the need for proper legal protection when operating a website.
Introduce Yourself & Go Live
This is it for the first section of this guide. The very last thing you should do before hitting that "Go Live" button in your WordPress Dashboard.
Create an "about me" page to introduce yourself to anyone who will visit your site and provide a way for them to contact you.

If you want to display an 'about me' snippet in your themes sidebar consider using the Meks Smart author widget for a clean and professional look. (It's what I'm using.)You can read my own introduction on the page I decided to call "Meet the Chef". A simple contact form can be created using the free WpForms Plugin.
That's it! If you follow this guide on how to set up a blog you will cover all the basics needed to get your blog up and running. You can learn more about blogging and the next steps toward success in Part 2 of How to set up a blog.
Some of the links in this post lead to affiliate sites through which Earth, Food, and Fire may earn a small commission (at no increased cost to you) should you make a purchase. This allows us to stay online and keep creating awesome content! For more info check the Affiliate Disclaimer. All recipes, and opinions are 100% my own.
Stefanie
Thank you for this! Stephanie recommended your how-to and it’s very helpful!
Markus Mueller
Glad you found it usefull! If you have any other questions please feel free to email me or contact me on facebook!