Making a homemade pie dough recipe from scratch is probably one of the easiest baking skills you can learn, and it will improve the quality of your pies, tarts, quiches, etc. This pie dough recipe literally only takes 5-10 minutes to make, and it only goes faster the more you do it and become comfortable with the steps.
It would take longer to go to the store, simply to buy a frozen pie shell, than it does to make it from scratch at home. Yes, you will have to chill the dough before using it, but the solution here is to make the dough before you go to bed the night before you plan on baking. Voilia! The pie dough is ready to use by morning.
Featured in: Thanksgiving Menu Ideas.

This post contains affiliate links for which I may be compensated if a purchase is made through the links provided. For more information please read my affiliate disclosure.
Jump to:
Why you should make your own pie dough.
Homemade pie dough is flakier, richer, and not to mention healthier than the store bought variety since it contains no preservatives. All you will need is flour, sugar, salt, butter (or shortening), and water. Butter will give your homemade pie crust more flavor, and create a nice flaky product, though shortening will create a flakier crust.
Please, please, please never use margarine when you're baking! You simply will not get the same result.
This pie dough recipe makes enough dough to fill one 9" pie pan. If you want to make a lattice or need a cover for your pie, (such as in this classic apple pie recipe) double the pie crust recipe and you will have more than enough to work with. Any leftovers can be saved and refrigerated for up to a week, (or frozen for up to 3 months), just make sure to thaw it under refrigeration completely before using.
What Makes A Pie Crust Flaky?
There are two key steps to making a flaky pie crust.
- The first is using cold butter, and leaving the butter in pea sized chunks when crumbling it in.
- The second is not over kneading the pie dough. The longer you knead the pie dough, the more you will develop the gluten in the flour making it stretchier, and less flaky.
Gluten is what gives dough its stretchy ability. Think of pizza dough, which is very stretchy and is kneaded for about 20 minutes. The long kneading time results in a soft (and with the addition of yeast of course) fluffy dough.
With pie dough though, you only want to knead so long until you get a smooth ball. This prevents the gluten strands from properly developing and ensures a nice flaky and crisp crust.
Refrigerating the pie dough after forming for at least 30 minutes to an hour, allows the butter to harden again. This helps prevent the butter from melting out of your dough when it goes in the oven, and simultaneously prevents the dough from shrinking.
What Ingredients You'll Needed To Make Pie Dough
Any pie dough recipe will only require a few basic ingredients that most folks will already have in their pantry. You'll need:
- 1 ¼ cups of all purpose flour
- ½ tbsp of sugar
- ½ tsp of salt
- ½ cup(¼ lb) of cold butter or shortening cut into small cubes.
- 7 tbsp of ice cold water
Step-By-Step Guide To Making Pie Dough
It is important to note, that the butter really should be cold and not melted or at room temperature. The bigger your butter flakes stay in the dough before you add water, the flakier the crust will be. If you mix the butter in until the whole mix is one powdery mixture you will get a tougher and denser crust.
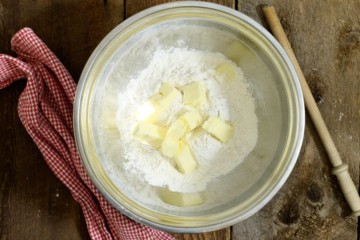
Measure out your flour, sugar, and salt and mix them together in a bowl.

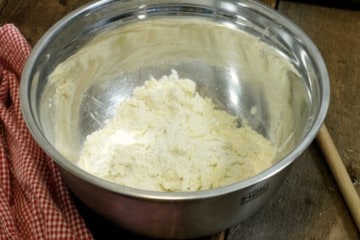
Add your cold diced butter or shortening to this mix, and using your hands, break the butter up, into little flakes. Make sure to keep coating the butter chunks with the flour so that they break up and don't stick together. You are aiming for flakes of butter the size of peas(roughly).

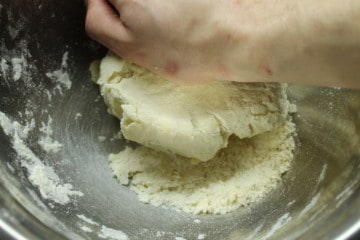
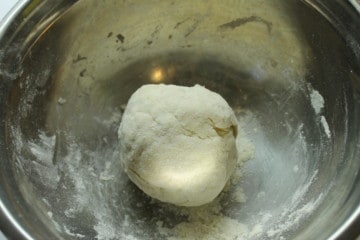
Mix in the cold water, and mix the pie dough with a spoon or your hands until it just starts to clump into one mass. Then using your hands knead the dough once or twice to get the pie dough to form a smooth ball.

Flatten the pie dough into a disk shape, wrap it in plastic wrap or a beeswax cloth wrap, and refrigerate the dough. Refrigerating helps re-chill the butter, and firms the dough back up.
How To Roll Out Pie Dough & Move It To A Pie Pan
Once the dough has chilled for a minimum of 30 minutes, flour a clean surface or countertop. Using a rolling pin, roll out the pie dough into a large circle, roughly ½ cm thick.

Transfer the rolled out pie dough to a greased pie pan. This can be done by rolling the pie dough up on a rolling pin, or by folding it into quarters and then quickly moving it over.


Once the pie dough has been moved to the pie pan, gently press the dough into all the corners of the pan to make sure there are no air pockets anywhere. Crimp the edges with a fork, or your fingers.


Once the edges have been crimped, you can trim off any excess dough with a sharp paring knife. I like to refrigerate the pie crust at this point, to re-chill the butter which has been warmed up through rolling out, etc. If you are refrigerating the pie crust overnight, make sure to cover it, or wrap it to prevent the crust from drying out.
If you need to blind bake the pie crust for your pie recipe, do so now.
Old Fashioned Pie Dough Recipe Video

Use This Pie Dough Recipe To Make:
Perfect for use in homemade pies, tarts, and other desserts that require a crust, you'll be glad you took five minutes to make this recipe.
- Old Fashioned Apple Pie
- Pumpkin Pie
- Dairy Free Pumpkin Pie
- Lemon Meringue Tarts
- Savory Caramelized Onion Tart
Made the recipe? Comment & Rate it below, then take a picture and tag me on Facebook. For more from scratch recipes, follow me on Facebook & Pinterest.
Recipe

Old Fashioned Pie Dough Recipe
Ingredients
- 1 ¼ cups All Purpose Flour
- ½ tablespoon Sugar
- ¼ teaspoon Salt
- ¼ lb Cold Butter cut into cubes
- 7 tablespoon Ice cold water
Instructions
- Mix the flour with the sugar and the salt.
- Dice your cold butter, add it to the flour, and using your hand break up the butter until you have small pea sized pieces or flakes.
- Add your 7 tablespoon ice cold water and stir it in with a wooden spoon or spurdle. Once the dough start to clump together, use your hands to knead it into a ball. Stop kneading as soon as it forms a smooth dough.
- Flatten the ball and wrap with plastic wrap. Refrigerate for at least 1 hour or overnight.
- Roll out the pie dough and use as directed in your recipe.


Nutrition
Nutrition info is auto-generated. This information is an estimate; if you are on a special diet, please use your own calculations.


Nina
so glad to have found your recipe - Yes, i just followed you on IG ! Thank you for the recipe!
Markus Mueller
Glad the recipe was helpful Nina! Thanks for the follow!
Cristina @ I Say Nomato
Pie crust is seriously my nemesis right now. It looks so easy! I've watched so many YouTube videos and tried so many 'no fail' recipes. They all either end up sticking to my counter even if I put flour down, or just crumbling apart. Thanks for making it sound attainable, I'll give it another go!
Markus Mueller
Cristina, if the dough is sticking to the counter when you go to roll it out, make sure the dough is cold. This will harden the butter and reduce the chances of it sticking. If it still sticks to the counter despite having flour down...put down more flour! The key here is to finely sprinkle it so it is evenly spread out and not in clumps. Its ok if there is a thicker layer of flour down, you are not re-mixing the dough after all, just rolling it out on top of the flour. Also make sure to flour both sides of the dough.. so flour the counter, and the top of the dough that will touch the rolling pin. If it starts to stick to the rolling pin, add a touch more flour to the top side. If the dough just crumbles apart it could be you don't have enough butter or water in the dough, or you didn't knead it long enough. When you first mix the dough make sure to only add enough water until all the flour in the bowl starts to stick together in one clump. Then take the clump out of the bowl and knead it on a floured surface until it just barely becomes a smooth ball. I hope this helps! i'd love to see pictures of your end results, and if you have any more questions, just shoot me an e-mail! [email protected]
Maria
Appreciate the details of this post. Photos are great. Thanks for sharing 🙂
Markus Mueller
I'm glad I could be of help! If you have any questions feel free to ask!
Jolina - The Unlikely Baker
This is too funny! I am seriously at this very moment just waiting for my ride so I can go to the store where one of the things I plan to buy is a pre-made pie dough! I'm not a very good dough maker and pre-made is just so easy....but you changed my mind! OK, universe (or Markus), I will try again (or at least not give up). I bookmarked this and will definitely let you know how that goes 🙂 Thanks!
Markus Mueller
That's to funny Jolina! I'm glad you saw this post before you got picked up! Send me a picture of your end result and if you have any questions feel free to contact me through the site or on facebook or twitter!
Nicoletta @sugarlovespices
That is really a beautiful tutorial! We like making our own pie dough, and next time we'll follow your steps and recipe. Thanks!
Markus Mueller
Your welcome! I actually find making pie dough kind of fun, not to mention it simply tastes better. I'd love to hear how yours turns out!
Vicky Chin
A great simple recipe! I like your instructions, very clear and easy to follow. Will definitely try it! Thanks for sharing!
Markus Mueller
Let me know how it turns out!
Anne
Great recipe! I made it with butter. It was delicious!